

How to Upload a PowerPoint to YouTube: Step-by-Step Guide

Have you ever wondered how to upload a PowerPoint to YouTube? That’s a fairly common question among many Microsoft PowerPoint users.
After creating a PowerPoint presentation, you may want to share it on YouTube to reach a greater audience.
Unfortunately, YouTube can only accept video files. A PowerPoint presentation may have video and audio elements embedded in it, but it is still not a video file.
You need to convert your presentation to a video file to upload it to YouTube. This tutorial will show you exactly how to do that.

Step 1: Create Your PowerPoint Presentation
Create your PowerPoint presentation as you normally would. However, keep in mind that you won’t be doing a live presentation, so try to include everything you need to make a great video, including audio clips.
Your audio could be music, sound bites, a narration (your voice recordings), or a combination of all these. Make sure to use them meaningfully.
Here is how to add audio to your presentation:
1. Click the Insert tab on the ribbon
2. Click Audio from my PC
Browse through the audio files on your computer and select the one you want to add to your presentation.
3. Click the Insert button to add the file
Step 2: Convert Your Presentation to a Video
This next step on how to upload a PowerPoint to YouTube is crucial because you can’t share your file on the widely accessible video platform without converting it to a video format.
Here’s how to convert your presentation to a video.
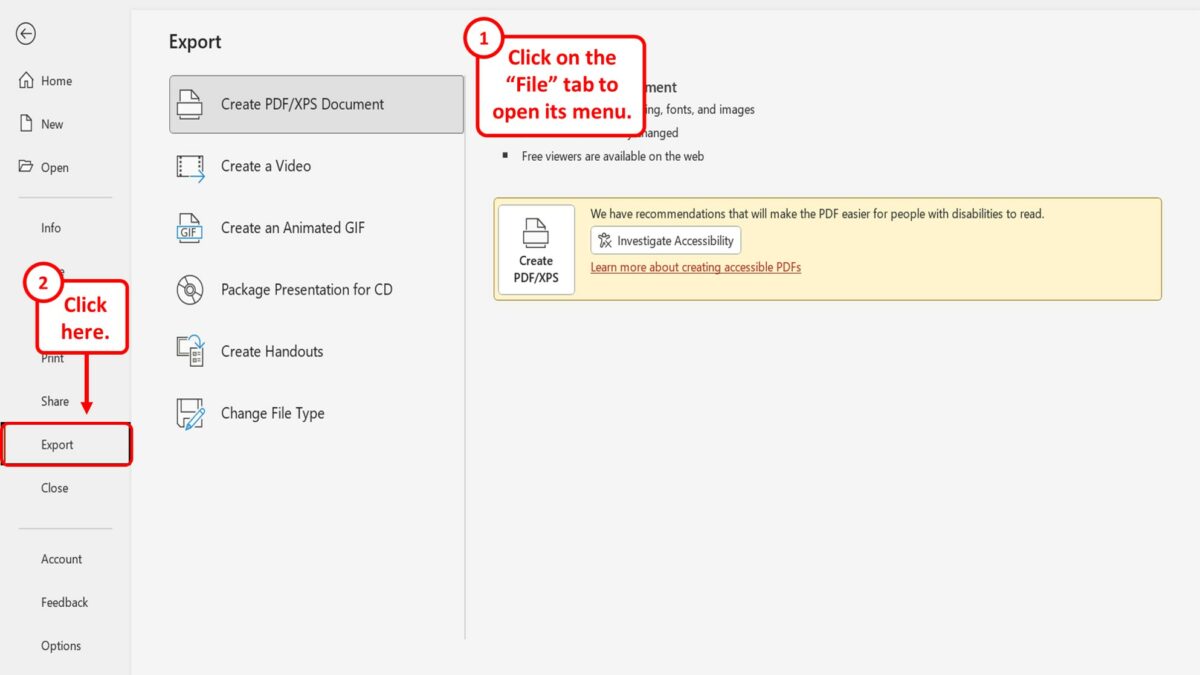
1. Click the File tab on the PowerPoint (2010 version or later)

2. Click the Export tab
3. Click Create a Video from the list of options

You can tweak some of the settings, including slide durations, video resolution, and narrations.
You can leave the resolution to full HD if you don’t know what to select. Simply let YouTube handle the file compression.
You can simply set how long you want each slide to display, especially if your presentation doesn’t have recorded narrations and timings. For example, you can set individual slides to show for 15 seconds.
4. Next, click the Create Video box below the settings
5. Click Save on the next dialog box to export your presentation in video format
Your PowerPoint presentation is now ready for YouTube.
Step 3: Upload to YouTube
Now that you’ve converted your presentation to a video, it’s time to upload it to YouTube. Here’s how to do that:
1. Sign in to your YouTube account or click the app on your mobile device
2. Click the Create icon on the top right corner of the window
3. Click Upload video

On a mobile device, tap the circled plus sign at the center bottom of the screen and tap Upload a video .
4. Locate the PowerPoint video file and click Open
You may be asked to create a YouTube channel if you don’t already have one. You can rename the file, write a description, set the privacy, and apply other settings when the upload is complete.
Tips to Make Your Video Better
Although your presentation will be viewed on YouTube, you still need to remember a few simple tips for a great video.
- Keep the visuals as simple as they can be; presentations generally work best that way. You don’t want to clutter the entire screen. Instead, allow a few empty spaces on each slide for improved readability
- Highlight only the most essential facts. Your audience should not have to endure a long list of bullet points. Remember that you are presenting, not writing a book
- Make use of themes or templates to give your presentation a uniform feel. You might mar an otherwise good presentation unless you are an expert with lots of experience creating eye-catching yet appealing presentations
- Use audios, effects, and transitions in meaningful ways. You want to engage your audience, but at the same time, you don’t want to appear cheesy
Why You Should Share Your PowerPoint Presentation on YouTube
Learning how to upload a PowerPoint to YouTube gives you the advantage of reaching a wider audience, whether or not they have a presentation program on their computers.
While Microsoft PowerPoint is a fairly popular presentation program, not everyone has ready access to it. Some of your clients, co-workers, students, or friends may not have the software on their computers. Others may have it (or some other similar application) but don’t know how to use it.
However, just about anyone can access YouTube from a computer, smartphone, or other mobile devices. It’s as simple as searching for your video on the platform and clicking play – no downloads or any other technical know-how required.
Closely related to this is that users don’t even need a computer to view your presentation. Not many mobile devices have a PowerPoint program, but they can all play videos, whether it’s an iPod, iPhone, or mobile phone.
Also, you don’t have to worry about specific PowerPoint versions. Usually, presentations in one version of PowerPoint might not work too well on another. A video eliminates all that worry. Users can even view the presentation on a DVD player by downloading it to disk.
You can easily embed the video in your blog or on any web page. Video files have better web support than presentation formats.
In a nutshell, more people can access your PowerPoint presentation if you share it on YouTube. You can copy and share the link to your video to make it easy for people to watch it.
Wrapping Up
Hopefully, you now know how to upload a PowerPoint to YouTube. Don’t worry if your video presentation doesn’t come out as you expected at first. You can also tweak things around until you get exactly what you want. The key is to experiment with the settings during the conversion process.
You can reach more people you can ever imagine with a YouTube presentation. Remember to set proper metadata (or description) so that people can easily find your video on YouTube.

Jamie Keet is a Technology Instructional Coach with a deep-rooted passion for educational technology. With a background that combines a marketing diploma, a degree in management, and a master's in educational technology, Jamie has spent the last 25 years in education, working across all grades and adult learning. His experience in the classroom has shaped his approach to tech education, focusing on making technology accessible and engaging for everyone.
Jamie's goal is simple: to help users feel confident and successful with technology, encouraging them to explore and learn on their own. He believes in breaking down the barriers that prevent people from getting started with technology, whether they're students in a classroom or individuals looking to improve their tech skills.
Outside of his professional work, Jamie enjoys keeping up with the latest tech trends and finding new ways to incorporate them into his teaching. His approach is all about simplicity, clarity, and making technology fun and accessible for all.
Further reading

Boosting Classroom Collaboration with Microsoft Teams

Streamlining Classroom Workflow with Microsoft To Do

Unlocking the Potential of My Day with the Outlook Calendar Update

New Microsoft Outlook Features: Revolutionizing Professional Communication

Discovering Bing Chat: The New Wave of Interactive Browsing

How to Insert Microsoft Excel Data into Microsoft Word and PowerPoint
- Latest Posts
- Microsoft Excel Tutorial
- Microsoft Word Tutorial
- Microsoft PowerPoint Tutorial
- Microsoft OneNote Tutorial
- Microsoft Outlook Tutorial
- Augmented Reality
- Education Technology
- General Tech
- Google Apps Tutorials
- Graphic Design
- Microsoft Forms
- Microsoft OneNote
- Microsoft Power Apps
- Microsoft Sway
- Microsoft Teams
- Microsoft Tutorials
- Online Teaching
- Productivity Apps
- Remote Learning
- Teaching Apps
- Video Editing Help
- Virtual Reality
- YouTube Help
How to Upload PowerPoint to YouTube? [Complete Guide!]
By: Author Shrot Katewa
![How to Upload PowerPoint to YouTube? [Complete Guide!]](https://artofpresentations.com/wp-content/uploads/2023/03/Featured-Image-2-1.jpg "how to convert a powerpoint presentation to a youtube video")
If you’re looking to share your PowerPoint presentation with a wider audience, uploading it to YouTube can be a great option. Not only does it allow you to reach a larger viewership, but it also makes it easy for people to access and share your content.
To upload PowerPoint to YouTube, go to “Your channel” and click on the “Manage Videos” button to open the “YouTube Studio” screen. Click on the “Create” button and select the “Upload videos” option from the dropdown menu. Finally, click on the “Select Files” button in the “Upload Videos” window.
In this guide, we’ll walk you through the steps to how to convert your PowerPoint to a video format and customize your video settings as well as how to record your PowerPoint presentation on YouTube. Let’s get started!
1. How to Convert a PowerPoint into a Video?
In order to upload a Microsoft PowerPoint presentation to your YouTube channel, you must first convert the presentation file into a video. To convert a PowerPoint presentation to a video, follow the 4 simple steps.
Step-1: Click on the “File” tab
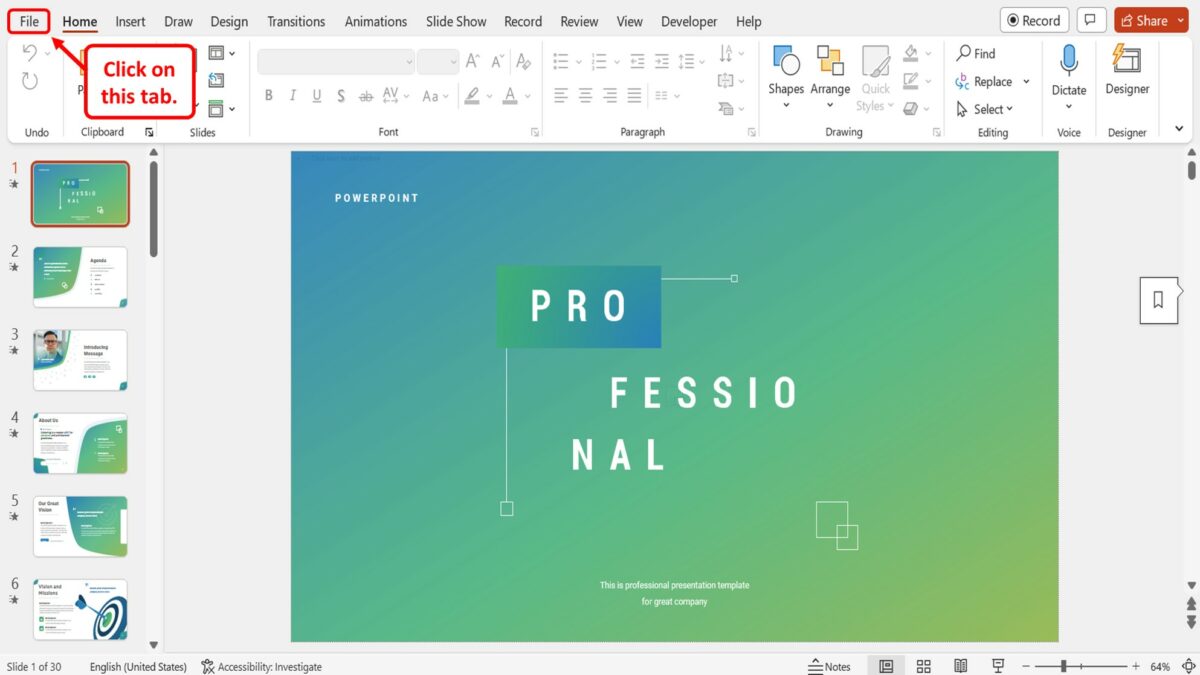
In the PowerPoint presentation file, you have to first open the “File” menu. To do so, click on the “File” tab in the menu ribbon located at the top of the screen.
Step-2: Click on the “Save As” option
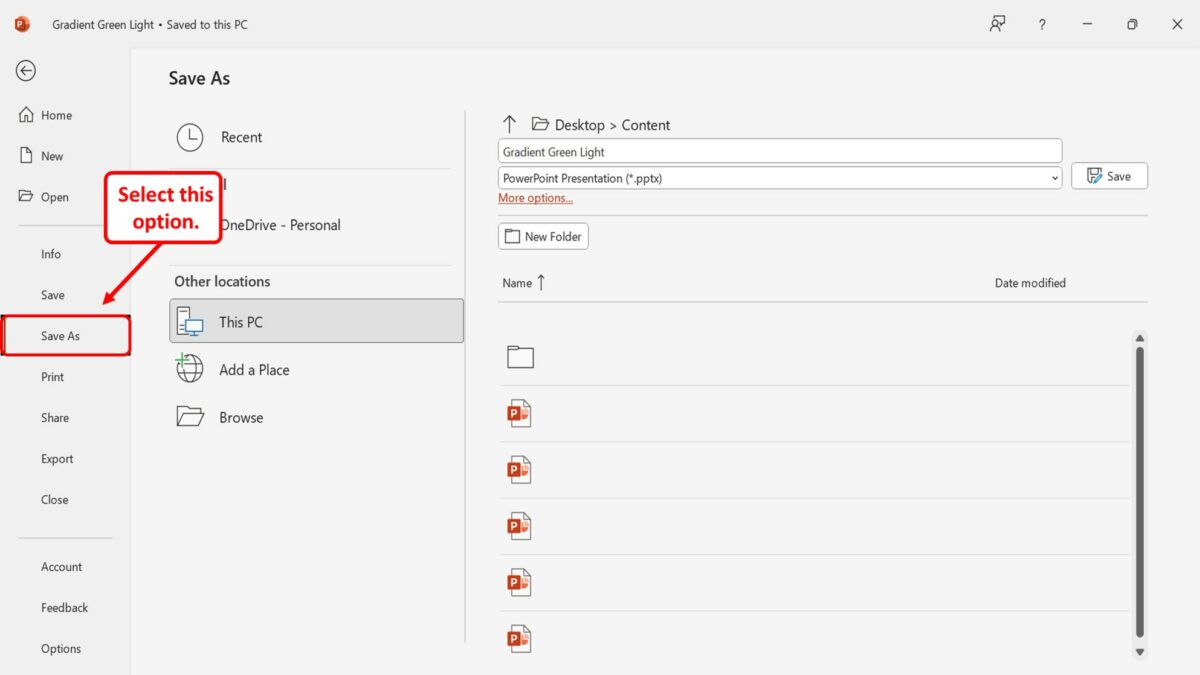
The next step is to click on the “Save As” option. It is located in the sidebar on the left side of the screen in the “File” menu.
Step-3: Click on the “Save As Type” box
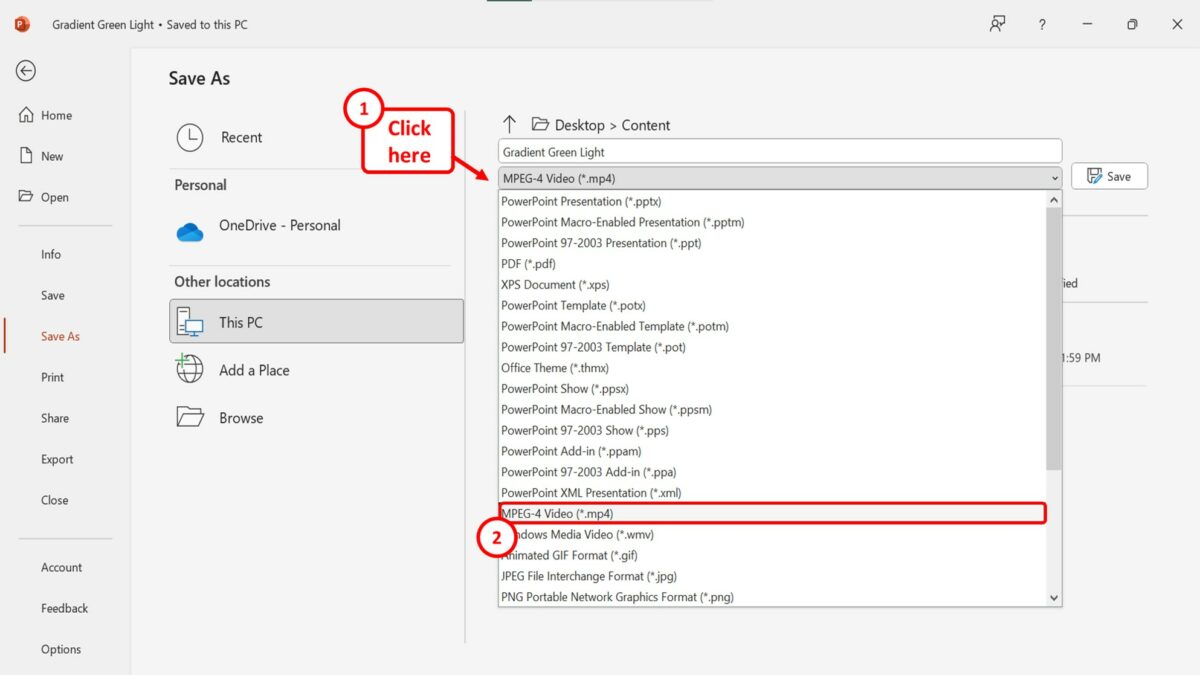
In the “Save As” screen, click on the “Save As Type” box which is the second box in the right column. Then click on the “MPEG-4 Video (*.mp4)” option or the “Windows Media Video (*.wmv)” option in the dropdown menu under the “Save As Type” box.
Step-4: Click on the “Save” button
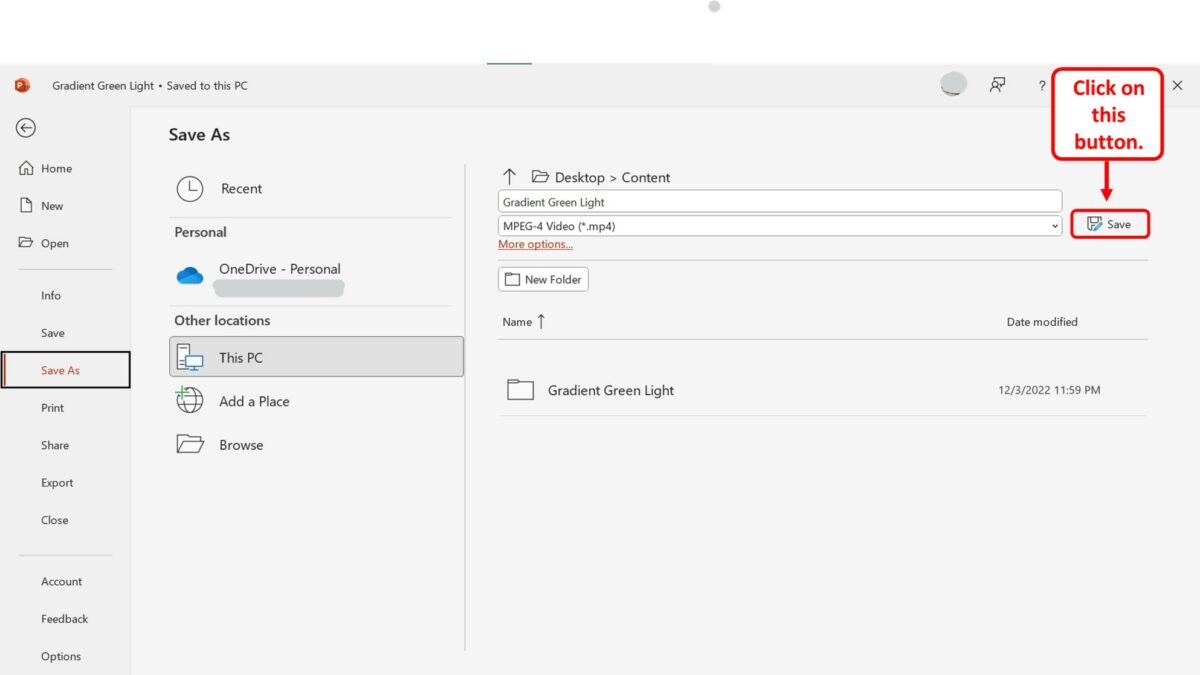
Finally, all you have to do is click on the “Save” button next to the “Save As Type” box in the “Save As” screen to save the PowerPoint presentation as a video.
2. How to Upload PowerPoint to YouTube?
In Microsoft PowerPoint, you can easily convert a PowerPoint presentation into a video. To do so, follow the steps mentioned in section 1 . Then you can upload it to your YouTube channel. All you have to do is follow the 4 quick steps.
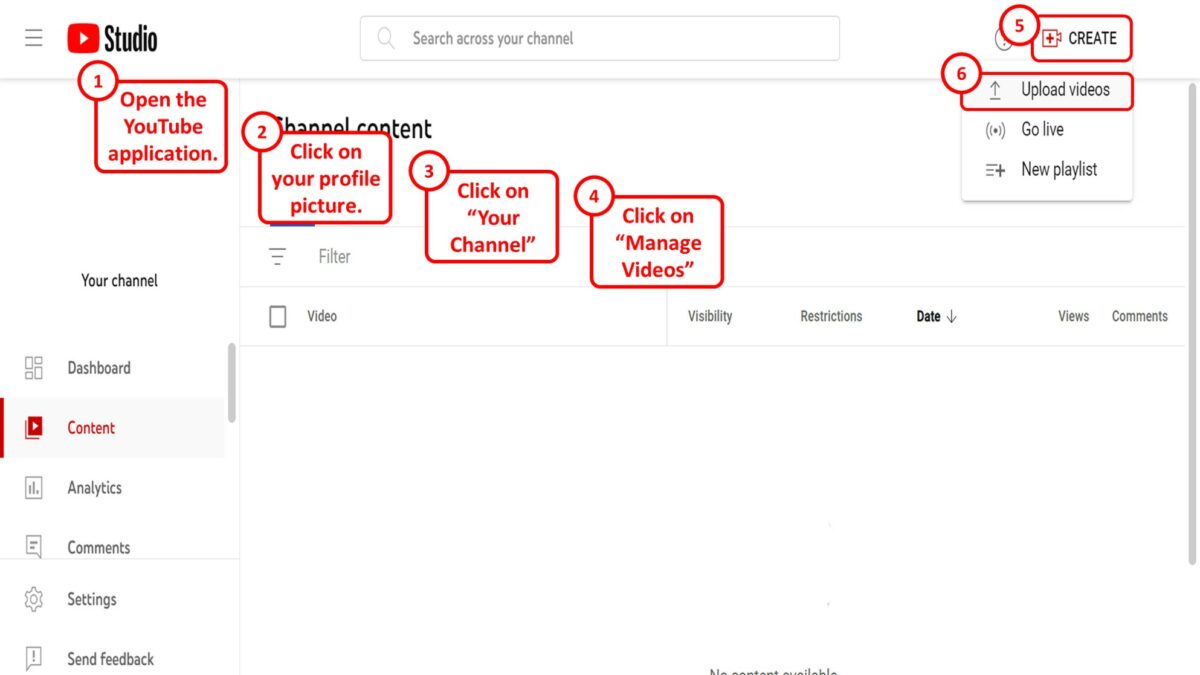
Step-1: Click on the “Your channel” option
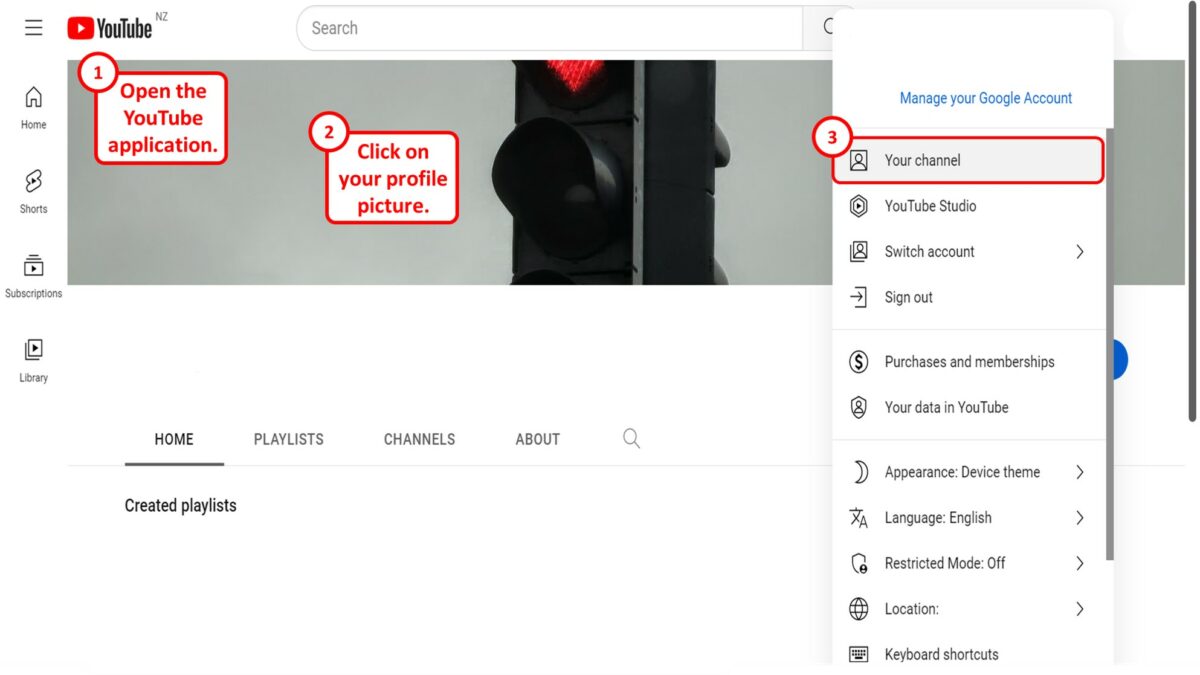
The first step is to open the YouTube application. At the top right corner of the screen, click on your profile picture. Then click on the “Your channel” option in the dropdown menu.
Step-2: Click on the “Manage Videos” option
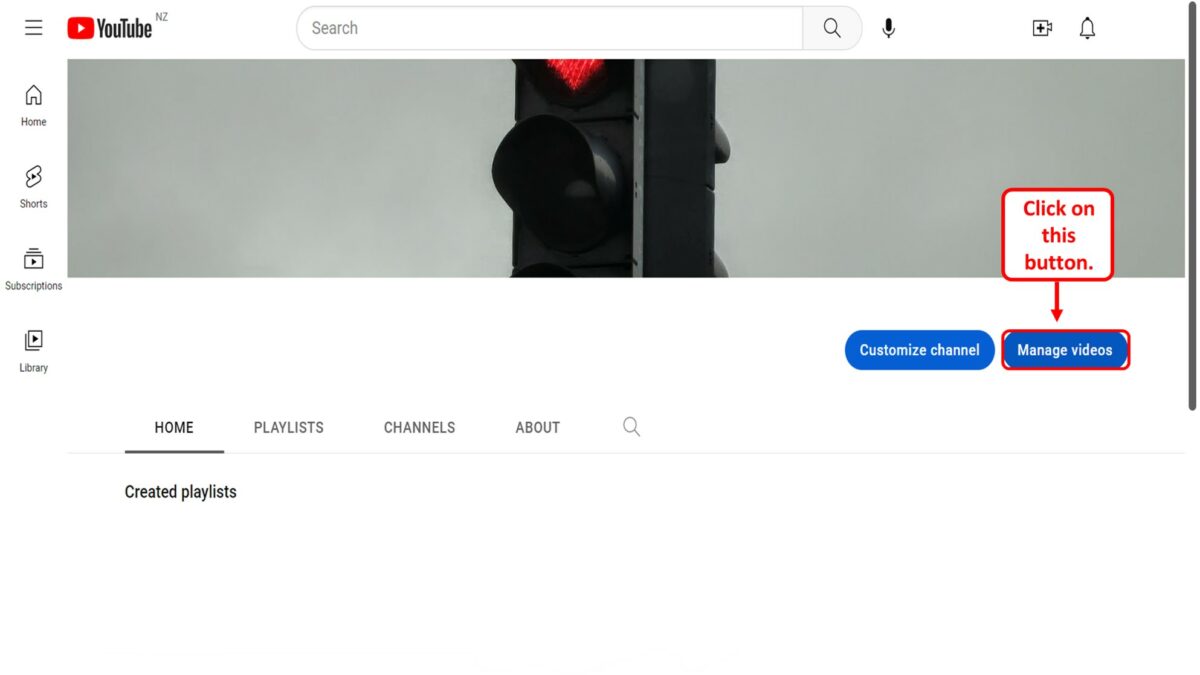
The next step is to open the YouTube Studio screen. To do so, click on the “Manage Videos” button in your YouTube channel.
Step-3: Click on the “Create” button
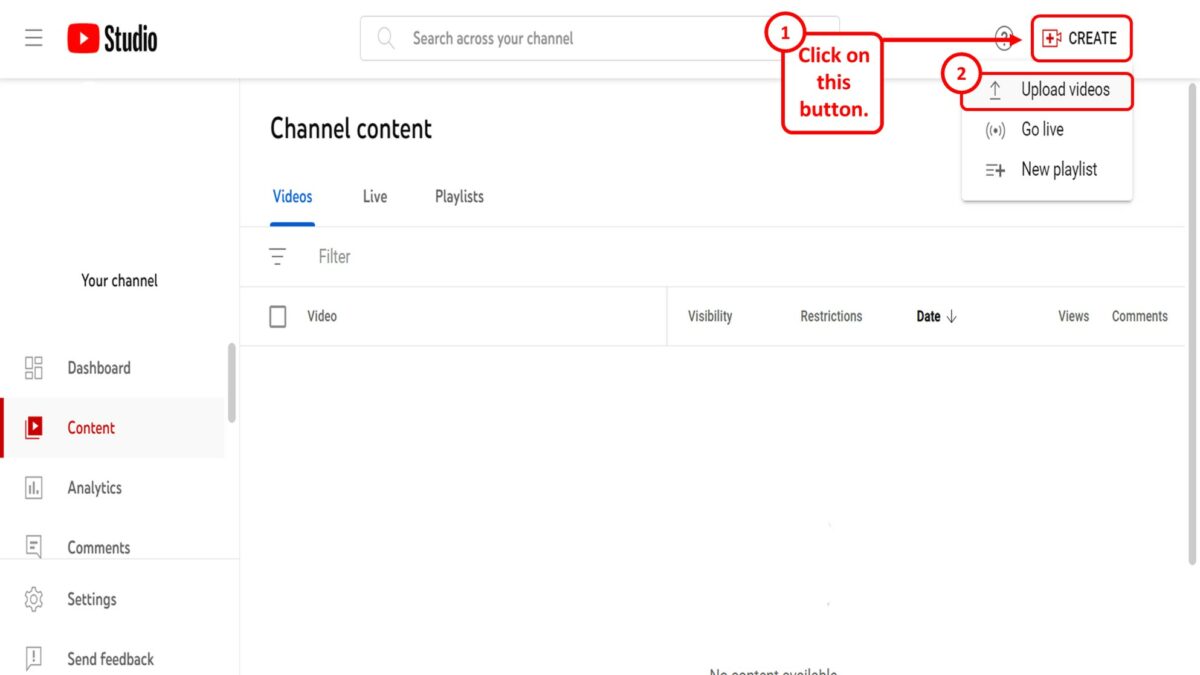
In the “YouTube Studio” screen, click on the “Create” button at the top right corner. Then click on the “Upload videos” option in the dropdown menu under the “Create” button.
Step-4: Click on the “Select Files” option
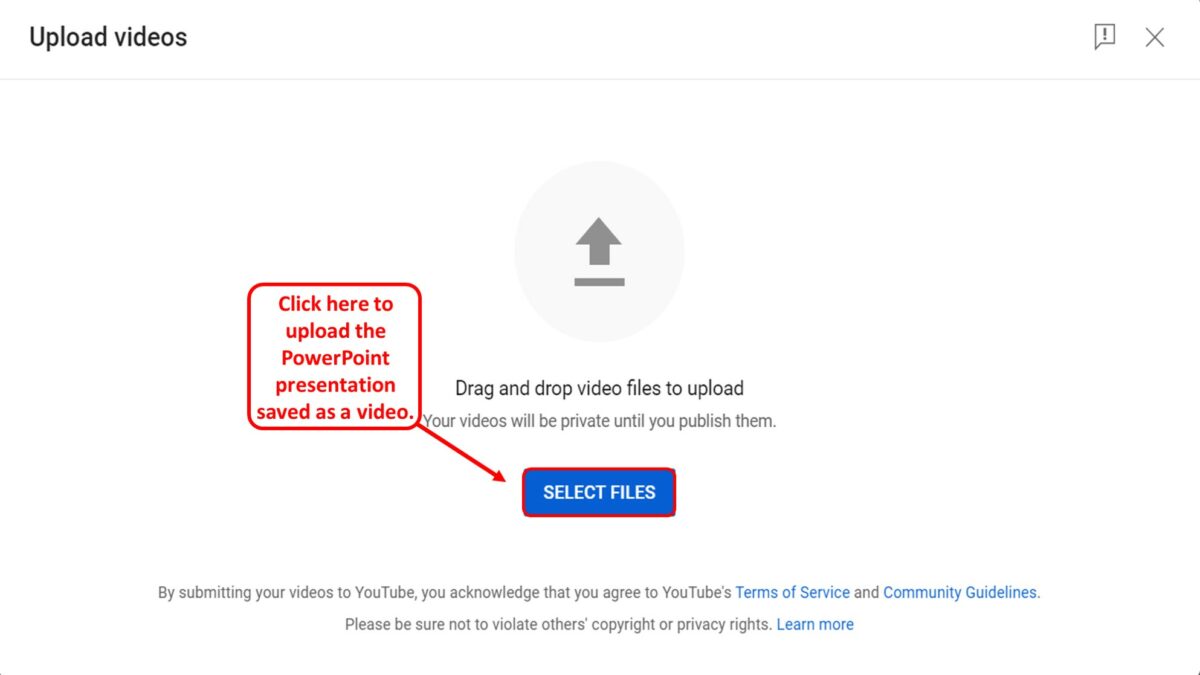
Finally, all you have to do is click on the “Select Files” button in the “Upload Videos” window to upload the PowerPoint presentation saved as a video on your device.
3. How to Record PowerPoint to Upload to YouTube?
In Microsoft PowerPoint, you can record the presentation with audio. By doing so, you can change slides at your own pace and also record your voice to complete the presentation. A recorded presentation is likely to be more engaging than a video presentation when uploaded to YouTube. To record a PowerPoint presentation, follow the 7 simple steps.
Step-1: Click on the “Record” tab
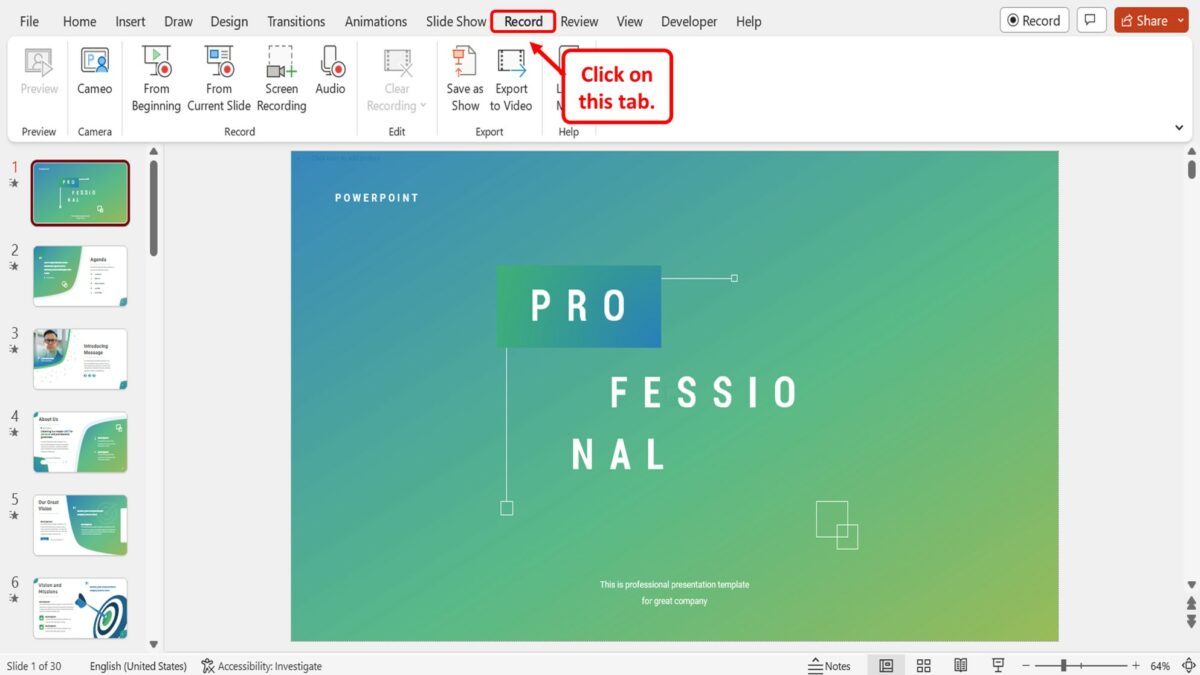
In the menu ribbon located at the top of the screen, click on the “Record” tab. This will open the “Record” menu.
Step-2: Click on the “From Beginning” option
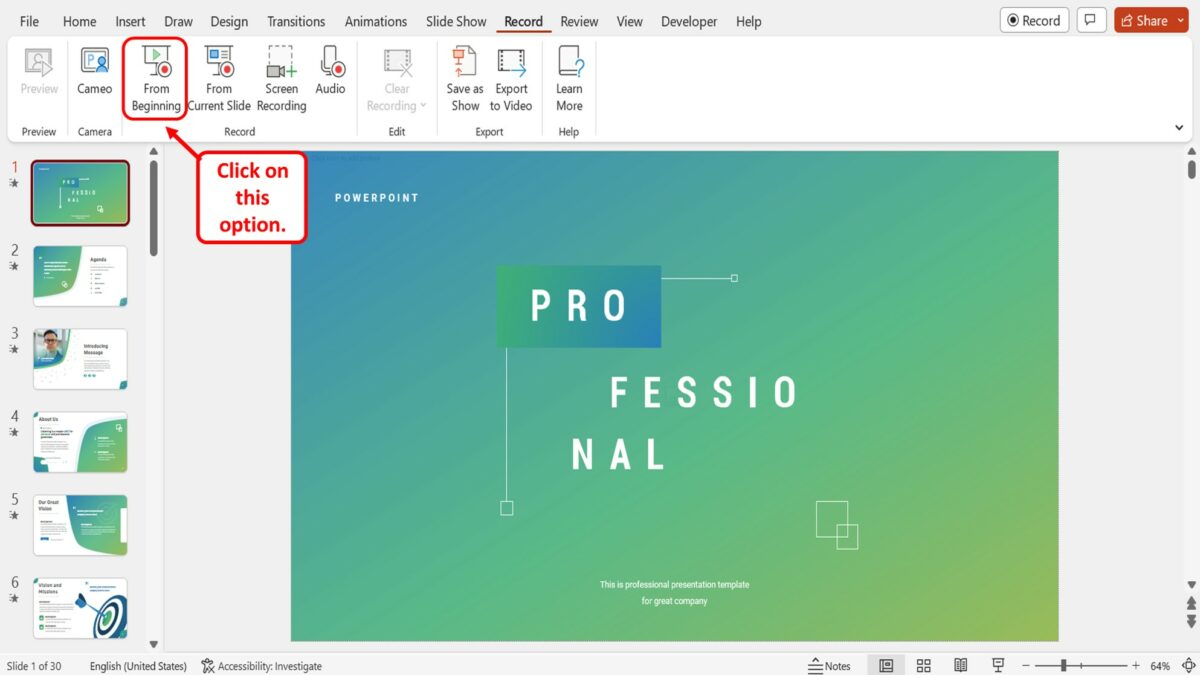
In the “Record” group of the “Record” menu, click on the “From Beginning” option. This will open the recording screen starting from the first slide in the presentation.
Step-3: Click on the “Start recording” option
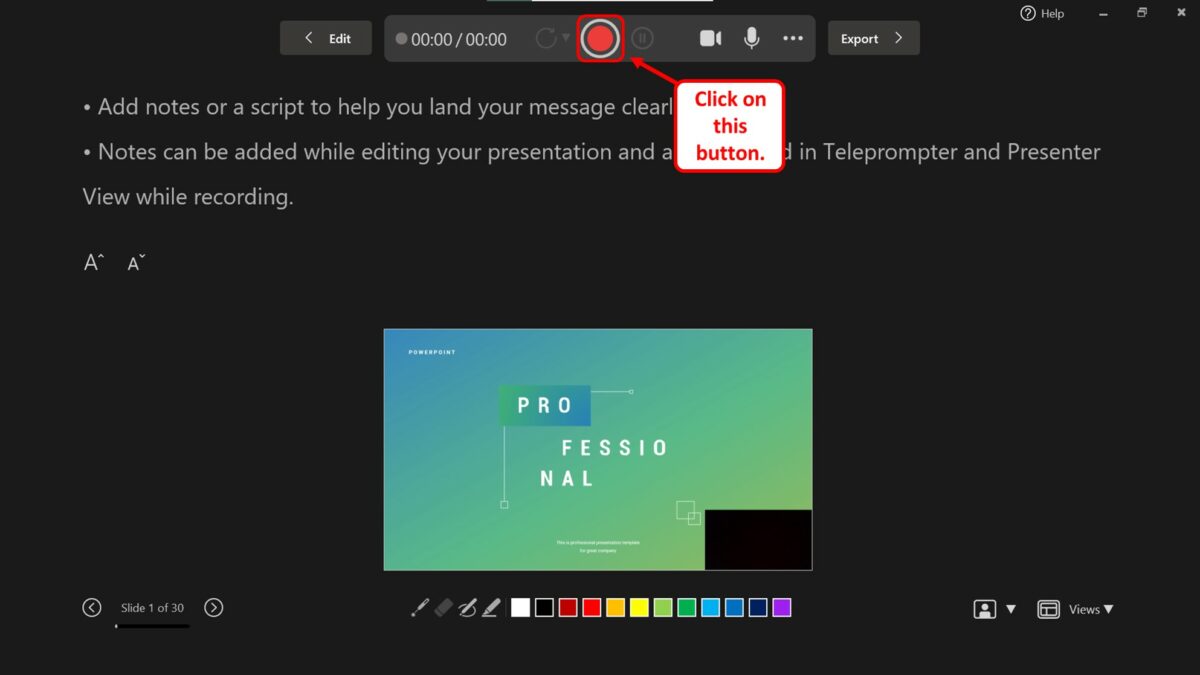
In the recording screen, you have to now click on the “Start recording” option which is the red circle in the middle of the toolbar located at the top of the screen. Alternatively, you can press the “R” key on your keyboard to start recording your presentation.
Step-4: Record the presentation
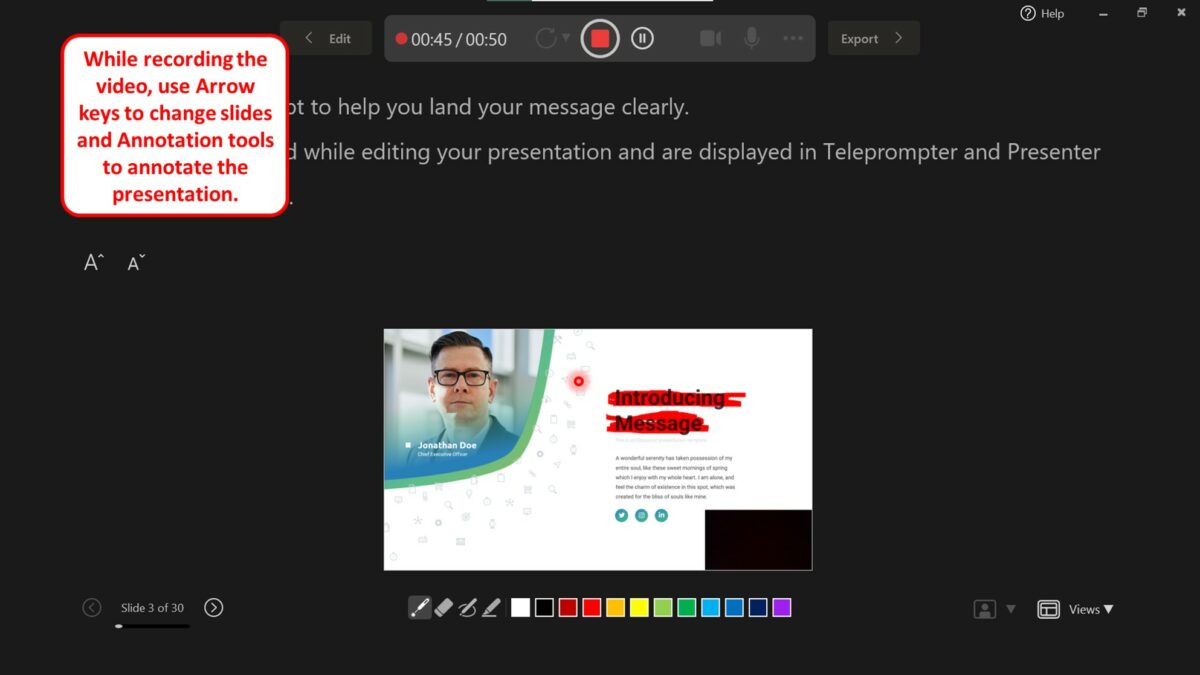
The next step is to simply record the video. All you have to do is present the video as you would to the live audience. You can use the arrow keys to change slides and the annotation tools available at the bottom of the screen to annotate the presentation.
Step-5: Click on the “Stop recording” option
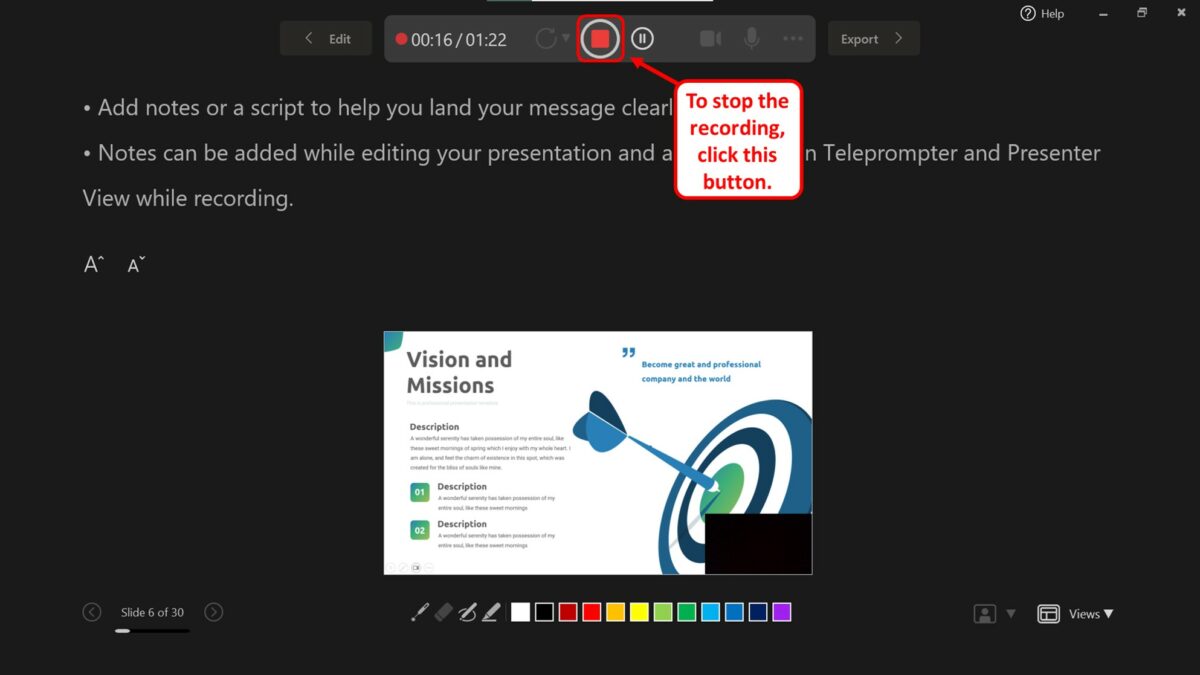
After you finish recording, click on the “Stop recording” option which is the red square icon at the top of the screen. You can alternatively press the “S” key on your keyboard to stop recording the presentation.
Step-6: Click on the “Export” option
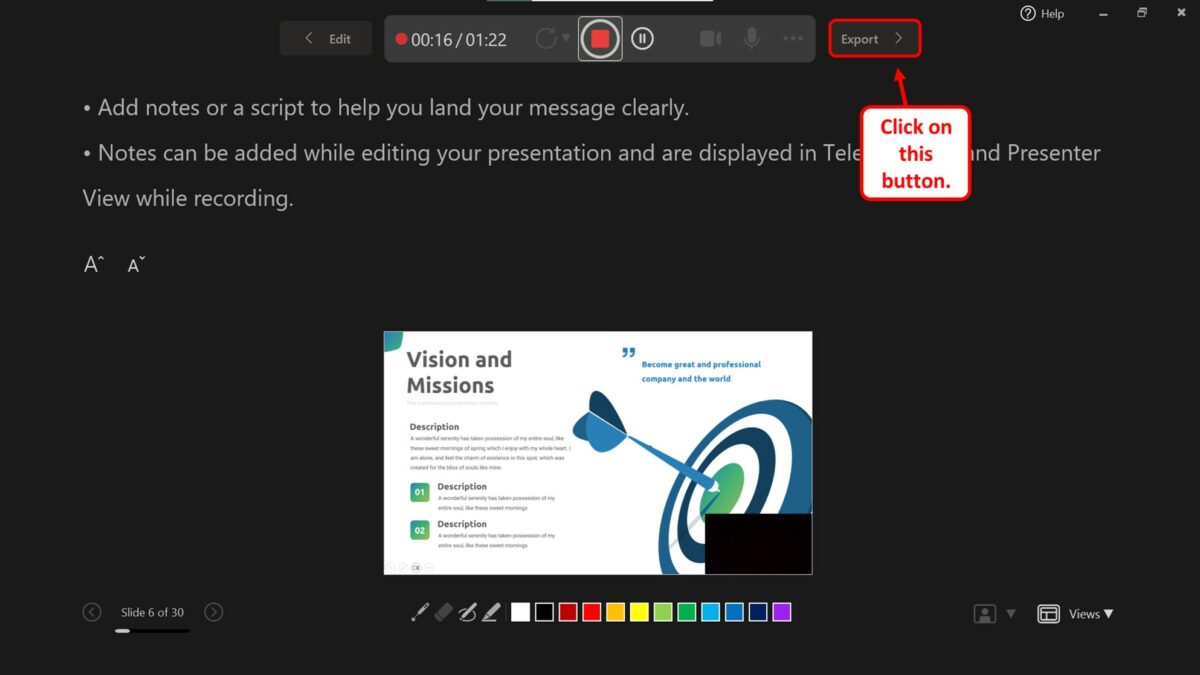
Now all you have to do is save the recorded presentation as a video that you can upload to YouTube. To do so, click on the “Export” button next to the toolbar at the top of the screen.
Step-7: Click on the “Export Video” option
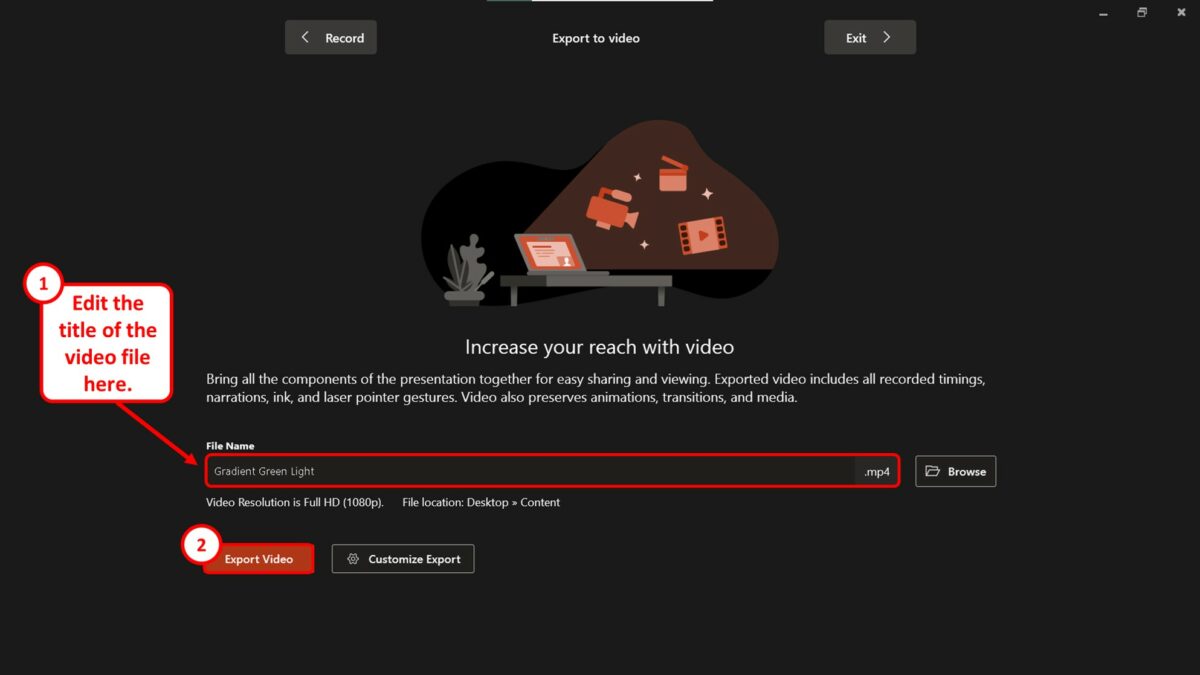
In the “Export to Video” option, you can now edit the title of the video file by clicking on the “File Name” box. Then all you have to do is click on the “Export Video” button at the bottom to save the recorded presentation as a video.
4. How to Upload Powerpoint to Youtube with Audio?
To upload a Microsoft PowerPoint presentation to YouTube with audio, you have to simply add audio to the PowerPoint presentation. Then you have to save the presentation as a video containing audio. All you have to do is follow the 7 easy steps.
Step-1: Click on the “Insert” tab
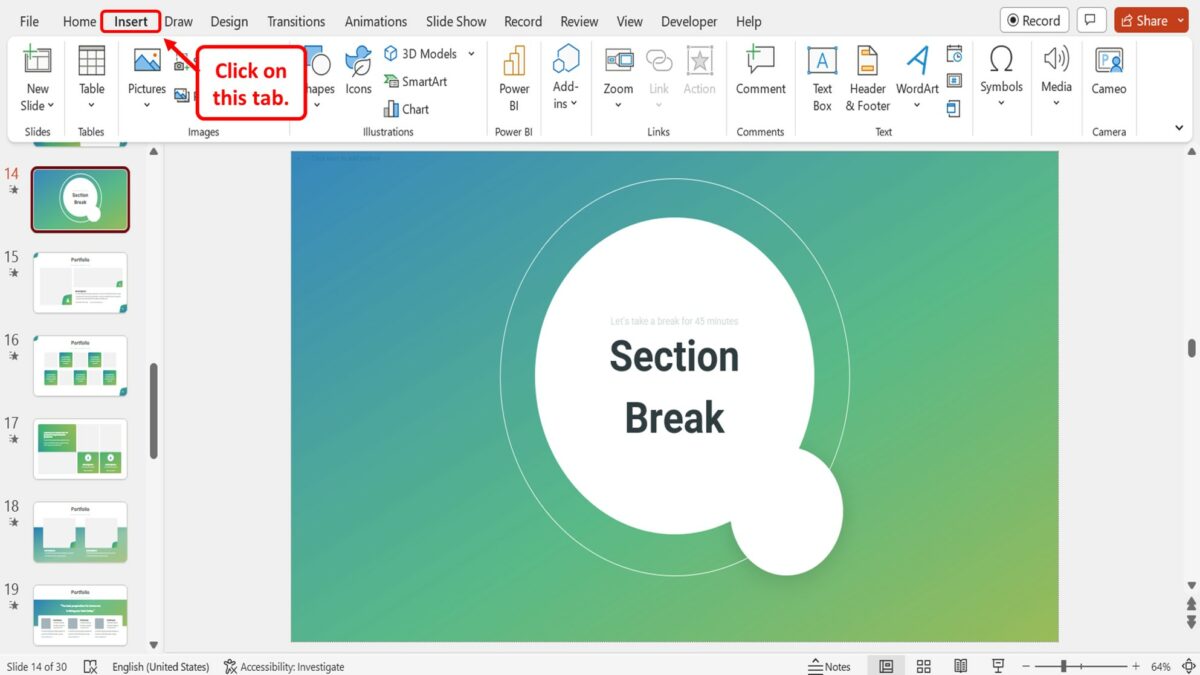
The first step is to insert the audio into the presentation slides. To do so, click on the “Insert” tab in the menu ribbon located at the top of the screen.
Step-2: Click on the “Audio” option
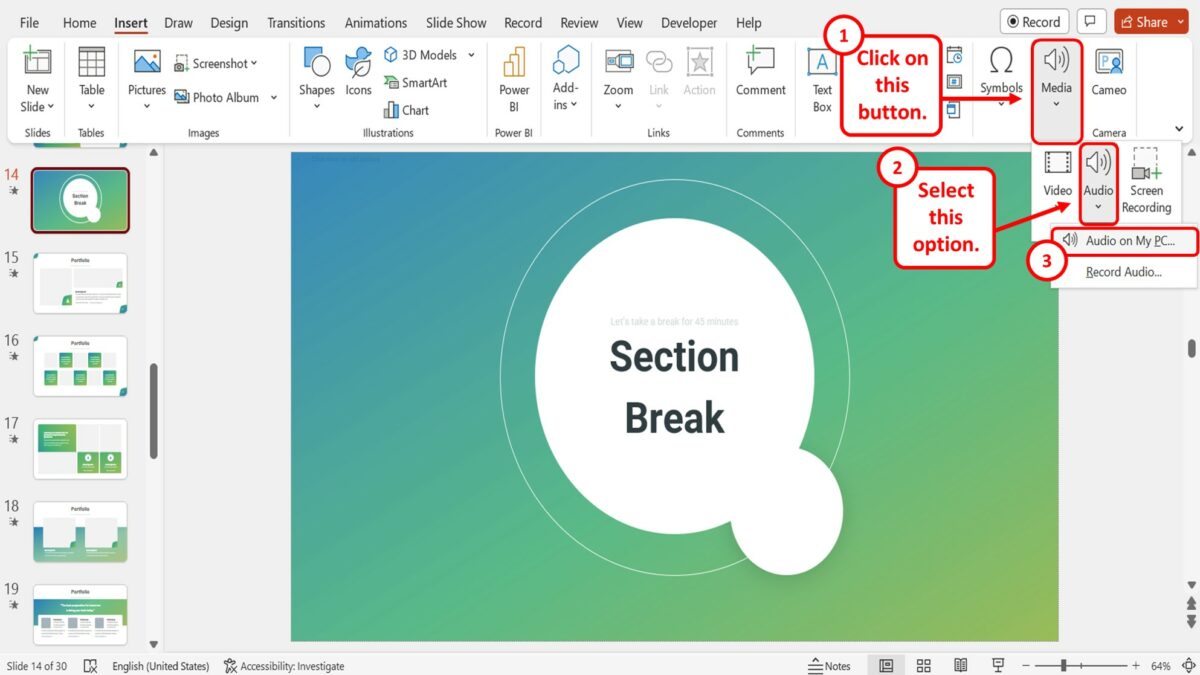
In the “Insert” menu, you have to now click on the “Media” button. Then click on the “Audio” option in the dropdown menu under the “Media” button. In the second dropdown list under the “Audio” option, click on the “Audio on My PC” option.
Step-3: Click on the “Insert” button

In the “Insert Audio” pop-up window, click on the audio that you want to insert into the presentation slide. Then click on the “Insert” button at the bottom of the pop-up window.
Step-4: Click on the “Export” option
The next step is to click on the “File” tab in the menu ribbon at the top of the screen. In the “File” menu, click on the “Export” option.
Step-5: Click on the “Use Recorded Timings and Narrations” option
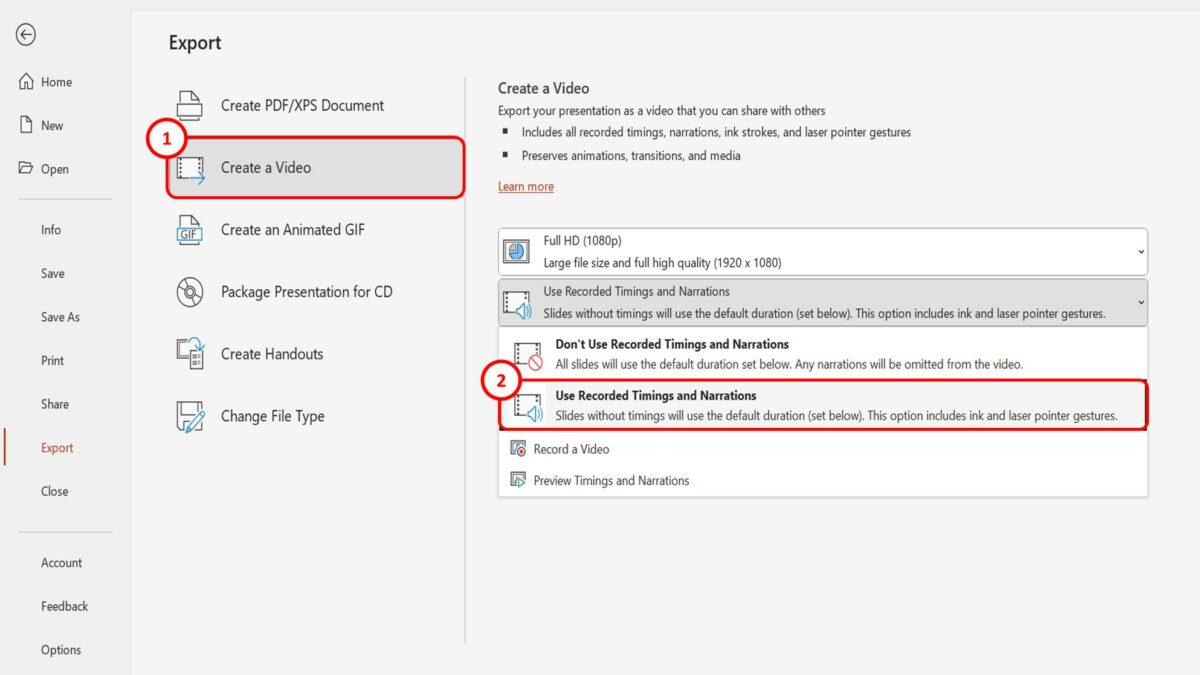
In the “Export” screen, click on the “Create a Video” option. Then click on the “Use Recorded Timings and Narrations” option in the “Create a Video” section in the right column.
Step-6: Click on the “Create Video” button

Now all you have to do is click on the “Create Video” button at the bottom of the “Create a Video” section in the right column of the “Export” screen. The presentation with the audio will be saved as a video on your device.
Step-7: Upload to YouTube
The final step is to upload the presentation video to YouTube. All you have to do is follow the steps detailed in section 2 .
Unsupported browser
This site was designed for modern browsers and tested with Internet Explorer version 10 and later.
It may not look or work correctly on your browser.
- Presentations
How to Upload a PowerPoint to YouTube in 60 Seconds
- Bahasa Indonesia
PowerPoint can not only create presentation files, but it can also export your presentation as a video file with no extra apps needed. Let's learn how to do that, and then upload the video file to YouTube.
We also have a helpful complement to this tutorial. Download our FREE eBook: The Complete Guide to Making Great Presentations . Grab it now before you read on.

Note: In this tutorial we use the X Note PowerPoint Template . You can get great PPT presentation templates on Envato Elements or in our Ultimate Guide to the Best Microsoft PowerPoint Templates .
How to Quickly Upload a PowerPoint to YouTube

1. Export Your Presentation
First, let's go over to the File tab in PowerPoint, and choose Export .
.jpg "how to convert a powerpoint presentation to a youtube video")
Click on Create a Video to export your presentation as a video file.
2. Set How Long Each Slide Shows
.jpg "how to convert a powerpoint presentation to a youtube video")
I'll leave this set to Full HD , and let YouTube handle the compression. If you've got recorded narrations and timings, you can change this option to include them.
Otherwise, just set a setting on how long you want each slide to show. For example, I could change this to 10 seconds, if I wanted each slide to show for 10 seconds.
3. Export the Video and Upload It
PowerPoint then exports a video file, once we press Save , that's ready for YouTube.
.jpg "how to convert a powerpoint presentation to a youtube video")
Now, just jump over to YouTube and start the upload process, just as you would with any video.
Drop the file into YouTube with metadata and settings, so that people can find it when they're looking for it.
.jpg "how to convert a powerpoint presentation to a youtube video")
You could also add music or settings using YouTube's built-in options. You don't need any extra apps to take a presentation straight from PowerPoint to YouTube.
Finishing Up!
Now that you now how to upload a PowerPoint to YouTube quickly, you can easily expand the audience for your slideshow. Sharing on YouTube is great option for marketing presentations and other presentations that need to reach a large number of people.
Make Great Presentations ( Free PDF eBook Download )
We also have the perfect complement to this tutorial, which will walk you through the complete presentation process. Learn how to write your presentation, design it like a pro, and prepare it to present powerfully.

Download our new eBook: The Complete Guide to Making Great Presentations . It's available for free with a subscription to the Tuts+ Business Newsletter.

Our Recommendations
- Best Small Business Loans for 2024
- Businessloans.com Review
- Biz2Credit Review
- SBG Funding Review
- Rapid Finance Review
- 26 Great Business Ideas for Entrepreneurs
- Startup Costs: How Much Cash Will You Need?
- How to Get a Bank Loan for Your Small Business
- Articles of Incorporation: What New Business Owners Should Know
- How to Choose the Best Legal Structure for Your Business
Small Business Resources
- Business Ideas
- Business Plans
- Startup Basics
- Startup Funding
- Franchising
- Success Stories
- Entrepreneurs
- The Best Credit Card Processors of 2024
- Clover Credit Card Processing Review
- Merchant One Review
- Stax Review
- How to Conduct a Market Analysis for Your Business
- Local Marketing Strategies for Success
- Tips for Hiring a Marketing Company
- Benefits of CRM Systems
- 10 Employee Recruitment Strategies for Success
- Sales & Marketing
- Social Media
- Best Business Phone Systems of 2024
- The Best PEOs of 2024
- RingCentral Review
- Nextiva Review
- Ooma Review
- Guide to Developing a Training Program for New Employees
- How Does 401(k) Matching Work for Employers?
- Why You Need to Create a Fantastic Workplace Culture
- 16 Cool Job Perks That Keep Employees Happy
- 7 Project Management Styles
- Women in Business
- Personal Growth
- Best Accounting Software and Invoice Generators of 2024
- Best Payroll Services for 2024
- Best POS Systems for 2024
- Best CRM Software of 2024
- Best Call Centers and Answering Services for Busineses for 2024
- Salesforce vs. HubSpot: Which CRM Is Right for Your Business?
- Rippling vs Gusto: An In-Depth Comparison
- RingCentral vs. Ooma Comparison
- Choosing a Business Phone System: A Buyer’s Guide
- Equipment Leasing: A Guide for Business Owners
- HR Solutions
- Financial Solutions
- Marketing Solutions
- Security Solutions
- Retail Solutions
- SMB Solutions
How to Upload PowerPoint Presentations to YouTube
Putting a presentation on YouTube can be a great way to reach co-workers and customers, and it's easy to do. Here's how.

Table of Contents
PowerPoint presentations have been a popular tool for decades, and they still hold power in the business world. From a small work meeting to a crowded TED Talk, there are many professional discussions and lectures made easier by PowerPoints.
PowerPoint presentations can be recorded and shared at a later date. By uploading PowerPoint presentations to YouTube , you can increase your reach to co-workers, clients or friends. Doing so also allows your audience to view presentations on their own time without missing any important information. Microsoft even does what it can to simplify this process, but you still have to follow a few important steps.
Here’s how to do it.
1. Record your PowerPoint presentation
The first step is to record your PowerPoint presentation so that once it’s uploaded, viewers will be able to hear and see the entire presentation. You can use the Insert menu to add individual recordings to each slide. To do this, go to Click Insert > Media > Audio > Record Audio.
To record the entire slideshow, go to the Slide Show tab, and select Record Slide Show. Then, choose whether to record from the beginning or from the current slide. This option will include all narration, animations and slide transitions in the PowerPoint video.
Click Slide Show > Record Slide Show > Start Recording
Once your presentation is fully recorded, it’s ready to be converted into a video and uploaded to YouTube.
2. Turn your PowerPoint presentation into a video
To upload a PowerPoint presentation, you must convert it into a video. That includes all of the media – narration, animation, pointer movements and slide transitions – that go with it. So, once the presentation is up on YouTube, viewers will be able to watch it as if they were viewing it in real time.
There are two main ways to convert a PowerPoint presentation into a video: saving the file in a video format and saving the presentation as a PowerPoint Show. The advantage of saving the file as a PowerPoint Show is that your presentation will automatically jump to full-screen mode when someone opens it. This is ideal for business owners who are looking to send their video presentation to certain people instead of uploading it to YouTube.
Video presentations are saved as Windows Media Video (WMV) files, while PowerPoint Show presentations are saved in their own PowerPoint Show format (PPSX).
To save the presentation as a video, select File > Export > Create a Video > Select Video Quality > Use Recorded Timings and Narrations> Create Video.
To save the presentation as a PowerPoint Show, simply save the file under a new format. Click File > Save As > Browse > Save as Type > PowerPoint Show > Save.
3. Add audio to your PowerPoint presentation
You can add audio to a PowerPoint presentation on a PC or a Mac. Audio options include sound bites, music and narration. Adding sound helps further engage viewers, especially if you’re including commentary like you would if you were actually presenting the PowerPoint slideshow.
While in edit mode for your PowerPoint presentation, follow these steps to add audio to a PowerPoint presentation on a PC:
Click Insert > Audio. Then, select Audio on my PC from the available menu options. All available audio files on your computer will come up in the dialog box. Select the file you want to add to the presentation and click Insert at the bottom of the dialog box.
Choose Audio Tools Playback to edit the options for the presentation. From here, you can edit options such as Fade, Sequence and Loop Mode.
Here’s how to add audio to a PowerPoint presentation on a Mac:
Click Insert > Audio. Select either Audio Browser or Audio from File. The former allows you to add the audio from iTunes, while the latter browses your computer for the correct file. Choose the audio file. From the Audio Format tab, you can edit options such as Loop Mode, Play Across Slides and Hide During Slideshow.
After you edit a presentation with audio, you can preview the results using the playback option. Save all progress before exiting the program.
4. Upload your PowerPoint presentation to YouTube
After converting the presentation into a video format, sign in to your YouTube account, and click Upload at the top of the page. Select the presentation video you want to upload, and then adjust the video privacy settings.
Once the video is uploaded, click Publish to make it viewable to others. Be sure to use a catchy title that best represents the topic of your presentation so the right audience can find it.
5. Share your PowerPoint presentation with co-workers
Uploading presentations to YouTube is a great way for colleagues and customers to learn about a business on their own time. It also can be a great way to advertise changes or updates to a business. Make sure your connections know where to find your presentation and encourage them to share it with their own network. Share the link on your LinkedIn page and social platforms , email it to co-workers, include it in an email marketing newsletter . There are many ways to market your presentation and increase its reach, so you can build a loyal audience and continue to post engaging content.
Tips for creating a good video
When putting together your presentation, you don’t want to do the bare minimum and hope it impacts viewers. Here are some tips for creating an engaging PowerPoint presentation video your audience will love:
- Use simple visuals: Presentations work best when the visuals are simple. Don’t clutter the screen; embrace white space for improved readability. Limit pages full of long lists of bullet points. Instead, highlight only the most important facts.
- Choose a theme that fits the topic of your presentation: PowerPoint offers templates, but you may want to customize one to avoid coming across as cookie-cutter. Remember that the use of color is important to convey messages. Cool tones, such as blue and green, work best for background colors, while warm shades, such as red and orange, are best for text and charts.
- Include video clips and audio in meaningful ways :A crashing symbol between slides is more likely to come across as cheesy than engaging. Use engaging yet professional videos and audio clips that add to the presentation, not distract the audience from the topic. This includes narration, an explainer video that is relevant to the subject or simple transitions from slide to slide.
- Remember your audience: The top tip for creating a good video is to always keep your audience in mind . Imagine the video from viewers’ perspective and allow that to shape the features you add.
- Don’t overcrowd your slides with text: Using too many words on each slide will be overwhelming to your audience following along. Instead, include one-sentence summaries or bullet points (but limit them), then add audio commentary to expand on them further.
- Tell a story: While you want to approach the presentation in a professional manner, don’t turn it into a lecture. Use anecdotes and engaging stories to communicate your message. Rather than talking to your audience, have a discussion with them — even if they can’t interact in the moment. Approach the entire presentation like a conversation rather than a lecture.

Building Better Businesses
Insights on business strategy and culture, right to your inbox. Part of the business.com network.
Sign up for our daily newsletter
- Privacy Policy
- Advertise with Us
How to Create a YouTube Video with PowerPoint

Few people nowadays have the patience or willingness to sit through multiple slide presentations. Online videos, on the other hand, are a powerful means to build user engagement in an era of lower attention spans. As long as the videos look professional, your audience will pay attention to whatever you have to say.
Follow these simple steps to convert your hard work that went in to creating a PowerPoint into an accessible and compact YouTube video.
Also read: 4 Free Online Tools to Add a Censor Bleep to Your YouTube Videos
Step 1: Clean Up Your Slides
If you want to give a professional finish to the video, try breathing life into the slides first.
Open the file with PowerPoint 2010 and click “View,” followed by “Slide Master,” to apply uniformity in alignment, bullets, fonts and spacing. After saving the Master template, go to “Slide Sorter” view and apply a minimalist, standard design. You can use an academic or corporate template as long as it’s minimal and clean.

Too much text in a slide will disrupt the attention span of the typical YouTube viewer. Get rid of bullet lists, fancy animations, flowcharts and tables. If you previously used a slide to describe something complex, break it down into easily digestible ideas spread across multiple slides.
Use screenshots and full-slide, high-resolution images to fill up your new presentation. PowerPoint 2010 allows you to insert online pictures with a Creative Commons license and from the Bing search engine.

You can also use the “Pictures with Captions” layout along with “Design Ideas” to create a robust background for video frames. Use free stock images for new picture ideas.

Also read: 14 Useful PowerPoint Templates to Set Up a Digital Planner
Step 2: Insert Audio
Background narration is the most important component of a high-quality YouTube video. You can download royalty-free music , but the best YouTube videos always come with speaker narration. Go to “Insert,” followed by “Audio,” where PowerPoint allows you to record your own voice for each slide.

There’s a chance you aren’t getting a very high-quality audio with PowerPoint alone. It’s far better to work with a pre-recorded audio clip and a tight script. You can use a voice recording app like Audiophile or an actual digital voice recorder. Our aim is to achieve professional results by filtering out echo and background noise.

For a fifty-slide presentation, you should aim for no more than ten seconds of recorded narration per slide. Go to “Slide Show,” followed by “Rehearse Timings,” to get the timings right for each slide. Import the MP3 files into their corresponding slides and play them in automatic mode.

Finally, you are only required to set up the slide show. Check the options for “Play Narration” and “Use Timings” along with “Browsed by an individual (window).”

Also read: How to Create and Manage Your YouTube Clips
Step 3: Insert Video Clips (Optional)
If you did a good job with rehearsed narrations and images as described earlier, you can skip this part. However, a mini video clip within a video is a powerful way to retain your YouTube viewer’s attention. Unlike in the past, playing a video clip automatically from your PowerPoint is very easy.
Go to “Insert,” followed by “Video,” where you can embed any video from YouTube’s “Share” menu and play it on your own presentation.

Always make sure that it is your own video. You can always choose Creative Commons videos from YouTube, Vimeo and other sites. Use PowerPoint’s “Playback” option which is displayed after you embed a new video.
Step 4: Save PPT as Video
After clicking “File,” followed by “Save As,” save the PowerPoint as a WMV file. Your video is now ready for upload on YouTube and any other video-sharing sites.

Step 5: Upload Video on YouTube
Upload the desired video output to your YouTube channel. If it is aimed at prospects alone, you might want to keep it private or unlisted with no embedding or comments allowed.

Do you agree that converting your PowerPoint files to a five- or seven-minute video is a good investment of time? Please let us know your thoughts. Want to make the most of your time? Learn these PowerPoint keyboard shortcuts .
Our latest tutorials delivered straight to your inbox

Sayak Boral is a technology writer with over eleven years of experience working in different industries including semiconductors, IoT, enterprise IT, telecommunications OSS/BSS, and network security. He has been writing for MakeTechEasier on a wide range of technical topics including Windows, Android, Internet, Hardware Guides, Browsers, Software Tools, and Product Reviews.

- Add, change, or remove transitions between slides Article
- Animate text or objects Article
- Use the Morph transition in PowerPoint Article
- Insert a video from YouTube or another site Article
- Add or delete audio in your PowerPoint presentation Article
- Record your screen in PowerPoint Article

Insert a video from YouTube or another site

In PowerPoint for Microsoft 365, PowerPoint 2021, or PowerPoint 2019, you can insert an online video from YouTube or Vimeo on a slide.
In PowerPoint for Microsoft 365, version 1907 or later, you can also insert an online video from Microsoft Stream, a video service for enterprises—people in an organization can upload, view, and share videos with one another.
The video plays directly from the website, and it has the site's controls for playing, pausing, volume, and so on. The PowerPoint playback features (Fade, Bookmark, Trim, and so on) don't apply to online videos .
Because the video is stored on a web site, rather than in your presentation, you must be connected to the internet in order for the video to play successfully.
Insert a web video
In your web browser, locate the video you want.
Copy the URL of the web page from the Address bar of your browser.
Switch back to PowerPoint and select the slide where you want to place the video.
On the Insert tab of the ribbon, select Video > Online Video .
In the Online Video dialog box, paste the URL you copied in step 2.
Select Insert .
Play the video
If a video is inserted successfully, you can play it either in Normal view or Slide Show.
A Play button appears on the video in Normal view.
In Slide Show, you can interact with videos just as you would in a web browser.
By default, videos from YouTube and Vimeo play in "click sequence." You can play the video without having to click the Play button. Just tap the spacebar to advance to the next step in your click sequence.
Troubleshooting
Not all online videos from these sites are allowed to be embedded. You should check on the video site to find out if a certain video can be embedded.
Internet Explorer 11 is required on your computer
Note: Microsoft 365 apps and services will not support Internet Explorer 11 starting August 17, 2021. Learn more . Please note that Internet Explorer 11 will remain a supported browser. Internet Explorer 11 is a component of the Windows operating system and follows the Lifecycle Policy for the product on which it is installed.
For the purpose of playing videos in PowerPoint, Internet Explorer 11 is required to be on your computer. You don't have to use it to browse the web; you simply have to have it installed, because under the covers, PowerPoint needs its technology to play videos on Windows.
If your operating system is Windows 10, then you already have Internet Explorer 11 installed. If you have an older version of Windows, you can go to this Internet Explorer Downloads page for instructions.
Want to insert a video from your computer instead?
See Insert and play a video file from your computer for all the details.
Terms of Use and Privacy policies
Terms of Use
Privacy Policy
Microsoft Stream:
SlideShare.net:
In PowerPoint 2016, you can insert an online video with an embed code or search for a video by name. Then you can play it during your presentation.
The video plays directly from the website, and it has the site's controls for playing, pausing, volume, and so on. The PowerPoint playback features (Fade, Bookmark, Trim, and so on) don't apply to online videos.
Insert the online video with an "embed" code
On YouTube or Vimeo, find the video that you want to insert.
Below the video frame, click Share , and then click Embed . (If you neglect to click Embed , you'll end up copying the wrong code.)

Right-click the iFrame embed code, and click Copy .

If the highlighted text that you copy begins with "http", STOP. It's the wrong code to copy. Return to step 2 and click Embed :

In PowerPoint, click the slide that you want to add a video to.
On the Insert tab, click Video > Online Video .
In the From a Video Embed Code box, paste the embed code, and then click the arrow.

A video rectangle is placed on your slide, which you can move and resize as you like. To preview your video on your slide, right-click the video rectangle, select Preview , and then click the Play button on the video.
Note: If your video doesn’t embed correctly, double-check that you have installed the required Office updates.
Search for the YouTube video by name
Click the slide that you want to add a video to.

In the Search YouTube box, type the name of the video that you want to insert, and press Enter.
Select the video from the search results, and click Insert .
Note: If your video doesn’t insert correctly, double-check that you have installed the required Office updates.
Preview the video
Once the video rectangle is on your slide, select it, right-click it and choose Preview .
A Play button appears on the video.
Click the video's Play button.
Because the video is on a web site, rather than actually in your presentation, you must be connected to the internet in order for the video to play successfully.
Embed content from Slideshare.net
On a slide in PowerPoint, you can embed content from Slideshare.net , a sharing web site for presentations, infographics, and documents.
On Slideshare.net, any content that can be embedded elsewhere has a Share button on it. That button opens a window where you can copy an embed code like an embed for a video.
On Slideshare.net , find the content you want to embed.
Select the Share button beneath the content frame.
Sharing codes appear in the video frame.
Select the box named Embed .
All the text in the box becomes selected when you do this.
Right-click the selected text and choose Copy .
The text you've copied contains more information than you need, so it needs to be trimmed and re-copied.
Paste the copied text into a text editor such as Word or Notepad.
Select the portion of the text that begins with <iframe src ... and ends with </iframe> . Copy that text.
That's the embed code you need for inserting the content into PowerPoint.
In PowerPoint, go to the slide where you want to insert the content.
On the toolbar ribbon, select the Insert tab, select Video , and then select Online Video .
The Insert Video dialog box opens.
Paste the embed code in the box named From a Video Embed Code , and then press Enter.
It takes a moment for PowerPoint to absorb the content. When it has done so, a black box appears on your slide.

Requirements
Your use of online videos is subject to each provider web site's Terms of Use and Privacy Policy.
SlideShare.net
In PowerPoint for the web, you can insert an online video from YouTube or Vimeo on a slide. (If you have a Microsoft 365 business or education subscription, you can also insert an online video from Microsoft Stream.)
Insert an online video
On a separate tab in your web browser, locate the video you want.
Copy the address of the web page from the Address bar of your browser.
Switch to PowerPoint for the web and select the slide where you want to place the video.
On the Insert tab of the ribbon, in the Media group, select Online Video .
In the Online Video dialog box, paste the address you copied in step 2.
The video is inserted on your slide. You can move the video by dragging with the mouse, and you can resize the video frame by selecting a corner and dragging.
To play the video, you must run Slide Show. On the ribbon, switch to the View tab, and in the Start Slide Show group, select From Current Slide .
(If you've turned off the Simplified Ribbon, you don't have a Slide Show tab; instead use the View tab to start the slide show.)
Slide Show opens, and then you can click the play button to begin.
For related information, see Play a video in PowerPoint for the web .
Trimming a video
PowerPoint for the web can't trim videos, and online videos can't be trimmed. If you have a video that you want to trim, you must save it to your computer, then insert it on your slide in a desktop version of PowerPoint.
Newer Mac versions
In PowerPoint for Microsoft 365 for Mac, PowerPoint 2021 for Mac, or PowerPoint 2019 for Mac, you can insert an online video from YouTube or Vimeo on a slide. Earlier versions of PowerPoint for macOS don't support inserting an online video.
In PowerPoint for Microsoft 365 for Mac, you can also insert an online video from Microsoft Stream, a video service for enterprises—people in an organization can upload, view, and share videos with one another. This feature requires PowerPoint for Microsoft 365 for Mac version 16.27 or later.
Switch to PowerPoint and select the slide where you want to place the video.
On the Insert tab of the ribbon, in the Media group at the right end, select Video . Then select Online Movie .
In the dialog box, paste the URL you copied in step 2.
Click Insert .
The video is added to the slide.
To preview the video, click the Play button that appears on top of video.
Inserting and playing an online video requires a recent version of macOS and PowerPoint for macOS:
PowerPoint version 16.15.18070902 or later
macOS 10.13.4 (High Sierra) or later
A Mac manufactured in 2012 or later
Why can’t I embed a video in PowerPoint?
Add audio to your presentation
Add text to a video
Video and audio file formats supported in PowerPoint
How to Make an Eye-catching YouTube Thumbnail
Create a video for YouTube with a template

Need more help?
Want more options.
Explore subscription benefits, browse training courses, learn how to secure your device, and more.

Microsoft 365 subscription benefits

Microsoft 365 training

Microsoft security

Accessibility center
Communities help you ask and answer questions, give feedback, and hear from experts with rich knowledge.

Ask the Microsoft Community

Microsoft Tech Community

Windows Insiders
Microsoft 365 Insiders
Was this information helpful?
Thank you for your feedback.
Blog > How to add a YouTube Video in PowerPoint
How to add a YouTube Video in PowerPoint
07.08.20 • #powerpointtips.
Sometimes, you want to show your audience a YouTube video during a presentation. Some people do so by opening the browser, going to YouTube and then typing the video title into the search bar, when in fact there is a much easier and more convenient way. In the this post, you'll learn how you can directly insert a YouTube Video into PowerPoint that plays automatically on your slide. Also, we have got some great suggestions about videos you could show your audience.
You can watch our video (which is by the way inserted from YouTube as well) down below and learn how to add a video to your slides in just one minute! If you don't feel like watching the video, you can also follow the step-by-step guide down below.
Step-by-Step Tutorial
- Go to Insert in the PowerPoint task line on the top.
- Click on Video on the top right corner. Then choose the option Online Video .

- A window will open which will ask you to insert the video’s URL.

- Open the YouTube video you would like to embed in your browser. You can simply right click on the address bar in the browser and copy the URL. Alternatively, perform a right mouse click on the video, and then click on Copy Video URL .

- Go back to PowerPoint and insert the URL by either pressing CTRL+V or right click and then Paste . Then click on Insert .

- Your video will then be inserted on your current slide. Just like any element, you can change its size or move it around now.
- To start the video (either while editing or in presentation mode), simply click on the play button.

YouTube video with offline playback
With the previously described option, it is necessary to have a stable internet connection while presenting. As that can not always be guaranteed, there is also a way of inserting YouTube videos that work offline. Follow these steps:
- Open the YouTube Video in your Browser. Copy the URL by clicking the address bar and then Right Click > Copy.
- Open the website y2mate.com . Paste your copied URL into the text field, then click Start .

- Choose one of the options for download (and click the Download button. We recommend 1080p or 720p.

- A window will open, and your video will convert. When it's ready, click Download .mp4" .
- After your file has downloaded, you should see it in your Downloads folder in the browser. By clicking "Show in folder", you'll see where it's saved on your device.

- Right click on the file in your folder and click Copy .
- Go to the PowerPoint slide where you want your video to be placed. Right click and Paste . Your video should now appear and play if you click on it.

What kinds of videos can I use in a presentation?
Videos are an amazing way to liven up your presentation. Especially when you're talking for a long time, the audience tends to get tired. That's where a variation of multimedia elements, such as videos, can be helpful. We recommend putting videos in the main part of a presentation, but of course you may also start or finish by presenting a video to your audience. There is no limit for the type of video, the only guideline you should follow is relevance. Before mindlessly pasting a video to your slide, ask yourself: "What purpose does this video fulfill within my presentation?" Is it supposed to inform and teach the audience, is it something you really want everybody to see, or is it just a funny little clip to lighten the mood? All of those purposes are fine. With this tip, you're one step closer to a wonderful presentation! If you want to learn more about successful presentations and Audience Engagement, check out our blogpost Top 10 Tools for increasing Audience Engagement .

Set the start of your video
After you've added a video from YouTube, it starts to play by default when you click anywhere on the slide during the presentation. That's usually fine, but can sometimes be annoying, e.g. when you have more than one video on one slide. In that case, it is helpful to set the Start to When clicked on . The video then won't start until you click directly on it. You can do that by first clicking on your video, going to the Playback tab on the right and then select When clicked on in the Start-selection. By choosing Automatically here, your video will start automatically, without having to click on it.
Add a video from your device
If you want to add a video that is saved on your computer, you can do so by following the tutorial in our article Insert a local Video .
Useful Keyboard Shortcuts
| Shortcut | Action |
|---|---|
| CTRL+C | Copy an element or text |
| CTRL+V | Paste a previously copied element or text |
| CTRL+Z | Undo an action |
| CTRL+Y | Redo an action |
| CTRL+S | Save |
How can I insert a YouTube video to PowerPoint?
Go to Insert > Video > Online Video. Copy the video URL from the address bar and paste it to the window that opens. Click Insert and your video should appear instantly.
Can I play a video directly on my PowerPoint slides?
Yes. You can insert a video from YouTube by using the URL, and it will be played directly on your slide. In our tutorial , you'll learn how to do so.
Can I play an offline video from YouTube in PowerPoint?
Yes, it is possible to play an offline YouTube video on your PowerPoint slides. We show you how it is done in our tutorial .
Related articles
About the author.

Pia Lehner-Mittermaier
Pia works in Marketing as a graphic designer and writer at SlideLizard. She uses her vivid imagination and creativity to produce good content.

Get 1 Month for free!
Do you want to make your presentations more interactive.
With SlideLizard you can engage your audience with live polls, questions and feedback . Directly within your PowerPoint Presentation. Learn more
Top blog articles More posts

Insert and edit Adobe Illustrator files in PowerPoint

Microsoft Copilot: A Comprehensive Review of the AI tool

Get started with Live Polls, Q&A and slides
for your PowerPoint Presentations
The big SlideLizard presentation glossary
Vocalized pause.
A vocalized pause means the pause when the silence between words is filled by the speaker with vocalizations like "um", "uh" and "er".
Break-out-Room
In live online training, it is sometimes useful to divide the students into small groups for certain exercises, as it would be impossible to have conversations at the same time. Break-out-rooms are used so that people can talk to each other without disturbing the others. When the exercise is over, they are sent back to the main room.
An e-lecture is a lecture that is held online. Many schools and universities offer e-lectures as technical opportunities improve.
Vertical Communication
Vertical communication means that information is passed from one person to the next according to a linear system based on their titles. This type of communication is used when a company follows a hierarchical structure or for important, sensitive information.
Be the first to know!
The latest SlideLizard news, articles, and resources, sent straight to your inbox.
- or follow us on -
We use cookies to personalize content and analyze traffic to our website. You can choose to accept only cookies that are necessary for the website to function or to also allow tracking cookies. For more information, please see our privacy policy .
Cookie Settings
Necessary cookies are required for the proper functioning of the website. These cookies ensure basic functionalities and security features of the website.
Analytical cookies are used to understand how visitors interact with the website. These cookies help provide information about the number of visitors, etc.

- Free Download Generate AI Video Online Free Download Buy Now
- AI script generator saves you time on initial script drafts.
- Add a human touch to your videos with lifelike AI avatars.
- Convert boring PowerPoint slides into engaging videos.
- Empower your video production with AI voice.
- Translate video content into diverse languages.
- Chrome Video Translators: Top 5 Video Translation Chrome Extensions
- How To Convert Video Voice to Text Online for Free?
- The Ever-Changing Era of AI Video Translation: A Reality to Be Fulfilled
- [Top 10] Solutions for Movie Subtitle Translation Making Things Perfect
- Translate Video From Japanese to English Online for Free
- Breakthrough in 2024: How to Make A Picture Speak
- Top 10 AI-Talking Avatars Revolutionizing Communication
- How to Make a Talking AI Avatar From Photos: Easy Guide
- How To Make Animation Talk? Explained with Easy Steps
- Easy Steps To Create Talking Memoji on iPhone [Free]
- Top 10 AI Avatar Generators in 2024
- Top 10 AI Avatar Video Generators in 2024
- The 8 Best AI Avatar Apps for iOS & Android
- 2024's Top 8 AI Character Creators
- How To Create AI Avatars Online (2024 Guide)
- Exploring The Best Text-to-Speech Online Tools To Use in 2024
- Exploring the Finest Text-to-Speech Male Voice Tools for Natural Output
- In-Depth Review of Ivona Text to Speech by NextUp Technologies
- The Best Text-to-Audio Converters of All Times
- Top 5 Best Tools to Convert Text to Audio Online for Free
- Best 12 AI Voice Cloning Tools [Online & Offline]
- Recognizing The Top Deepfake Voice App and Software in the Market
- Top Voice Cloning Apps for Android & iOS Devices
- Coqui Voice Cloning: The Ultimate Solution to Streamline Audio Content
- [Review] Descript Overdub: Controlling the Audio in Video
- Top 4 Hatsune Miku Voice AI Generators for All Times
- Top 6 Darth Vader AI Generators for All Platforms
- Top 6 Mickey Mouse Voice Generators Providing Efficient Results
- An Ultimate Guide of Best Narrator Voice Generators
- A Comprehensive List of The Top SpongeBob Voice Generators
- Best AI YouTube Script Writers and The Ultimate Guide
- Top 5 AI Movie Script Generators in 2024
- Top 10 AI Script Generators in 2024
- Top 10 AI Script Writers to Choose in 2024
- Translate Video Speech to Text with Speech-to-Text Converters
- Master Deepface Live: Download and Train Your Live Model
- Level Up Your AI Streaming Game: A Quick Guide and Tool Recommendation
- 5 Must-Know Hacks to Beat Deepfake Attacks: Streamer Survival Guide
- Build Your AI Twitch Streamer with Animated Avatars
- Smooth Presentations on Any Platform – Convert PPSX to MP4
- How to Make a PowerPoint Presentation With a Video of the Presenter
- How to Make a 3D PowerPoint Presentation That Viewers Will Love
- Top Methods to Create a Green Screen in PowerPoint
- How to Convert PowerPoint Presentations to AVI – Best Methods
Full Guide on How to Convert PowerPoint to YouTube Video [2024]
- Where to Find the Best Anniversary Video Template Download
- Top 5 Sites to Look for Video Template Download
- 10 Best Video Editors with Templates In 2024
- A Comprehensive Guide to Using Canva Video Templates and its Alternative Choice
- Where to Find 1000+ Free and Paid Video Promo Templates
- How To Create AI-Powered Videos Using Synthesia Avatar and Voices
- Top 10 Text-to-Video AI Generators to Create Engaging and Captivating Videos
- The Best AI Video Makers from Photos to Create Captivating Videos with Pictures
- Top 5 AI-Powered Script to Video Makers of 2024
- Top 8 AI Titles Generators for Creating Catchy Titles For All Platforms

Have you ever made a killer presentation and wished you could share it on YouTube? Or perhaps you want an easy way for people to access it.
Well, we know how to make it happen! Various ways can help you convert your PowerPoint presentation into a video. After that, you can upload it to your YouTube channel. It will not only create a source for the users to access but also help reach more people.
Are you getting curious to discover the methods? This article will explain everything about converting PowerPoint to YouTube videos. We will explore both manual and easy methods with their step-by-step guide! Let's get started!
In this article
Part 1. is it possible to convert powerpoint to youtube video, features of wondershare virbo, steps to convert ppt to youtube video using wondershare virbo, method 1. convert powerpoint to youtube video on windows, method 2. convert powerpoint to youtube video on mac, part 4. use cases of converting powerpoint to youtube video, the bottom line.
This question is very common among users. But the good news is that you can convert your PowerPoint presentation to a YouTube video. Indeed, PowerPoint is by far the most popular tool people use to make presentations. However, the only issue is the limited usability of PPT files. You can’t upload them to show them anywhere, for example, on YouTube.
What's the solution? Well, you need to convert your PPT file to video. Then, you will be able to upload it on YouTube and other platforms. We will explore a few methods to convert PowerPoint to YouTube videos. You can go through these methods. Remember that your approach and outcome will depend on the method you choose. Now, let's move forward and see how to turn a PowerPoint into a YouTube video.
Part 2. How to Convert PowerPoint to YouTube Video? (One-Click)
One of the hassle-free and reliable solutions to convert PowerPoint to YouTube videos is Wondershare Virbo . It is a powerful tool that can convert your PPT files into high-scale videos in just a few clicks. You won't lose any design elements, animations, or other effects.

But do you know what the best part is? Its user-interface. Virbo has made the conversion process simple. People of all skill levels can use it to create YouTube videos with PowerPoint. Plus, it offers a library of 300+ realistic AI avatars to present your content. Well, the features of this amazing tool don't end here; let's see what else it has to offer.
- Fast Conversion: Virbo's conversion speed is very fast. You can create videos from your presentations in seconds.
- AI Avatars: It offers 300+ realistic AI avatars that can present your content. You can also add text. They will read it in a realistic and professional way.
- Multilingual Narrations: Virbo also helps you generate voiceovers in 90+ languages using AI voices. Subtitles can also be automatically generated from your text.
- Customization Options: You can select BG music and animation styles and edit text styles within Virbo. Customize your videos to match your context.
- Versatile Usage: The Virbo's generated video can be used in various ways. You can convert PowerPoint to YouTube for training materials, marketing content, and more.
After reading the amazing features of Virbo, you must be wondering how it is so easy and what the steps are for doing so. Well, why don't you see them yourself?
First, download and install the Wondershare Virbo on your laptop or PC by clicking the button below. Then, follow the steps given below:
Convert Your PPT to Video
Step 1: Once the software is installed, launch it and click the " Create Video" button on the homepage.

Step 2: Select " Landscape" as an aspect ratio and click "Import PP." Then, drag and drop your PowerPoint presentation file.

Step 3: If you want to extract the script, select the " Extract text from PPT" option. Then click the " Create Video" button. Virbo will start creating the video.

Step 4: Here, you can add customization to your video. You can add AI avatars from an extensive library. You can also select the voice, its speed, pitch, volume, and more.

Step 5: Once you are done editing, you can preview the video by clicking the " Preview" button in the above right corner. Then, you can click " Export" to save it on your device.

So, this is how you can create a YouTube video with PowerPoint in just a few taps. Isn't it easy? Of course, it is! You don't have to follow the daunting steps.
- Basic: $9.9/month
- Essential: $19.9/year
- Pro: $199/year
Part 3. How to Convert PowerPoint to YouTube Video? (Manual Method)
This section will explore the manual methods of how to convert PowerPoint to video for YouTube. There are two methods that you can follow. We will also walk you through their step-by-step guides to make the process easy to follow. Let’s dive in!
If you have Windows OS, converting PPT slides to videos is simple. Here are the steps for the newer version of Microsoft PowerPoint:
Step 1: Open PowerPoint on your device and navigate to the file you want to convert.
Step 2: Click " "File" " and select the " "Export" " option from the menu.

Step 3: Click " "Create a Video," " and you will see new options on the right-side menu.

Step 4: Here, select the quality of your video and click the " "Create Video" " button.

Step 5: You can also select the duration for each slide and add narrations.

Once you are done, Microsoft PowerPoint will convert your slides into a video. You can save it on your device and upload it on YouTube.
The steps to convert PowerPoint to YouTube video are similar to those for Windows. However, there are a few slight changes that you need to make. You can follow the steps given below:
Step 1: Open PowerPoint on your Mac and navigate to the file you want to convert.
Step 2: Click " "File" " and select the " "Export" " option from the top menu.

Step 3: Click the " "Create Video" " button, and you will need to select the following options:
- Select the video resolution and quality.
- Set the name for the video file and choose the destination to save it.
- Select the video file type: MP4, for example, or whatever you want.

Step 4: Now, click " "Export," " and your video will be saved on your Mac
The time of conversion will depend on how big your file size is. Once the conversion is done, your PPT file will be available as a video on your Mac.
Some users might find this method difficult to follow. Or they have the older versions of PowerPoint. In that case, we recommend you pick Wondershare Virbo’s PPT to video converter as we introduced in the former part.
So, why do we have to convert PowerPoint to YouTube videos? There can be plenty of reasons. However, some of the common ones are as follows:
- Business Proposals: You can share your business ideas and plans in a video presentation on YouTube. It's a great way to reach potential partners and clients.
- Education Tutorials: You can make easy tutorials with PowerPoint and share them on YouTube to teach others. You can use templates to keep it simple and engaging.
- Training Modules: You can turn your training materials into videos for easy learning. Anyone can access and watch them whenever they need.
- Product Demos : You can show what your product can do by converting PPT to YouTube videos. People love seeing how things work in action.
- Personal Stories: Share your stories and experiences through simple videos. It's like telling a story with pictures.
- Professional Portfolios : Show your work in a video portfolio to potential clients. It's an easy way to showcase your skills and accomplishments.
The use cases of converting PowerPoint to YouTube videos don't end here. There are many other uses for doing so. However, these were some of the common ones.
In today's world, converting PowerPoint to YouTube is no longer a challenge. In this article, we have explored how to turn PowerPoint into a YouTube video. We introduced you to two methods for Windows and Mac.
However, if you don't want the hassle and need a quick conversion, there is no better option than Wondershare Virbo. This tool is easy to use and comes with many other helpful features. Simply download it and start converting your PowerPoint files to videos.
FAQs on How to Turn a PowerPoint into a YouTube video
Can i add background music to my powerpoint video, what’s the ideal length for a youtube video created from a powerpoint, can i convert powerpoint video to audio, you may also like.

Related articles
How to Put YouTube Videos in PowerPoint: A Step-by-Step Guide
Want to make your PowerPoint presentation a bit more engaging with a cool YouTube video? It’s actually pretty simple to do. By following a few easy steps, you can embed a YouTube video directly into your PowerPoint slide. This way, you won’t have to switch between applications during your presentation – it’ll all be right there in your slide show!
Step by Step Tutorial on How to Put YouTube Videos in PowerPoint
Before we dive into the steps, know that adding a YouTube video to your PowerPoint will enhance your presentation and keep your audience interested. No more boring bullet points, just a captivating video to emphasize your point!
Step 1: Find the YouTube video you want to embed
Locate the YouTube video that you want to add to your PowerPoint presentation.
Finding the right YouTube video is the first step. Make sure it’s relevant to your presentation’s content and will add value for your audience. Once you’ve found it, copy the URL from the address bar.
Step 2: Open your PowerPoint presentation
Open the PowerPoint presentation where you want to insert the YouTube video.
Make sure you’re on the slide where you want the video to appear before you move on to the next step. This will save you the hassle of moving it later on.
Step 3: Click on the ‘Insert’ tab
In PowerPoint, go to the ‘Insert’ tab on the menu bar.
The ‘Insert’ tab is where all the magic happens – from adding pictures and shapes to videos, it’s your go-to for jazzing up your slides.
Step 4: Select ‘Video’ and then ‘Online Video’
Within the ‘Insert’ tab, click on ‘Video’ and then select ‘Online Video’.
By selecting ‘Online Video’, you’re telling PowerPoint that you’re looking to add a video from the web, not one that’s saved on your computer.
Step 5: Paste the YouTube video URL
In the dialog box that appears, paste the YouTube video URL that you copied earlier.
After you paste the URL, PowerPoint will do a quick check to make sure it’s a valid link. If all is well, you’ll be able to move on to the next step.
Step 6: Resize and position the video on your slide
Once the video is embedded, you can resize and position it on your slide to fit your design.
Click and drag the corners of the video to resize it, and click and drag the video itself to move it around the slide. You can also use the format options to add effects like borders or shadows.
After you complete these steps, you’ll have a YouTube video embedded directly into your PowerPoint slide. No more awkward pauses while you exit the presentation to open up a browser. Your video will play seamlessly within your slide when you’re presenting, making for a smooth and professional presentation.
Tips for Putting YouTube Videos in PowerPoint
- Make sure you have a stable internet connection during your presentation, as the video will need to buffer.
- Test the video before your presentation to ensure it plays correctly.
- Keep the video short and to the point – you don’t want to lose your audience’s attention.
- Consider the volume of the video – ensure it’s audible for your audience but not overwhelming.
- If the video is long, use the ‘Trim Video’ feature in PowerPoint to show only the relevant part.
Frequently Asked Questions
Can i put a youtube video in powerpoint if i don’t have an internet connection.
No, you need an internet connection to play a YouTube video in PowerPoint as it streams directly from the website.
Will the video play automatically when I get to that slide?
You can set the video to play automatically or when clicked – it’s up to you. You’ll find these options in the ‘Playback’ tab once the video is inserted.
Can I put a YouTube video in any version of PowerPoint?
You can embed YouTube videos in PowerPoint 2010 and later versions. Earlier versions do not support this feature.
What if the YouTube video is removed or the link changes?
If the YouTube video is removed or the link changes after you have embedded it, the video will not play in your PowerPoint. Always check the video link before presenting.
Can I embed a video that is not from YouTube?
Yes, as long as it’s an online video, you can embed it by following the same steps and using the video’s direct link.
- Find the YouTube video you want to embed.
- Open your PowerPoint presentation.
- Click on the ‘Insert’ tab.
- Select ‘Video’ and then ‘Online Video’.
- Paste the YouTube video URL.
- Resize and position the video on your slide.
There you have it – putting YouTube videos in PowerPoint is a piece of cake! With this handy skill, you can now make your presentations more dynamic and engaging for your audience. Just remember to choose videos that complement your content and resonate with your listeners. And don’t forget to test everything beforehand to ensure a smooth-running presentation. Happy presenting, and may your slides be ever compelling!

Matthew Burleigh has been writing tech tutorials since 2008. His writing has appeared on dozens of different websites and been read over 50 million times.
After receiving his Bachelor’s and Master’s degrees in Computer Science he spent several years working in IT management for small businesses. However, he now works full time writing content online and creating websites.
His main writing topics include iPhones, Microsoft Office, Google Apps, Android, and Photoshop, but he has also written about many other tech topics as well.
Read his full bio here.
Share this:
Join our free newsletter.
Featured guides and deals
You may opt out at any time. Read our Privacy Policy
Related posts:
- How to Put Embedded Youtube Video in Powerpoint 2010
- How to Set Time for Slides in Powerpoint
- How to Add Page Numbers in Powerpoint 2010
- How to Save Powerpoint as PDF with Notes
- How to Loop a Slideshow on Powerpoint 2013
- How to Delete a Slide in Powerpoint 2010
- How to Unhide a Slide in Powerpoint 2013
- How to End Powerpoint on Last Slide in Powerpoint 2010
- How to Make a Powerpoint Slide Vertical in Powerpoint 2013
- How to Hide a Slide in Powerpoint 2010
- Can You Save a Powerpoint as a Video in Powerpoint 2013?
- How to Embed a YouTube Video in Powerpoint 2013
- How to Create a PowerPoint Presentation Step by Step: 2024 Guide
- How to Embed a Video in PowerPoint: The 2024 Guide
- How to Rotate a Slide in PowerPoint: A Step-by-Step Guide
- How to Insert Slide Number PowerPoint: The Ultimate 2024 Guide
- How to Add a YouTube Video in Powerpoint Online
- How to Change Hyperlink Color in Powerpoint 2010 (An Easy 5 Step Guide)
- How to Copy a PDF File Into PowerPoint: A Step-by-Step Guide
- How to Embed a Word Document Into PowerPoint 2000: A Step-by-Step Guide
How-To Geek
How to add a video to a microsoft powerpoint presentation.
If a picture speaks a thousand words, a video speaks a million words!
Quick Links
Embedding videos versus linking to videos, supported video formats in powerpoint, how to insert a video into a powerpoint presentation, manage an embedded video's playback in powerpoint.
Videos can make presentations even more interesting or exciting. If you're looking to add a video to your Microsoft PowerPoint presentation, it's easy to do so. We'll show you how.
In PowerPoint, you can either embed a video or link to a video from your presentation. If you embed a video, your video becomes part of the presentation, which increases the overall size of the presentation file.
Related: How to Send PowerPoint Presentations With an Embedded Video
If you link to a video, PowerPoint only adds a reference to that video in your presentation. The downside of this method is that you need to send the video file separately if you share your presentation with someone. We have written a guide on how to send PowerPoint presentations with videos , so check that out.
In this guide, we'll focus on embedding a video in your presentation so you don't have to worry about sending separate files. And, if you're looking to add a YouTube video to your presentation , there's a way to do that, too.
Related: How to Embed a YouTube Video in PowerPoint
PowerPoint supports multiple video formats, including ASF, AVI, MP4, M4V, MOV, MPG, MPEG, and WMV. If your video is already in one of these formats, you can quickly add that to your presentation.
If your video is in another format, you can convert it to a supported format and then add it to your presentation.
Related: How to Use Handbrake to Convert Any Video File to Any Format
First, make sure the video you want to add to your presentation is saved on your Windows or Mac computer. Then, open your presentation with PowerPoint on your computer.
On the PowerPoint window, in the left sidebar, click the slide in which you want to add a video.

At the top of the PowerPoint window, click the "Insert" tab.

In the "Insert" tab, under the "Media" section (which is to the extreme right side of the interface), click "Video."

You'll now see an "Insert Video From" menu. Here, select "This Device."

Your computer's standard "open" window will open. In this window, access the folder that has your video file. Then double-click your video file to add it to your presentation.

You'll see your selected video in your presentation. To resize this video, click it and use the handles around the video to change its size. Then drag the video to place it at its desired location in your slide.

If you'd like to test the video, at the bottom-left corner of the video, click the play icon.

And you're all set.
Now that you have added a video to your presentation, you might want to change how it plays in your slides. In PowerPoint, you have multiple ways to change your video's playback.
To access these playback options, first, click your video in your presentation. Then, at the top of the PowerPoint window, click "Playback."

In the "Playback" tab, under the "Video Options" section, you will find various options to manage your video's playback.

For example, to change how your video starts to play in your presentation, click the "Start" drop-down menu and select one of these options:
- In Click Sequence : This plays your video in the click sequence. This means if you press the button for the next slide, your video will play.
- Automatically : This option automatically plays your video when the slide with your video opens.
- When Clicked On : Select this option to play your video only when you click it.

The other options are "Play Full Screen," which opens your video in full screen, and "Loop Until Stopped" that plays your video over and over again until you manually stop it.
Before you close PowerPoint, make sure you save your presentation so that your embedded video is saved with it. Do this by clicking File > Save in PowerPoint's menu bar.

And that's how you make your PowerPoint presentations even more engaging by including videos in them. Exciting!
If you don't want to add a video but you do want audio, you can add music to your presentations . This also helps enhance your presentation quality.
Related: How to Add Music to Your PowerPoint Presentation
- Ad Creative Eye-catching designs that perform
- Social Media Creative Engaging assets for all platforms
- Email Design Templates & designs to grab attention
- Web Design Growth-driving designs for web
- Presentation Design Custom slide decks that stand out
- Packaging & Merch Design Head-turning apparel & merch
- eBook & Digital Report Design Your digital content supercharged
- Print Design Beautiful designs for all things printed
- Illustration Design Visual storytelling for your brand
- Brand Identity Design Expertise & custom design services
- Concept Creation Ideas that will captivate your audience
- Video Production Effortless video production at scale
- AR/3D Design New creative dimensions that perform
- AI-Enhanced Creative Human expertise at AI scale

Imagine capturing your audience’s attention with a dynamic video clip relevant to your topic. Instead of flipping through static slides, the energy shifts when we introduce multimedia. Visual elements like videos can illustrate concepts more effectively than text alone, making our presentations much more captivating.
We’ve all sat through monotonous presentations that felt like watching paint dry. By embedding a YouTube video, we instantly elevate the quality of our presentation. Whether it’s for educational purposes or a business pitch, this simple method can make a significant difference in how our message is received. And trust me, it’s easier than you might think!
- 1.1 Incorporating Multimedia Elements
- 1.2 Optimizing Videos for Viewer Engagement
- 1.3 Effective Use of Internet Resources
- 1.4 Designing for Audience Interaction
- 2.1 Structuring Your Slide Deck
- 2.2 Employing Effective Transition Techniques
- 2.3 Leveraging PowerPoint’s Advanced Features
- 3.1 Using the Insert Tab for Online Videos
- 3.2 Troubleshooting Common Video Playback Issues
- 4.1 Understanding Video Formats and Compatibility
- 4.2 Adjusting Playback Settings for a Smooth Experience
Creating Engaging Presentations with PowerPoint
Creating engaging presentations with PowerPoint is about combining multimedia elements with strategic design to connect effectively with your audience. Thoughtful use of videos, properly optimized, can significantly enhance the viewer’s experience and drive your message home.
Incorporating Multimedia Elements
We all know that an engaging PowerPoint presentation often goes beyond text and images. Including multimedia elements like YouTube videos can make your slides more dynamic and interactive. Videos offer a break from static text while providing visual and auditory stimulation.
One way to incorporate multimedia is by embedding YouTube videos . This ensures the presentation remains seamless without needing to exit PowerPoint. Simply navigate to the Insert tab, select Online Video , and paste your video link. Adjusting the size and placement of the video ensures it blends well with other content.
Optimizing Videos for Viewer Engagement
Embedding videos is a start, but optimizing those videos is crucial for engagement. We should consider the start and end times to focus on the most relevant content. This keeps your message concise and impactful.
Think about the settings too. Autofill the video to play automatically or set it to start with a cursor click. This lends you control over how and when the video commences. Ensuring the video is of high quality without buffering issues is also paramount, requiring a stable internet connection.
Effective Use of Internet Resources
The internet is an endless resource for enriching our presentations. Aside from embedding YouTube videos , using online images, graphs, and templates can make a presentation more informative and engaging. Leveraging these resources saves time while enhancing the quality.
For instance, websites like Unsplash and Pexels provide high-resolution images for free. Integrating tools and plugins like Poll Everywhere for live audience polling can also foster interaction. Citing resources effectively ensures the credibility of the information shared.
Designing for Audience Interaction
Designing a presentation isn’t just about visuals; it’s about interaction. Engaging the audience keeps them invested. Consider using interactive elements like quizzes or Q&A sections within your slides. This promotes an interactive environment.
Use animations sparingly to highlight key points without overwhelming the audience. A clear and clean design keeps attention focused on the message. When sharing the presentation, providing a share button or easy-access links allows the audience to revisit your content effortlessly.
Crafting outstanding presentations involves these tactics to ensure that your slides are not just visually appealing but also resonate with your audience, maximizing engagement and retention.
Mastering Slide Management and Organization
By optimizing our slide management, we can create an engaging, professional look for our PowerPoint presentation. This section covers essential techniques for structuring slides effectively, using transitions, and leveraging advanced features.
Structuring Your Slide Deck
A well-structured slide deck is essential for conveying our message clearly. We start by establishing a logical flow:
- Introduction: Welcome and set the stage.
- Main Content: Present data, insights, and analysis in a sequence.
- Conclusion: Summarize and call to action.
Organize slides to build smoothly between ideas, ensuring each slide supports the core message.
Using bullet points and succinct text enhances readability and retention. Besides, incorporating headings and subheadings provides structure, guiding our audience through the presentation. We keep slide titles consistent and use formatting to highlight key points.
Employing Effective Transition Techniques
Transitions can add a polished feel to our presentation when used effectively. They should be smooth and purposeful, not distracting.
- Fade: Perfect for a subtle, professional touch.
- Push: Useful for introducing new sections.
- Wipe: Gives a sense of continuation.
We balance transitions to maintain engagement without overwhelming the audience. Animations enhance the flow but keeping them simple and relevant is key. Customizing the duration can make transitions feel seamless and natural.
Leveraging PowerPoint’s Advanced Features
PowerPoint offers advanced features that can boost our presentation significantly. Embedding multimedia like YouTube videos can captivate our audience.
| Insert process charts, cycles, hierarchies | Visualize complex ideas | |
| Uniform style and layout | Consistent design | |
| Animate objects and text | Enhance delivery |
Adjusting these elements adds a professional touch and keeps the audience engaged without being gimmicky.
By mastering these aspects of slide management and organization, we can create compelling and effective PowerPoint presentations that leave a lasting impression.
Embedding Online Videos in PowerPoint
Embedding online videos into PowerPoint presentations can enhance your message, making your content more engaging and dynamic. We’ll explain how to use the Insert tab to add online videos and share troubleshooting tips for common playback issues.
Using the Insert Tab for Online Videos
To embed a YouTube video, first, copy the URL of the video you want to include. Navigate to YouTube, find your video, and click on the Share button below the video player. Copy the provided URL.
Next, open your PowerPoint presentation and select the slide where you want to insert the video. Click on the Insert tab in the ribbon. Within this tab, find the Media group and select Online Video .
A dialog box will appear, prompting you to paste the video URL you copied. Paste the URL and click Insert . The video should now be embedded in your slide. This method allows the video to be played directly within your presentation, ensuring a seamless experience for your audience.
Troubleshooting Common Video Playback Issues
Sometimes, embedded videos might not play as expected. Here are a few common issues and solutions:
- Black Box Instead of Video: This often occurs if there’s a poor internet connection . Make sure you’re connected to a reliable network.
- Video Not Playing at All: Check to ensure the video URL is correct and the video’s privacy settings allow for embedding. Also, verify that your PowerPoint is up to date.
- Playback Lag or Buffering: Ensure your connection is stable. Try preloading the video before your presentation starts.
- No Sound: Double-check the volume settings on your device and within the video itself.
If issues persist, consider downloading the video and embedding it as a local file instead. This can prevent dependence on internet connectivity during your presentation.
By understanding these troubleshooting tips, you can ensure your embedded videos play smoothly, enhancing the overall effectiveness of your PowerPoint presentations.
Technical Aspects of Video Integration
Embedding a YouTube video in PowerPoint involves understanding the right video formats and compatibility aspects, along with adjusting playback settings for an optimal experience.
Understanding Video Formats and Compatibility
When it comes to embedding videos, compatibility is key. PowerPoint supports various video formats such as MP4, AVI, MOV, and WMV. Among these, MP4 is typically the most compatible due to its wide-ranging support across devices and software.
Using valid URLs from YouTube or an embed code lets our video play directly on the slide. However, we need to ensure our PowerPoint and system can support embedding and streaming online videos. Older PowerPoint versions might not support certain formats or streaming capabilities, so keeping software updated is vital.
Some basic steps include:
- Extract the video URL from YouTube.
- Navigate to the Insert tab in PowerPoint.
- Select Online Video and paste the URL.
- Resize and place the video on the slide as needed.
Adjusting Playback Settings for a Smooth Experience
Once the video is embedded, adjusting playback settings can significantly enhance our presentation. We can set videos to autoplay or start when clicked. Also, adjusting the start time and volume can cater to specific sections of the video or audience preferences.
For instance, tweaking the start time ensures the most relevant content displays immediately. We can also set the video to start full-screen, providing a more immersive experience.
Key settings to consider:
- Autoplay: Automatically start the video when the slide appears.
- Start Time: Specify when the video should begin.
- Volume Controls: Adjust the default volume level.
- Full-Screen Mode: Enable the video to play in full-screen for better visibility.
Managing these playback settings properly ensures that our video runs seamlessly during the presentation, adding value without distracting from the main content.
Related posts:
- How to Do Hanging Indent on PowerPoint: Step-by-Step Formatting Guide
- How to Crop a Picture into a Circle in PowerPoint: A Step-by-Step Guide
- How to Copy a Slide from One PowerPoint to Another: A Step-by-Step Guide
- How to Save PowerPoint as Video: Step-by-Step Guide for Beginners
- How to Make a Picture a Circle in PowerPoint: Step-by-Step Guide
- How to Print Notes in PowerPoint: A Step-by-Step Guide
- How to Add Narration to PowerPoint: Step-by-Step Guide for Effective Presentations
- How to Insert PDF into PowerPoint: A Step-by-Step Guide for Seamless Integration
- How to Play PowerPoint Slides Automatically Without Clicking: Step-by-Step Guide
- How to Embed Excel into PowerPoint: A Step-by-Step Guide
- How to Add Hyperlink in PowerPoint: A Step-by-Step Guide
- How to Do a Voice Over on PowerPoint: Easy Steps for Professionals
Leave a Comment Cancel reply
Save my name, email, and website in this browser for the next time I comment.
Your current User-Agent string appears to be from an automated process, if this is incorrect, please click this link:
PPT Converter
CloudConvert is an online document and presentation converter. Amongst many others, we support PDF, PPTX, PPT, ODP. Thanks to our advanced conversion technology the quality of the output will be exactly as good as if the file was saved through the latest Microsoft Office 2021 suite.
capture website as
Create archive.
PPT is a presentation file format associated with Microsoft Power Point. This file extension can contain text, data, charts, diagrams, music and some other multimedia files. Although it is associated with Microsoft Office, it can be run on Open Office also.
Convert from PPT
- PPT to HTML
- PPT to PPTX
Convert to PPT
- NUMBERS to PPT
- PAGES to PPT
- POTX to PPT
- PPSX to PPT
- PPTM to PPT
- PPTX to PPT
+200 Formats Supported
CloudConvert is your universal app for file conversions. We support nearly all audio, video, document, ebook, archive, image, spreadsheet, and presentation formats. Plus, you can use our online tool without downloading any software.
Data Security
CloudConvert is ISO 27001 certified and has been trusted by our users and customers since its founding in 2012. No one except you will ever have access to your files. We earn money by selling access to our API, not by selling your data. Read more about that in our Security Overview .
High-Quality Conversions
Besides using open source software under the hood, we’ve partnered with various software vendors to provide the best possible results. Most conversion types can be adjusted to your needs such as setting the quality and many other options.
Powerful API
Our API allows custom integrations with your app. You pay only for what you actually use, and there are huge discounts for high-volume customers. We provide a lot of handy features such as full Amazon S3 integration. Check out the CloudConvert API .

Cloud Storage

Custom Business Email

Video and voice conferencing

Shared Calendars

Word Processing

Spreadsheets
Presentation Builder

Survey builder

Google Workspace
An integrated suit of secure, cloud-native collaboration and productivity apps powered by Google AI.
Tell impactful stories, with Google Slides
Create, present, and collaborate on online presentations in real-time and from any device.
- For my personal use
- For work or my business

Jeffery Clark
T h i s c h a r t h e l p s b r i d g i n g t h e s t o r y !

E s t i m a t e d b u d g e t

Make beautiful presentations, together
Stay in sync in your slides, with easy sharing and real-time editing. Use comments and assign action items to build your ideas together.

Present slideshows with confidence
With easy-to-use presenter view, speaker notes, and live captions, Slides makes presenting your ideas a breeze. You can even present to Google Meet video calls directly from Slides.

Seamlessly connect to your other Google apps
Slides is thoughtfully connected to other Google apps you love, saving you time. Embed charts from Google Sheets or reply to comments directly from Gmail. You can even search the web and Google Drive for relevant content and images directly from Slides.

Extend collaboration and intelligence to PowerPoint files
Easily edit Microsoft PowerPoint presentations online without converting them, and layer on Slides’ enhanced collaborative and assistive features like comments, action items, and Smart Compose.

Work on fresh content
With Slides, everyone’s working on the latest version of a presentation. And with edits automatically saved in version history, it’s easy to track or undo changes.

Make slides faster, with built-in intelligence
Assistive features like Smart Compose and autocorrect help you build slides faster with fewer errors.

Stay productive, even offline
You can access, create, and edit Slides even without an internet connection, helping you stay productive from anywhere.
Security, compliance, and privacy

Secure by default
We use industry-leading security measures to keep your data safe, including advanced malware protections. Slides is also cloud-native, eliminating the need for local files and minimizing risk to your devices.
Encryption in transit and at rest
All files uploaded to Google Drive or created in Slides are encrypted in transit and at rest.
Compliance to support regulatory requirements
Our products, including Slides, regularly undergo independent verification of their security, privacy, and compliance controls .
Private by design
Slides adheres to the same robust privacy commitments and data protections as the rest of Google Cloud’s enterprise services .

You control your data.
We never use your slides content for ad purposes., we never sell your personal information to third parties., find the plan that’s right for you, google slides is a part of google workspace.
Every plan includes

|
|
| $12 USD info Or $14.40 per user / month, when billed monthly
|
|---|---|---|
| content creation | done | done |
| Secure cloud storage | 15 GB per user | 2 TB per user |
| remove | done | |
| Secure email | done | done |
| remove | done | |
| Video and voice conferencing | 100 participants | 150 participants |
| remove | done | |
| Centralized administration | remove | done |
| remove | done | |
| Self-service online and community forums | 24/7 online support and community forums |
Collaborate from anywhere, on any device
Access, create, and edit your presentations wherever you are — from any mobile device, tablet, or computer — even when offline.

Get a head start with templates
Choose from a variety of presentations, reports, and other professionally-designed templates to kick things off quickly..

Photo Album

Book Report

Visit the Slides Template Gallery for more.
Ready to get started?
Creating a Radial Chart in PowerPoint: A Step-by-Step Tutorial

Creating visually appealing presentations is key to engaging your audience. Luckily, PowerPoint offers many tools to convey your message effectively. Today, let's explore one of these tools: the radial chart .
Radial charts stand out for their originality and unique visual appeal compared to other charts. The cool rounded format not only captures the audience's attention but also leaves a lasting impact.
Ready to level up your data presentation game? Follow this step-by-step tutorial to create a radial chart in PowerPoint and present your data like a pro!

Today, we'll cover the following topics:
What is a Radial Chart?
Donut chart vs. radial bar chart vs. pie chart, how to make a radial chart in powerpoint, free ppt radial chart templates, looking for more effective presentations 24slides is the answer.
A radial chart displays data in a circular layout, starting from the center. This means it can take many shapes . According to Tableau's blog , there are two common types of radial charts: donut and sunburst charts.
A donut chart is a pie chart with a hole in the middle. On the other hand, a sunburst chart shows connections across multiple levels of categories.
Another common chart you'll find when searching online for radial charts is the radial bar chart . A great way to compare categories with circular bars instead of the classic horizontal bars.
Although all these charts look similar, each has unique features that make them better for different data types.
The next section will review the differences between the most common radial charts. In the meantime, here's a classic radial chart example: a donut chart.

I’ve already defined that a radial chart can take many shapes. But, among so many options, which one should I choose?
To help you, I’ll differentiate between the main types of radial charts: donut chart, radial bar chart, and pie chart. Are they really the same? The short answer is... not exactly.
After researching and consulting with our expert designer, Carmen Navarrete , these are the differences:
A donut chart has one layer of information, which is helpful for simple comparisons. A radial bar chart, on the other hand, has multiple layers for detailed comparisons with subcategories. In contrast, a pie chart has no layers and consists of sections.
While they might seem similar, it's key to remember that they're not the same technically. This visual comparison will be helpful to you:

We already know what a radial chart is and the differences between its types. So, let's create a radial chart from scratch in PowerPoint. Let's walk through the easiest way to do it, step by step.
This chart overlays a pie chart and a donut chart. This allows for comparing two sets of proportions or displaying additional information in a compact and visually appealing manner.
Making the outer body of your radial chart
Add a partial circle.
- Choose the slide for the radial chart and go to the Insert tab.
- Next, click on Shapes > Basic shapes > Partial Circle .

- Click and drag to draw the pie. Holding Shift to keep its proportions.
- To change the style, go to Shape Fill and pick your favorite color.
For a minimalist look, remove the borders by selecting "No Border" in the Shape Outline options.

Adjust the size of the pie chart
- Click the shape to resize your pie chart, and a selection box with dots will appear.
- Select and drag any of the yellow dots to adjust the size of your shape.

Duplicate the pie chart
- After resizing the shape, copy and paste it (Ctrl C + Ctrl V or Cmd C + Cmd V on a Mac).
- Next, place the duplicate over the original and use the red guidelines to align them correctly.
Change the color and rotate the duplicate chart
- To differentiate it, click on it and navigate to the Shape Format tab . Choose Shape Fill and select a specific color.

- Once you have both pie charts lined up, click the rounded arrow at the top. Next, rotate the duplicate pie chart.

Resize the duplicate chart
- Move the copied radial chart away from the original. Use the yellow handles to resize it to look like a piece of pie with some space. Make sure the two charts are parallel.

Creating and styling the inner body
Create the first inner circle.
- Duplicate the first pie chart (the blue one) and change its color to light blue (like the example) to differentiate. To do this, choose the Shape Fill option.
- Then, make it smaller than the original. To ensure it looks good, adjust it directly over the original.

Create the second Inner Circle
- For this step, duplicate the second pie chart (the light blue) and change its color to blue (like the example) to differentiate .
- Then, make it smaller and adjust it until it looks good.

Inserting data labels and text
Create data labels.
You need to label each section's meaning.
- Go to the Insert tab, then select Shapes . In the rectangles section, select the rounded rectangle option.
- Drag the rectangle where you want your label.
- Repeat the process , changing the second color’s rectangle to light blue (in this example).

Insert text in labels
- Just double-right-click on the rounded rectangles we created earlier and start typing.
- To customize the text style, select the text and utilize the formatting tools that appear.

Link the labels to the radial chart
To connect the radial bar chart labels, you need to add lines.
- Click on the Insert tab > Shapes > Lines. Next, draw a line connecting your label to the chart.
- For this step, you will need to draw multiple lines.

Change lines color
- To change the line's color, click on it and go to the Shape Format tab.
- Next, choose the Shape Outline option. Here, choose the color that matches your radial chart. Repeat the process for all the lines.

Change lines thickness
The lines are thin by default, so make them thicker for better visibility.
- Click on the Shape Format tab > Shape Outline option > Weight option . Next, choose the weight you prefer.

Adding text
Insert titles.
- Click on the Insert tab. Next, click the Text Box button. Finally, draw a text box under each label.

Insert descriptive text
- Click on the Insert tab. Next, click the Text Box button. Finally, draw a text box under each title and start typing.
- For the last step, apply styling and make sure everything is correct.

You can add information to the inner sections if needed. This provides more context for your explanation.
And there you have it: a shiny radial chart for your presentation!
A radial chart is a simple way of displaying data in a circular format. However, mastering PowerPoint takes time and practice, especially for beginners who may find it challenging at first.
Luckily, our Templates by 24Slides platform has hundreds of free PowerPoint chart templates. You can download the donut, radial bar, and pie charts here.
All the templates are completely editable. With just a few clicks, you can create a stunning presentation. Have fun customizing them!
Just remember to ensure consistency and keep it simple. After all, knowing how to use PowerPoint charts effectively can make all the difference.
In this article, I’ve shown you why using a radial chart is a game-changer for presenting data . But if you still struggle to communicate your message effectively, you can always rely on professionals.
We are the world's largest presentation design company with 10+ years of expertise and more than 200 designers worldwide.
24Slides supports thousands of companies and professionals each month, allowing them to give powerful on-brand presentations.
You can focus on the content while 24Slides expert designers handle all the visual elements. In less than 24 hours , you'll get a standout, fully editable presentation that will impress your audience.

Ready to upgrade your PowerPoint prowess? Don't miss this content:
- PowerPoint Charts, Graphs, & Tables Made Easy | Tips & Tricks
- Mastering the Art of Presenting Data in PowerPoint
- PowerPoint 101: The Ultimate Guide for Beginners
- How to Create a Flowchart in PowerPoint
- How to Make a Timeline in PowerPoint? Step by step
Create professional presentations online
Other people also read

Tutorial: Save your PowerPoint as a Video
How To Convert Google Slides To PowerPoint and Vice Versa

How To Add Animations To PowerPoint
Free All-in-One Office Suite with PDF Editor
Edit PDFs like Word
Convert, merge, split, scan, and sign PDFs
More than PDF: Use Word, Excel, and PPT for FREE
Windows • MacOS • Linux • iOS • Android

Select areas that need to improve
- Didn't match my interface
- Too technical or incomprehensible
- Incorrect operation instructions
- Incomplete instructions on this function
Fields marked * are required please
Please leave your suggestions below
- Quick Tutorials
- Practical Skills
How to Convert PPT to PDF for Teachers
As teachers, we often find ourselves juggling countless responsibilities, from lesson planning to grading assignments. Amidst this whirlwind of tasks, converting PowerPoint presentations to PDFs can sometimes feel like an unnecessary hurdle. But trust me, I've been there, and I understand the frustration. This guide is your one-stop shop for converting PPTs to PDFs with ease, ensuring your valuable content reaches your audience seamlessly.
Reasons for Converting PPT to PDF
Let's start with a fundamental truth: PowerPoint (PPT) and PDF are like two different languages – they simply can't understand each other. Trying to open a PPT file in a PDF viewer will lead to a compatibility error.
To bridge this gap and ensure your audience can seamlessly access and engage with your presentation content, converting PPT to PDF is your secret weapon. Here's why this conversion is a game-changer for teachers:
Print Perfection:
The Advantage: PDFs are designed for printing. They guarantee that your slides and handouts look exactly as they do on your screen, with no formatting mishaps.
In the Classroom: Imagine distributing crisp, clear handouts of your lecture notes. Or picture yourself confidently presenting at a workshop with perfectly formatted materials. Converting to PDF makes this a reality, ensuring your printed materials look professional and polished.
Presentation Prowess:
The Advantage: PDFs are the universal language of document sharing. They maintain consistent formatting across different devices and software, eliminating the dreaded "it looks different on my computer" issue.
Sharing with Confidence: Whether you're emailing lesson materials to students or sharing presentation slides with colleagues, PDFs ensure that everyone sees the same high-quality visuals and layout, regardless of their device or operating system.
Universal Compatibility:
The Advantage: PDFs are universally compatible, meaning they can be opened and viewed on virtually any device with a PDF reader.
Reaching Every Student: This is a game-changer in today's diverse classrooms. Students can access PDF presentations on their laptops, tablets, or smartphones, ensuring that everyone stays on the same page, no matter their device preference.
Converting PPT to PDF Online Using WPS PDF Tools
Converting PowerPoint presentations to PDF format is made easy and convenient with WPS PDF Tools. This online tool provides a simple and efficient way to convert your PPT files to PDF, and the best part is, it's completely free. Follow these step-by-step instructions along with images to convert your PPT to PDF effortlessly:
Step 1: Access WPS PDF Tools Visit the WPS PDF Tools website by clicking on the following link: WPS PDF Tools
Step 2: Upload Your PPT File Once you're on the WPS PDF Tools website, you'll see a clear interface with a "Choose File" button.
Step 3: Convert to PDF After the file has finished uploading, simply click on the "Convert" button. WPS PDF Tools will then process your PPT file and convert it into a PDF format.
Step 4: Download Your PDF Once the conversion process is complete, you'll be provided with a download link for your newly converted PDF file. Click on the "Download" button to save the PDF file to your computer.
Step 5: Enjoy Your Converted PDF Congratulations! You've successfully converted your PowerPoint presentation to PDF format using WPS PDF Tools. You can now use your PDF file for printing, sharing, or any other purposes you may have.
By following these simple steps, you can quickly and efficiently convert your PPT files to PDF format using WPS PDF Tools, all for free. Say goodbye to compatibility issues and hello to seamless document conversion.
Converting PPT to PDF on Desktop or Mobile
For those who frequently need to convert PowerPoint presentations to PDF, WPS Office proves to be an excellent choice. Whether you're working on a desktop or mobile device, WPS offers seamless conversion capabilities. Let's explore how to convert PPT to PDF using WPS Office on both desktop and mobile platforms:
If you're using a Windows or Mac desktop, WPS Office software provides an efficient solution for converting PPT to PDF. Follow these simple steps:
Step 1: Open Your Presentation
First, open WPS Office on your desktop. Navigate to the presentation you want to convert by clicking on the 'Open' button or by selecting the file from the 'Recent Documents' section.
Step 2: Access the Export Option
Once your presentation is open, go to the 'File' menu located at the top-left corner of the screen. This will open a dropdown menu with several options.
Step 3: Select 'Export to PDF'
In the dropdown menu, look for the 'Export to PDF' option. This might be under a sub-menu such as 'Export' or 'Save As', depending on the version of WPS Office you are using.
Step 4: Configure PDF Settings
After selecting 'Export to PDF', a new window will appear, allowing you to customize various settings for your PDF file. Here are some key settings you might consider adjusting:
Range: You can choose to export the entire presentation or only specific slides by specifying a range.
Output Format: Ensure the format is set to PDF.
Options: Depending on your needs, you can tweak additional settings like including or excluding hidden slides, exporting only notes, or adjusting the resolution for images.
Step 5: Choose the Destination Folder
Decide where you want to save the PDF file. You can navigate through your computer’s directories to select the desired folder. Make sure to give your file a recognizable name to avoid any confusion later.
Step 6: Export the File
Once all settings are configured, click on the 'Export' or 'Save' button. The conversion process will begin, and within a few moments, your PDF file will be ready in the chosen directory.
For users on the go, whether you have an Android or iOS device, the WPS Office app offers convenient conversion capabilities. Follow these steps to convert PPT to PDF on your mobile device:
Open the WPS Office app on your mobile device. Navigate to and open the PowerPoint presentation you want to convert.
Tap on the 'Tools' or 'Menu' icon, typically found in the bottom or top corner of the screen (it often looks like three dots or lines).
Step 3: Select Export to PDF
From the menu that appears, select Output as PDF.
Step 4: Export the File
Tap the 'Export' or 'Save' button. The app will convert your presentation to a PDF and save it in the chosen location.
By following these straightforward steps, you can effortlessly convert PPT to PDF using WPS Office on both desktop and mobile devices, ensuring compatibility and ease of use wherever you go.
Use Word, Excel, and PPT for FREE, No Ads.
Edit PDF files with the powerful PDF toolkit.
Microsoft-like interface. Easy to learn. 100% Compatibility.
Boost your productivity with WPS's abundant free Word, Excel, PPT, and CV templates.
Easy Conversion of Documents with WPS Office
WPS Office not only excels in converting PowerPoint presentations to PDF but also provides seamless conversion for a wide range of document formats. With its intuitive interface and powerful features, WPS Office ensures that your documents are easily accessible and compatible across platforms. Plus, WPS documents are fully compatible with Microsoft Office formats, eliminating any compatibility concerns.
Example Converting Word to PDF : Converting Word documents to PDF format is a straightforward process with WPS Office. Follow these steps:
Step 1: Open Your Document: Launch the WPS Office app and locate your Word document.
Step 2: Access Export Option: Look for the export function, usually denoted by an arrow or labeled "Tool”
Step 3: Select PDF Format: Choose "PDF" as the output format from the menu.
Step 4: Configure Settings (Optional): Adjust any additional settings if needed, such as layout or security.
Step 5: Choose Destination: Select where you want to save the PDF file.
Step 6: Convert and Save: Initiate the conversion process. Once done, confirm the PDF is saved correctly.
With WPS Office, converting documents to PDF format and ensuring compatibility across platforms has never been easier. Whether you're a teacher, student, or professional, WPS Office provides the tools you need to streamline your document conversion tasks and enhance productivity.
Perfecting Your PDF with WPS AI.
In the realm of education, leveraging the full potential of PDF documents is crucial for educators aiming for excellence in their instructional materials and administrative tasks. With WPS AI at your disposal, enhancing and perfecting your PDFs becomes not just a possibility, but a seamless reality tailored to meet the unique needs of teachers. Let's explore some of the recommended features of WPS AI PDF specifically designed for educators:
1. Rapid Summarization For Lesson Plans: WPS AI PDF offers a powerful feature that swiftly summarizes documents such as lesson plans. By condensing lengthy content into concise summaries, this feature saves time and enhances efficiency for teachers.

2.Keyword Extraction For Study Guides: The AI-powered keyword extraction feature efficiently extracts terms and concepts from study guides. This aids teachers in identifying and emphasizing essential points for student comprehension,ultimately facilitating effective teaching and learning.

3. Enhanced Search For Curriculum: With advanced search capabilities, WPS AI PDF enables teachers to quickly locate specific content within curriculum documents. This feature streamlines the process of finding relevant information, allowing educators to focus more time on teaching and less time on searching.

4.Seamless Conversion for Classroom Materials: WPS AI PDF seamlessly converts teaching materials such as presentations, handouts and worksheets to PDF format while preserving formatting and quality. This ensures that educators can create professional-looking classroom materials with ease.
By using WPS AI PDF, educators can greatly improve how they manage and prepare documents, which in turn enriches the teaching and learning experience. With a range of advanced features designed specifically for educators, WPS Office is an essential tool for streamlining educational workflows and achieving academic excellence. Keep in mind that some of these features are exclusive to Pro and Ultimate versions.
Q1. How can I Save PowerPoint Presentations as PDF files?
You can save your PowerPoint presentation as a PDF by clicking on "File" > "Save As" > Selecting "PDF (*.pdf)" from the dropdown menu and then clicking "Save".
Q2. How can I Convert PowerPoint to PDF and Video?
To convert your PowerPoint to PDF, follow the same steps as saving as PDF. To convert to video, click on "File" > "Export" > "Create a Video", select your options, and click "Create Video".
Converting PPT to PDF is an essential skill for teachers in today's digital age. Whether you're using free online tools like WPS PDF Tools or the versatile WPS Office software, the process is simple and efficient. By converting your PowerPoint presentations to PDFs, you ensure compatibility, accessibility, and professional presentation of your educational materials. And with the added power of WPS AI, you can take your PDFs to the next level, optimizing them for both instructional and administrative purposes.
- 1. Delete Pages from PDF for Teachers
- 2. How to Compress PDF [For Teachers]
- 3. How to Edit a PDF [For Teachers]
- 4. How to Create a Fillable Form in Word [For Teachers]
- 5. How to Convert PDF to Word [For Teachers]
- 6. 10 Professional Teaching Presentation Examples for Teachers Teach with Ease and Style!
15 years of office industry experience, tech lover and copywriter. Follow me for product reviews, comparisons, and recommendations for new apps and software.
COMMENTS
Microsoft PowerPoint has a built-in feature that enables you to record ... Learn how to use PowerPoint to make your own YouTube videos or other types of videos.
In this step-by-step tutorial, learn how to upload a PowerPoint presentation to YouTube. We start with enabling the recording tab so you can prepare your Pow...
Here's how to convert your presentation to a video. 1. Click the File tab on the PowerPoint (2010 version or later) 2. Click the Export tab. 3. Click Create a Video from the list of options. You can tweak some of the settings, including slide durations, video resolution, and narrations.
To convert a PowerPoint presentation to a video, follow the 4 simple steps. Step-1: Click on the "File" tab. In the PowerPoint presentation file, you have to first open the "File" menu. To do so, click on the "File" tab in the menu ribbon located at the top of the screen. Step-2: Click on the "Save As" option.
On the File menu, select Save to ensure all your recent work has been saved in PowerPoint presentation format (.pptx). Select File > Export > Create a Video. (Or, on the Recording tab of the ribbon, select Export to Video .) In the first drop-down box under the Create a Video heading, select the video quality you want, which pertains to the ...
In the top-left corner of PowerPoint, click the "File" option. From the sidebar that opens after clicking the "File" option, select "Export." In the "Export" menu, click "Create a Video." To the right of the "Export" menu, you will now see a "Create a Video" section. In this section, you will define the options for your video file.
First, let's go over to the File tab in PowerPoint, and choose Export . Start by clicking on the File tab. Click on Create a Video to export your presentation as a video file. 2. Set How Long Each Slide Shows. In many cases you can let YouTube handle the compression. I'll leave this set to Full HD, and let YouTube handle the compression.
In this step-by-step tutorial, I show you how to turn your Powerpoint Presentation into a .mp4 or .mov video file which you can share with others, play for a...
Save all progress before exiting the program. 4. Upload your PowerPoint presentation to YouTube. After converting the presentation into a video format, sign in to your YouTube account, and click ...
Step 1: Clean Up Your Slides. If you want to give a professional finish to the video, try breathing life into the slides first. Open the file with PowerPoint 2010 and click "View," followed by "Slide Master," to apply uniformity in alignment, bullets, fonts and spacing. After saving the Master template, go to "Slide Sorter" view and ...
In the Seconds spent on each slide box, select the default time you want to spend on each slide. Select Create Video. Enter a file name and then browse to the location you want to save your video. In the Save As type box, select if you want to save the video as a MPEG-4 Video or Windows Media Video. Tip: The MPEG-4 Video format is recommended ...
Copy the address of the web page from the Address bar of your browser. Switch to PowerPoint for the web and select the slide where you want to place the video. On the Insert tab of the ribbon, in the Media group, select Online Video. In the Online Video dialog box, paste the address you copied in step 2. Select Insert.
Go to the PowerPoint slide where you want your video to be placed. Right click and Paste. Your video should now appear and play if you click on it. What kinds of videos can I use in a presentation? Videos are an amazing way to liven up your presentation. Especially when you're talking for a long time, the audience tends to get tired.
Select the slide where you want to embed the YouTube video. On the "Insert" tab, click the "Video" button. On the drop-down menu, select the "Online Video" option. The Insert Video window that appears lets you search YouTube for a video or paste in that embed code you copied from the YouTube website. Paste the embed code and click ...
Step 1: Once the software is installed, launch it and click the "Create Video"button on the homepage. Step 2: Select "Landscape"as an aspect ratio and click"Import PP."Then, drag and drop your PowerPoint presentation file. Step 3: If you want to extract the script, select the "Extract text from PPT"option.Then click the "Create Video"button.Virbo will start creating the video.
Step 1: Find the YouTube video you want to embed. Locate the YouTube video that you want to add to your PowerPoint presentation. Finding the right YouTube video is the first step. Make sure it's relevant to your presentation's content and will add value for your audience. Once you've found it, copy the URL from the address bar.
On the PowerPoint window, in the left sidebar, click the slide in which you want to add a video. At the top of the PowerPoint window, click the "Insert" tab. In the "Insert" tab, under the "Media" section (which is to the extreme right side of the interface), click "Video." You'll now see an "Insert Video From" menu.
If you want to interpret the content of a video and make a new presentation, you can use the Plus AI YouTube to PPT tool. How do I embed a YouTube video into PowerPoint? Copy the "Embed Code" from YouTube. In PowerPoint, click Insert -> Video -> Online Video -> From Video Embed Code.
Click and drag to draw a rectangle on the slide to hold the YouTube video. Go to YouTube and copy the URL of the video you want to embed. Go to the slide with ActiveX object, right click on the ActiveX object and click on "Properties". Scroll down to the Movie field and insert the copied URL. Another useful video:
Watch this video to learn how to convert your PowerPoint presentation into a video. When you make a recording of a presentation, all its elements (narration,...
Image to PPT using AI Convert Image to PPT with a single click. Click "upload Image" select your image and we will create presentation with the same. Create PPT from Image. New. →. MagicChart Create charts from text online instantly. Streamline data visualization for presentations and reports. Create Chart from Text.
How to Use. 1. Enter the URL of the YouTube video you want to convert. 2. Click the 'Extract Slides' button. 3. Wait for the conversion to complete and preview the PDF.
Embedding a YouTube video in PowerPoint can transform a dull slideshow into an engaging presentation. To embed a YouTube video, we need to first locate the video on YouTube, copy its URL, and then paste it into PowerPoint using the 'Insert' tab. It's a straightforward process that anyone can master with a bit of guidance.
Turn a spark of inspiration into personalized presentations with Copilot in PowerPoint. Copilot will turn existing Word documents into presentations, create new presentations from simple prompts or outlines, or find the best places for impactful imagery—and will help you leave audiences dazzled with skillful storytelling.
Learn how to publish your own video using Microsoft PowerPoint with narration, annotations, animations, and timings. As full disclosure, I work at Microsoft ...
PPT Converter. CloudConvert is an online document and presentation converter. Amongst many others, we support PDF, PPTX, PPT, ODP. Thanks to our advanced conversion technology the quality of the output will be exactly as good as if the file was saved through the latest Microsoft Office 2021 suite. ... We support nearly all audio, video ...
Easily edit Microsoft PowerPoint presentations online without converting them, and layer on Slides' enhanced collaborative and assistive features like comments, action items, and Smart Compose ...
Follow this step-by-step tutorial to create a radial chart in PowerPoint and present your data like a pro! Today, we'll cover the following topics: What is a Radial Chart? Donut chart vs. Radial Bar chart vs. Pie chart; How to make a Radial Chart in PowerPoint; Free PPT Radial Chart Templates; Looking for more effective presentations? 24Slides ...
Q2. How can I Convert PowerPoint to PDF and Video? To convert your PowerPoint to PDF, follow the same steps as saving as PDF. To convert to video, click on "File" > "Export" > "Create a Video", select your options, and click "Create Video". Summary. Converting PPT to PDF is an essential skill for teachers in today's digital age.
In this video, you will learn how to convert a PowerPoint presentation to a video easily with Wondershare DemoCreator. Official website: https://bit.ly/30oaQ...