

Turn your presentation into a video
When you make a recording of a presentation, all its elements (narration, animation, pointer movements, timings, and so on) are saved in the presentation itself. In essence, the presentation becomes a video that your audience can watch in PowerPoint.
So you have two options for turning your presentation into a video that's ready to view:
Save/export your presentation to a video file format (.mp4 or .wmv).
Save your presentation as a PowerPoint Show (.ppsx) file. (A PowerPoint Show appears full-screen in Slide Show, ready to view immediately.)
Save as a video file
After you've created your slides and recorded any timing and narrations and laser pointer gestures that you want to include, you're ready to create a video file.

On the File menu, select Save to ensure all your recent work has been saved in PowerPoint presentation format (.pptx).
Select File > Export > Create a Video . (Or, on the Recording tab of the ribbon, select Export to Video .)
In the first drop-down box under the Create a Video heading, select the video quality you want, which pertains to the resolution of the finished video. The higher the video quality, the larger the file size. (You may want to test them to determine which one meets your needs.)
* The Ultra HD (4K) option is only available if you're using Windows 10 or later.
The second drop-down box under the Create a Video heading tells whether your presentation includes narration and timings. (You may switch this setting if you like.)
If you haven't recorded timed narration, by default the value is Don't Use Recorded Timings and Narrations .
The default time spent on each slide is 5 seconds. You can change that timing in the Seconds to spend on each slide box. To the right of the box, select the up arrow to increase the duration, or select the down arrow to decrease the duration.
If you have recorded a timed narration, by default the value is Use Recorded Timings and Narrations .
Select Create Video .
In the File name box, enter a file name for the video, browse for the folder that will contain this file, and then select Save .
In the Save as type box, choose either MPEG-4 Video or Windows Media Video .
You can track the progress of the video creation by looking at the status bar at the bottom of your screen. The video creation process can take up to several hours depending on the length of the video and the complexity of the presentation.
Tip: For a long video, you can set it up to be created overnight. That way, it’ll be ready for you the following morning.
To play your newly-created video, go to the designated folder location, and then double-click the file.
Save as a PowerPoint Show
When someone opens a PowerPoint Show file, it appears full-screen in Slide Show, rather than in edit mode. The viewer begins watching the presentation immediately.
On the File menu, select Save As .
Choose the folder location where you want to store your PowerPoint Show file.
In the Save as type box, choose PowerPoint Show (*.ppsx) .

Select Save .
Why turn your presentation into a video?
When you want to give a high-fidelity version of your presentation to colleagues or customers (either as an e-mail attachment, published to the web, on a CD or DVD), save it and let it play as a video.
You can save your presentation as either an MPEG-4 video file (.mp4) or a .wmv file. Both formats are widely supported and can be streamed over the internet.
Some tips to remember when recording your presentation as a video:
You can record and time voice narration and laser pointer movements in your video.
You can control the size of the multimedia file and the quality of your video.
You can include animations and transitions in your movie.
Viewers do not need to have PowerPoint installed on their computers to watch it.
If your presentation contains an embedded video, the video will play correctly without your needing to control it.
Depending on the content of your presentation, creating a video may take some time. Lengthy presentations and presentations with animations, transitions, and media content will likely take longer to create. Fortunately, you can continue to use PowerPoint while the video is being created
What parts of a presentation won't be included in a video?
The following items won't be included in a video that you create using PowerPoint:
Media inserted in previous versions of PowerPoint. To include these, you can convert or upgrade the media object.
For example, if you inserted the media using PowerPoint 2007, it will be linked and it will play in the presentation. However, when you export the file as a video, the linked media will be dropped. You can convert the file to the new file format (select the File tab, and under Info , select Convert ), or you can right-click the media object and then select it to upgrade; it will embed the file and export it correctly.
QuickTime media (unless you have a third-party QuickTime codec named ffdShow installed and you have optimized for compatibility)
OLE/ActiveX controls
What to do with your video after creating it
After you create a video, you can share it with others by using the following methods:
Email your presentation to others
Save to a file share or other location
Upload it to your organization's Microsoft Stream video-sharing site , as described in the next section, "Save to a video-sharing site."
Save to the Microsoft video-sharing site
After you've created the video file, you can upload it to a video-sharing site. Microsoft Stream is an enterprise video service where people in an organization can upload, view, and share videos. Microsoft 365 business or education subscribers have access to this service from within PowerPoint for Microsoft 365.
Select File > Export , and then select Publish to Microsoft Stream .

Type a title and a description for the video.
Set other options, including whether you want others in your organization to have permission to see the video:

Select the Publish button.
The upload process can take several minutes, depending on the length of the video. A status bar at the bottom of the PowerPoint window tracks the progress, and PowerPoint shows a message when the upload is finished:

Select the message to go directly to the video playback page on Microsoft Stream.
For more information about this service, begin reading with What is Microsoft Stream? It includes information about Office 365 Video vs. Microsoft Stream.
1 The Ultra HD (4K) option is only available if you're using Windows 10 or later. 2 In PowerPoint 2016, the Ultra HD (4K) option isn't available in the Volume License edition.
When someone opens a PowerPoint Show file, it appears full-screen in Slide Show, rather than in edit mode. The viewer begins watching the presentation immediately.
Burn your presentation to a disc

Need more help?
Want more options.
Explore subscription benefits, browse training courses, learn how to secure your device, and more.

Microsoft 365 subscription benefits

Microsoft 365 training

Microsoft security

Accessibility center
Communities help you ask and answer questions, give feedback, and hear from experts with rich knowledge.

Ask the Microsoft Community

Microsoft Tech Community

Windows Insiders
Microsoft 365 Insiders
Find solutions to common problems or get help from a support agent.

Online support
Was this information helpful?
Thank you for your feedback.
How To Turn a Powerpoint Presentation Into a Video
The quick and easy was as well as expert tweaks
Powerpoint is a popular tool used to present and showcase a product or message. It comes with many layouts, themes, and tools to help you build professional presentations. What if you spend a lot of time creating a visually appealing and well laid-out presentation and you want to share it with someone who doesn’t have Microsoft Office?
The short answer is you can’t. However, if you turn it into a video it can be easily viewed by most people with an Internet connection. Another benefit of turning Powerpoint into a video is it is a great way to repurpose your content into another format. Video is quickly becoming a huge part of businesses’ digital marketing strategy.

Even though Powerpoint is not marketed as a video tool, and there are many video tools, apps, and platforms available, you might be thinking why should you use Powerpoint?
A few good reasons are:
- As mentioned above, you can’t share your presentation with someone who doesn’t have Powerpoint installed on their computer.
- You have already spent a lot of time creating a fully automated Powerpoint presentation and don’t want to start from scratch with a video.
- Video creation is not in your arsenal of skills, and you don’t want to learn how to use a new tool.
The Quick & Easy Way
If your presentation is complete with automatic timings, transitions and animations, you might be shocked to learn how easy it is to convert it into a video.
- Open your Powerpoint presentation.
- Click on File , select Save As , and from the drop-down menu, choose MPEG-4 Video (*.mp4). (available in Powerpoint 2010 and above).

Too easy? It actually is. But keep in mind this only works for presentations that are already completely set up and ready to show to viewers.
Use The Export Option
- Another way to convert to a video file is to click on File , choose Export , and click on Create a Video .

- There are a few options for you to select that will affect how your final video turns out. Start by selecting quality.

The choice you make will affect the clarity, resolution, and video file size. The higher the quality, the larger the file.
I generally use Full HD (1080p), but if you have a slow Internet upload speed or the file size is an issue, HD (720p) will also produce a high-res HD video.
Choose The Timings
The next option controls how long each slide stays on the screen or the timings of your video.

- If you choose Don’t Use Recorded Timings and Narrations , each slide will be shown for the same amount of time. When you use this option, you can select the number of seconds you want each side to stay before moving onto the next one.

- Now let’s click Create Video and save your file to your computer.

- Find the location where you saved your video and play it. It will open in your default video player or app. The slides will play for the length of time you set above.
- You may wish to do this to allow viewers to read slides with longer text. This can be accomplished by choosing a different timing setting. Select Record Timings and Narrations.

- This option enables you to customize how long each slide lasts on the video and gives you the option to record a voiceover. If you want to record a voiceover, you have several options. To change your microphone, look under settings .

- You can also include a box of yourself recording the video by selecting the Camera option from the settings shown above.
- To start your voiceover, click on the red Record button. Powerpoint will give you a few seconds to get ready while it counts down 3, 2, 1.

- While you are recording your voice, your Powerpoint is also recording the timings. The amount of time you spend on each slide before moving to the next will set the timing.
- To move to the next slide, use the arrow keys. When you get to the end, “X” out of the recording screen. You will then be taken back to the settings page with the timings you recorded.
- Click on Create Video and save it to your computer. Each slide in your video will now last as long as it took you to talk about it when recording.
How To Set Up Powerpoint Presentations With Transitions, Animations & Timings
If you would prefer to set the animations, timings, and transitions before creating the video, below are a few examples of how to do so. This way, you can use the quick and easy way to convert it into a video described above.
What Are Transitions?
Have you ever seen a Powerpoint presentation that does something flashy or catches your eye between slides? Those special effects are called transitions.
There are three categories of transitions you can choose to use in your presentation. They are:
- Subtle : Basic and simple movement from one slide to another.
- Exciting: More elaborate and more interesting than subtle.
- Dynamic: When used between two slides that are similar in layout, this transition will only move the placeholders, not the slides.

When applied in moderation, transitions can add a professional and visually appealing effect to your presentation.
If you use too many transitions, the results can be confusing, erratic, and distracting.
Apply a Transition
- Select the slide from the Slide Navigation panel where you want to apply the transition. This slide will appear after the transition you choose.
- Click on Transitions from the top navigation. Note that the default is None . Click on More or the down arrow to see all the available options.

When you click a transition, you will automatically see a preview of what it will look like if selected. You can either use the transition for a single slide or click Apply to All to use the same transition for all the slides in your presentation.

Customize The Direction Of The Transition
Each transition has different effect options.
- To choose the one you want to use, click on Effect Options , select one, and watch Powerpoint automatically show you a preview of your selection.

Change The Duration Of a Transition
- Choose the slide you want to change the time for and look for the Duration field. In this example, the side is set to 01.00 .

- Let’s increase the time to .025 to make the transition a little slower. You can choose to set the duration for the selected slide only.
- Click Apply to All to use the same transition duration for all the slides.
Add Sound To The Transition
- Click on the dropdown menu next to Sound from the top bar navigation. Choose a sound, then preview it.

- To preview the sounds, from the top bar navigation click Slide Show and then From Current Slide .

How To Move To The Next Slide
If you are doing a live presentation in front of an audience, you usually would press the spacebar or click your mouse to advance to the next slide.
However, as we are converting the presentation to a video, you want to use the Advance Slides setting to automate the process.

- Now you want to remove (deselect) the checkmark next to On Mouse Click . In the After field, enter the amount of time you want the slide to be displayed before moving onto the next one. In the example above, the slide will last 00:03.36 .
Custom Animations
Animations in Powerpoint add motion to different elements in your presentation. The purpose is to draw attention to the key points, such as specific text, shapes, tables, images, and other objects.
Using animations in Powerpoint videos makes it more engaging and exciting to watch. Some of the types of motion you can add to your slides are:
- Changing the color or size of an image or text.
- Causing an image to appear or disappear.
- Moving an object around your slide.
Add An Animation
- Start by selecting an object to animate, click on Animations , and choose an option. If you don’t see the Animation Pane , click on it to open it.

- Now click on Effect Options and choose one. Different animations have different options.

To start an animation, click on the drop-down menu next to Start and choose from one of the options below:
- On Click will start the animation when you click a slide.
- With Previous will start the animation at the same time as the previous animation on the previous slide.
- After Previous will play it immediately after the previous animation completes.
Click on Duration to set how long you want the animation to last. If you want to add a delay before an animation starts, use the Delay option.
To add more effects, click on Add Animation and choose the one you want to use. If you want to change the order an animation appears on the slide, click on the animation marker.

- Choose Move Earlier or Move Later to change the order the animation appears in the sequence.
Add An Animation To a Group
- Press control on your keyboard and select the objects you want to include in the group.
- Next click on Shape Format , then Group , and Group again.

- Then select Animations and choose the one you want to use.
Animate Text
- Highlight the text where you want to add an animation.
- Click Add Animation and choose an option. You will see it in the Animation Panel on the right side.

- The next step is to click the drop-down menu next to the animation you just added. This is another place where you can decide when you want it to start. Choose from Start On Click , Start With Previous , or Start After Previous .
- Click the drop-down again next to the text animation, and this time select Effect Options.

Here is where you will set the direction, timing, and other specific animation options.
There are a lot of special effects you can add to Powerpoint. With practice, you will be able to create an engaging presentation using automatic animations and transition timings.
Once you are finished completing the above steps, you can use the simple way described at the beginning of this content to turn a Powerpoint presentation into a video. In just a few minutes, you will have a compelling, engaging, and visually appealing video to share with others.

David has a background in small business and lives in Australia. He is a WordPress and Ubuntu Developer who enjoys design, CSS and tech tool integration. Read David's Full Bio
Read More Posts:

PPT to Video
Convert PowerPoint presentations to video online; free

Free online PowerPoint to video converter
VEED lets you convert your PowerPoint presentations to videos in just a few clicks, straight from your browser. You can even record yourself while presenting your slides using our free screen and webcam recorder.
Upload your slides and record your webcam, audio, and screen. Easily customize your layout, background, and camera feed. Add annotations, scenes, and even soundwaves for audio recordings.
How to Convert PPT to Video:

Select layout
Select from our list of layouts; in this case—Slides or Slides and Camera (you may need to click to ‘Allow’ permission to access your screen, camera, or microphone). You can record just your screen, your webcam, or both at the same time!

Start recording
Click the red button to start recording! You'll see a countdown before the recording starts. Don't worry if you mess up. You have unlimited time and unlimited retakes. You can navigate to other pages, and don't worry, you are still recording.

Review, edit, and export
You can playback your recording to review it, click ‘Share’ to share with friends and colleagues, or ‘Edit’ to edit your video (perfect for adding text, subtitles, and professional touches to your screen recording)
‘PPT to Video’ Tutorial

A slide show presentation with multiple layouts
VEED features multiple layouts that you can choose from. Select one that best suits your PowerPoint presentation needs. You can record your screen and audio at the same time, record your slides and camera or slides only. After recording, give your PowerPoint presentations a new look! Add annotations, images, text, and more. You can download your PPT presentation as an MP4 video format so you can play it in different multimedia players.

Add scenes and personalize
Our powerful PowerPoint to video converter lets you add scenes so you can easily edit each clip when you’re done recording. How does it work? It’s really simple! When you click on the Stop button while recording, VEED automatically saves that clip and you have the option to pick up where you left off by adding another “scene” or recording. This helps you manage and edit your video clips later on. Personalize your presentation even more using our full suite of video editing tools!

Create professional-looking business videos
With a lot of businesses taking their operations online, there has never been a more important time for video editing software in all industries. Our screen and slides recorder allows your team to record important business messages, explainers, presentations, and more. Share, comment, review, and collaborate with videos online—no software to download. You can even add subtitles automatically and translate them to different languages! Our automatic translation tool is available to premium subscribers. Check our pricing page for more info.

It’s super easy! Upload your PowerPoint slides to VEED and start recording. You can also choose to record your webcam while presenting your slides. Edit your recording and export it as an mp4 video!
To share the video, all you have to do is click ‘Copy Link’ and leave the Public Video toggle on. Then anyone with the link will be able to watch and comment on your video, like on google drive. (Note - they will NOT be able to edit the video. Only you will be able to edit.) You can also export your recording as MP4 and play it on Windows Media Player and other multimedia players.
Just click ‘Edit’ when the recording is finished, and you will be taken into VEED’s video editor. Here you will be able to add subtitles, text, annotations, music, sound effects, and much more. Just hit the ‘Export’ button when you’re finished, to save your new edited recording.
VEED gives you the option to record only your audio. Just select “Audio” in the layouts. If you want to record your audio with your webcam, it happens automatically! When you start using the screen recorder, you will need to click ‘Allow’ to give the recorder access to your microphone. That’s it. As soon as you start recording the video (screen, webcam, or both), the audio will also be recorded, so you can make awesome video presentations, explainer videos, team comms videos, and more!
VEED allows you to record your webcam along with your screen and audio. Just select “Screen & Webcam” when choosing a layout for your presentation recording.
VEED works with Windows and Mac. You can access our screen and presentation recorder straight from your browser. No software or plugins to install!
Discover more
- Convert Slides to Video
- PowerPoint to MP4
What they say about VEED
Veed is a great piece of browser software with the best team I've ever seen. Veed allows for subtitling, editing, effect/text encoding, and many more advanced features that other editors just can't compete with. The free version is wonderful, but the Pro version is beyond perfect. Keep in mind that this a browser editor we're talking about and the level of quality that Veed allows is stunning and a complete game changer at worst.
I love using VEED as the speech to subtitles transcription is the most accurate I've seen on the market. It has enabled me to edit my videos in just a few minutes and bring my video content to the next level
Laura Haleydt - Brand Marketing Manager, Carlsberg Importers
The Best & Most Easy to Use Simple Video Editing Software! I had tried tons of other online editors on the market and been disappointed. With VEED I haven't experienced any issues with the videos I create on there. It has everything I need in one place such as the progress bar for my 1-minute clips, auto transcriptions for all my video content, and custom fonts for consistency in my visual branding.
Diana B - Social Media Strategist, Self Employed
More than a PPT to video converter
VEED is so much more than just a free PowerPoint to video converter. It lets you do more than just record your screen and presentation slides. You can resize your screen recordings to fit any video-sharing and social media platform. You can also edit your videos—add text and captions automatically, add music, sound effects, draw on your videos, and more! Try VEED and start creating powerful business videos for your company.

Critical PowerPoint Shortcuts – Claim Your FREE Training Module and Get Your Time Back!
How to Convert PowerPoint to Video (Step-by-Step)
- PowerPoint Tutorials
- Shortcuts & Hacks
- October 22, 2019
In this article you’ll learn how to convert PowerPoint to video, and the different options you have.

While most people know how to use PowerPoint to present their products and services live, few people know how to turn a PowerPoint into a video that runs on its own.
And while that might sound complicated, it’s in fact pretty easy, as you will see below.
There are two different ways to turn your PowerPoint presentations into video, the first of which gives you the most options, as discussed below.
But before you start the conversion process, here are some thoughts about why you should consider doing it in the first place.
Why Convert PowerPoint to Video?
It keeps your presentation the way it was intended.
Exporting your presentation as a video keeps all elements safely locked in place. That way you can email it to your colleagues or clients without worrying that something will shift, or that timings be messed up.
Video is more accessible and shareable
While most people have PowerPoint on their computer, we shouldn’t assume that they do. Convert your PowerPoint to video and the receiver can open it even if they don’t have a Microsoft subscription. They will have to have a media player though!
It’s also easier to view videos on a mobile device, so busy clients can check out your presentation while on the move.
Furthermore, it’s also easier to share videos on multiple platforms. They can be posted to YouTube, on your company blog, and on social media and video sharing networks.
People love videos!
With more than 75 million people watching online videos every day across the United States alone, you know you’re onto a good thing. According to marketing gurus, just mentioning the word ‘video’ in the subject line of an email increases the click-through rate by 19%.
We human beings naturally love a good story because it conveys a message on an emotional level; and videos are very effective for storytelling, especially in contrast to written text or even images.
Since people’s decision-making process is often based on emotions, turning your presentation into a video can be very convincing.
What is an MP4?
MP4 is short for MPEG-4 Video, and is a universal video format that plays on any device.
When converting PowerPoint to video, you can choose between the MPEG-4 Video file format (MP4) or the Windows Media Video file format (WMV), as discussed below.
The two main advantages of MP4 for your videos are:
- It’s a pre-compressed and compact file type format (so it’s small)
- It plays on just about any device
When converting PowerPoint to video, I highly recommend using the MP4 format unless you have a specific reason not to.
To learn more of the advantages of the MP4 format, see this Quora thread here .
Option #1. Convert PowerPoint to video

To convert your PowerPoint presentation into a video, simply:
- Click the File tab
- Select Export
- Select Create Video
- Choose your Video Quality and Recorded Timings and Narrations (see details below)
- Click Create Video
Choose where to save the video on your computer and click Save .

As a result, your PowerPoint presentation is converted into video, based on the Recorded Timings and Narrations you selected, or the preset seconds per slide you set (all discussed below).
You can even add music and loop it throughout your video if you want to. To learn how to add music to PowerPoint, read our guide here .
Video quality
Video quality determines not only the quality of your video output, but also how large the video file will be, as you can see in the image below.

For most situations, the Full HD (1080p) is a great choice.
That said, if you are showing your video on a large overhead projector and size isn’t an issue, you can improve the quality of your video by using the Ultra HD (4K) format.
Below you can see the different video quality options you have in the Create a Video dialog box.

If file size is an issue or you are just showing your video on a smaller laptop screen, you can save a lot of space with the HD (720p) or HD (480p) formats.
HD (720p) is supported on most websites and video platforms such as YouTube and Facebook. The HD (480p ) option is the best option for mobile devices.
Setting recorded timings and narrations

Recorded Timings and Narrations are important when converting PowerPoint to video as they not only dictate how long your video will be, but determine when things happen in your presentation.
There are a variety of ways you can set yourRecorded Timings or Narrations (all detailed below), but in short, your options are:
- Automatically set how many seconds you want per slide
- Set your own Rehearsal Timings (no audio or video) by clicking through your presentation
- Narrate your PowerPoint with voice and/or video, which automatically sets the slide timings for you
If you use the Record Slide Show dialog box to narrate your entire presentation, you can simply use the Save As dialog box (discussed next) to save your PowerPoint as a video, as your narrations will take care of everything in your video.
To learn everything you need to know about narrating a PowerPoint presentation, read our guide here .
Properly using PowerPoint animations
If you have animated sequences in your presentation and are going to use a pre-set number of seconds per slide, I recommend setting all your animations to After Previous.

To set an animation to trigger automatically as your slide changes, simply:
- Select your animated object
- Open the Animations tab
- Open the Start drop down
- Select After Previous
This ensures that your animations will trigger after the previous action, whether that is an animation or advancing to the next slide.
If you leave your animations set to On Click , they can add a delay of as much as 10 seconds to your video. This is especially if you are using the second conversion method (see the section below here on saving PowerPoint as a video).
Option #2. Save PowerPoint as Video
The fastest way to convert your PowerPoint presentations into a video format, is to use the Save As dialog box.
This works best when you have narrated your PowerPoint presentation using the Record Slide Show dialog box, and just want the Full HD (1080p) quality for your video.

That’s because all of your slide timings, actions and animated sequences are saved within your narration, so all PowerPoint then has to do is save itself as a video using the default settings.
If you are not narrating your presentation, then I recommend using the first method discussed above.

To save your presentation as a video from inside PowerPoint, simply:
- Hit F12 or Ctrl + Shift + S to open the Save As dialog box
- Choose a location to save your video
- Change the file type to either MPEG-4 Video (recommended) or Windows Media Video
- Click Save
Depending on the size of your presentation, it might take a minute or two to save your presentation as a video, so just hang tight.
When it is finished, your PowerPoint will be saved as a video in the Full HD (1080p) format. If you want a different video quality, you will need to use the Create a Video dialog box (see the first method discussed above).
After you save your presentation as a video, you can then embed it in other presentation if you want to. To learn how to embed a video in PowerPoint, read our guide here .
Note: I highly recommend saving your presentation in the MPEG-4 (MP4) file format as it is more universally accepted than the Windows Media Video (WMV) file format.
How to Record and Set Timings for Your Video
When converting PowerPoint to video, the timings not only determine the length of your video, they also determine the timing in which your animated sequences are triggered.
If you have a lot of animated sequences in your presentation, I don’t recommend using a set number of seconds per slide.
That’s because you can’t control the lag between the animated sequences and your content. Instead, I recommend using the Rehearse Timings command.
Here are the 4 different ways you can set and adjust slide timings for your presentation, from easiest to slowest.
1. Set a default number of seconds per slide

To use a standard number of seconds per slide for your slide timings, simply:
- Navigate to the File tab
- Click Export
- Select Create Video
- Set the number of seconds
The more seconds you set per slide, the longer your video will be in total.
2. Set transition timings to advance your slides
PowerPoint transitions are another great way to not only make flipping between your slides less abrupt, but also to automatically advance your slides.
Using the Transitions tab, you can both set a default number of seconds for all of your slides, as well as adjust the time spent on individual slides.

For example, to set a Fade transition and slide timings of 3 seconds per slide, simply:
- Navigate to the Transitions tab
- Click the Fade transition
- Under the Effect Options , choose Through Black
- Deselect On Mouse Click
- For After , input 3 seconds (and make sure there is a check mark next to After )
- Click Apply to All
As a result, all the slides in your presentation will now have a Fade transition and will automatically advance after 3 seconds.
You can also adjust the duration of the transitions between your slides if you want to get specific, but I think the default is usually fine.
3. Use the Rehearse Timings command
If you want to control the flow of your timings by manually clicking through your presentation, you can use the Rehearse Timings command.
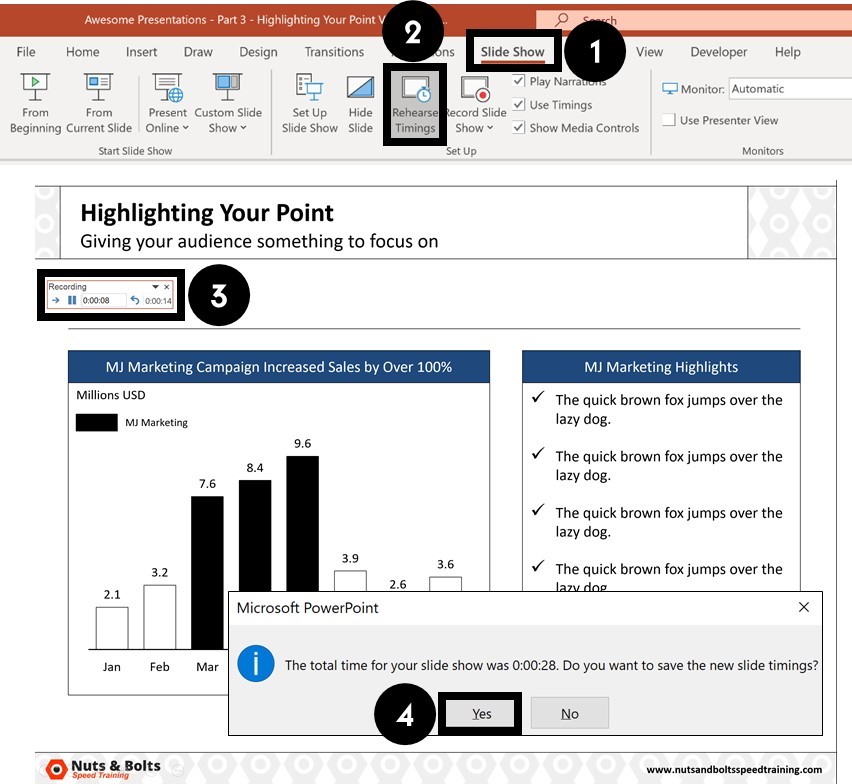
To set your slide timings with the Rehearse Timings command, simply:
- Navigate to the Slide Show tab
- Click the Rehearse Timings command
- Use the Rehearse Timings dialog box to click through your presentation
- When you are finished, click Yes to save the slide timings
Here is a quick run through of the commands on the Rehearse Timings dialog box.

Clicking Repeat starts the rehearsal timing over for the current slide you are on. That means you can restart the timing without having to start the presentation over from scratch.
4. Use the Record Slide Show command
The Record Slide Show command is the NEWEST and best way to add audio and video narrations to your presentations.
The advantage of using this tool to narrate your PowerPoint presentation, is that all of your slide timings, animations and actions are recorded for each slide.
That means you can simply use the Save As dialog box to quickly convert your narrated PowerPoint into a video.

To use the Record Slide Show command to narrate your presentation from the beginning, simply:
- Navigate to Slide Show tab
- Open the Record Slide Show drop down
- Select Record from Beginning
To learn how to use the Record Slide Show command to narrate your PowerPoint (and all the options you have), read our guide here.
Note: If you just click the Record Slide Show button (instead of opening the drop down), you will begin recording your narration from your current slide.
So that’s how to turn PowerPoint into a video, either by exporting your video using the Create a Video command, or by saving your PowerPoint presentation as a video using the Save As dialog box.
If you narrate you presentation using the Record Slide Show command, the Save As dialog box is the fastest way to turn your presentation into a video.
And while PowerPoint gives you two different video file types to choose from, I recommend using the universal MP4 video file format. That’s because it ensures that your video will play on any device (computer, tablet, or phone) that people may have.
If you enjoyed this article, you can learn more about our PowerPoint training courses and other presentation resources by visiting us here .
What’s Next?
Related articles, about the author.

This Post Has One Comment

Very useful tips. Many thanks!
Comments are closed.
Popular Tutorials
- How to Strikethrough Text (l̶i̶k̶e̶ ̶t̶h̶i̶s̶) in Word, Excel & PowerPoint
- How to Make Animated Fireworks in PowerPoint (Step-by-Step)
- Strikethrough Shortcut (l̶i̶k̶e̶ ̶t̶h̶i̶s̶) for Word, Excel & PowerPoint
- How to Create a Flash Card Memory Game in PowerPoint (Like Jeopardy)
- Keyboard Shortcuts Not Working: Solved
PowerPoint Tutorial Categories
- Strategies & Opinions
- Presentation Design
- Pictures, Icons, Videos, Etc.
- New Features
- Miscellaneous
- Charts & Data Viz
We help busy professionals save hours and gain peace of mind, with corporate workshops, self-paced courses and tutorials for PowerPoint and Word.
Work With Us
- Corporate Training
- Presentation & Template Design
- Courses & Downloads
- PowerPoint Articles
- Word Articles
- Productivity Resources
Find a Tutorial
- Free Training
- For Businesses
We help busy office workers save hours and gain peace of mind, with tips, training and tutorials for Microsoft PowerPoint and Word.
Master Critical PowerPoint Shortcuts – Secure Your FREE Training Module and Save Valuable Time!
⌛ Master time-saving expert techniques.
🔥 Create powerful presentations.
🚀 Propel your career to new heights.
We value your privacy – we keep your info safe.
Discover PowerPoint Hacks Loved by Industry Giants - KKR, AmEx, HSBC!
Over 114,880 professionals in finance, marketing and sales have revolutionized their PPT skills with our proven methods.
Gain FREE access to a full module of our premium PowerPoint training program – Get started today!
We hate spam too and promise to keep your information safe.
You are currently viewing a placeholder content from Facebook . To access the actual content, click the button below. Please note that doing so will share data with third-party providers.

How to Make a PowerPoint into a Video in Under 5 Minutes
- how to make a powerpoint into a video

PowerPoint is, by far, the most popular tool people use to make presentations , whether for school projects or work-related activities, such as staff training or pitching a product idea to investors.
PowerPoint is genuinely a great tool. It’s simple and easy to use, offers hundreds of themes, and if you spend a bit of time playing around with all the different options inside the program, you can make professional presentations that will captivate your audience.
The only issue regarding PowerPoint—more specifically, presentations in general—is the limited usability of PPT files. You can’t upload a presentation on YouTube , for example. You could technically share it on your website or on social media, but a presentation without a presenter is just a random compilation of images.
Unless the person who created the presentation takes the time to weave the story, explain all the concepts, and expand on the bullet points the audience sees on the slides, the presentation won’t have the desired impact.
Does that mean that presentations are only viable in a face-to-face setting? Not exactly. There are a number of different ways to utilize presentations, but they all involve converting the PPT file into a video .
Now, the question begs itself— how do you make a video out of a presentation?
Turn PPTs into engaging videos
With InVideo’s online editor

Creating a Video from PowerPoint
The first thing that will go through most people’s minds is a webinar. When you stop to think about it, a webinar is nothing more than a glorified presentation. Someone takes the time to record themselves as they’re going through all the different slides and explaining everything in detail.
A webinar is a rather specific form of content, and it takes a lot of time and effort to put one together and to get enough people to watch it to make it worthwhile. Unless you’re an experienced salesperson who is adamant about selling a product and firmly believes that the best way to do so is to blabber about it for two hours, you’re probably looking for a faster, less painstaking way to turn a PowerPoint into a video.
Thankfully, there are a number of different ways to do so. In fact, PowerPoint itself gives you the option to convert the presentation into a video. In this article, we’ll walk you through the entire process step by step and show you how to make a video PPT using all the different versions of the program.
How to make a video from PowerPoint?(Office 365, PowerPoint 2019, PowerPoint 2016)
Although the option is there, keep in mind that it’s not as simple as clicking a Convert to video button. You do need to record narration and laser point gestures (mouse movement on-screen) beforehand.
The reason for that is simple and technical in nature—unless you record narration and timings beforehand, PowerPoint will default to five seconds per slide when creating a video.
You can change this by clicking the upward arrow next to the Timing under the Create a Video option, but keep in mind that you’ll be adjusting the time for all slides simultaneously. There is no option to adjust how long each individual slide will appear on the screen.
If you want to use different timings per slide, as well as record narration, select the Recording option inside PowerPoint and create a video.
Here’s how you’ll enable recording inside Office 365 PowerPoint, as well as PowerPoint 2019 and 2016:
1. Click on File and select Options on the left-hand side of the screen 2. Choose Customize Ribbon (A) from the drop-down menu 3. Check Recording (B) in the pop-up window and hit OK (C)

Image source: Microsoft
You’ll see a new option appear on your screen under the Recording tab, titled Record Slide Show. Clicking on the downward pointing arrow will allow you to choose whether you want to start recording the slideshow from the start or from the slide you’re currently on.
You can also choose to record the narration as audio or video, and you will be able to leverage a variety of different tools, such as pens and markers, to highlight certain elements on your slides.
As you’re recording, the red circle next to the Record Slide Show button will be blinking, indicating that the audio and/or video is being captured. Once you go through all the slides, you can either:
- Click on the square Stop button - Press S on your keyboard.
Exporting your video
The easiest way to export the video you just recorded is to navigate to the Recording tab and select Export to Video . This will open up a new menu, and PowerPoint will prompt you to choose the video quality.
One thing to keep in mind is that the Ultra HD option is available only on Windows 10 .
Next up, you’ll need to either set the timings for the slides or select the Use Recorded Timings and Narration option.
Then, click on Create a Video , name your file, and choose where you want to save it.
Finally, select the Save as Type option and choose between two available formats:
- MPEG-4 Video - Windows Media Video
PowerPoint will start converting the slideshow into a video automatically. Depending on the video quality and length, this process might take a while, so we suggest timing it so that you don’t have to use the computer during that time. For larger, Full HD or Ultra HD videos, it’s best to keep the program running overnight.
PowerPoint 2013
One notable difference with the 2013 version of PowerPoint is that the video quality options are slightly different. Ultra HD (4K) was just entering the scene, and not a lot of people owned devices that supported the 3840 × 2160 video resolution, so it’s no surprise that the option doesn’t exist in this version.
The interface didn’t change much over the years, so if you happen to be running PowerPoint 2013, you’ll go through the exact same process as with the newer versions of the program:
1. Navigate to File , click Export , and choose to Create a Video 2. Select the resolution 3. Set timing parameters or use recorded timings and narration 4. Click on Create Video 5. Choose Save as Type and select between MPEG-4 or Windows Media Video
PowerPoint 2010
If you are still using the 10-year-old version of PowerPoint, the options for creating a video out of your slideshow will be a bit different.
The first thing to keep in mind is that PowerPoint 2010 only supports .mp4 files and that the maximum resolution for the videos is 1290 x 720, which isn’t exactly ideal. If you want to create a professional-looking video from your PowerPoint presentation to share with business partners or your audience, you might want to consider a less restrictive alternative.
Here’s how you would turn your slideshow into a video in this outdated version of the program:
1. Select Save & Send under File 2. Choose the option Create a Video at the very bottom of the right-hand side of the screen 3. Find the Create a Video tab if you want to see the available video quality options 4. Click on the downward-pointing arrow next to the Computer & HD Displays option and choose from the three available options 5. Choose between Use and Don’t Use Recorded Timings and Narration depending on whether you want to use recorded timings and narration 6. Click on Create a Video , name it, choose the destination folder, and hit Save
PowerPoint Video Drawbacks
It’s always great when you can use the same tool for various different tasks. In the case of PowerPoint, you can both create the presentation within the program and convert it into a video on the spot.
That said, PowerPoint isn’t a video editing tool . What we mean by this is that you are severely limited in terms of what you can do with the video you create from your PPT. There are no transitions, you can’t leverage fade-ins and fade-outs, and there is no music, among other things.
No matter how you look at it, the videos created through PowerPoint will be bland. PowerPoint’s PPT to video conversion might get the job done if your only goal is to share a presentation internally with your team. Even then, it only makes sense in a remote work environment, where you can’t physically hold the presentation to your coworkers.
If you’re planning on using the presentation as a core part of your marketing strategy , then the video quality—and we don’t mean the resolution here—you’ll get from PowerPoint won’t suffice. No matter how professional you sound during the narration, the videos created through PowerPoint will still give off the impression that you didn’t try all that hard.
When you see the production value of the videos that businesses share on their websites, YouTube channels , and social media, it’s painfully obvious that PowerPoint videos can’t compete. This doesn’t mean you have to spend months learning video editing or spend a small fortune hiring a professional videographer to make and edit the videos for you.
With InVideo, a powerful yet easy-to-use online video editor , you can create stunning videos from your presentations in minutes! We’ll walk you through the whole process to show you how easy it is to create breathtaking videos from presentations with InVideo .
How to make a video from a PowerPoint Presentation using InVideo?
Videos are quickly becoming an integral part of every business’s marketing strategy. Whether you’re a startup, an enterprise, a medium-size business, or a solo entrepreneur, you will need to use videos if you want to attract as much traffic to your website as possible. The same goes for influencers and bloggers—videos beat any other type of content when it comes to user engagement.
InVideo makes video editing quick, easy, and fun. Thanks to our intuitive, drag-and-drop video editor , professionally designed video templates , and an extensive library of photos and audio tracks, you can create killer videos in no time, even if you have absolutely no video editing experience.
Our platform is cloud-based, meaning you can access it from any browser on your computer and laptop. This also means that your video editing capabilities won’t depend on how powerful your machine is, meaning you can create HD and Ultra HD videos even with a low-end PC or laptop.
The best part about InVideo is the fact that you can export up to 60 videos per month for free! With our free plan , you’ll have access to all of InVideo’s features so that you can play around with all the different options and learn video editing at your own pace. We also have dozens of video editing tutorials for different use-cases, so you can get started right away.
Creating videos from photos and PowerPoint presentations is one of many things you can do with InVideo.
Here’s are the simple steps you can follow to create a stunning video from your presentation with InVideo:
Step 1: Create an account
To get started, you’ll need to create an account.
Navigate to our website and click Sign Up in the top right corner. Input your email, set up your password, and you’re good to go. We’ll never ask you for your credit card information or phone number. We won’t bombard you with emails either—we hate spam as much as you do.
Step 2: Select a Template or start from scratch
Once you log in, you’ll see several different options on the homepage:

The Pre-made Templates option will be selected by default. While there are over 5000 stunning video templates in our library, we strongly suggest that you go with the Blank Template option for this purpose.
You will be starting from scratch, but it’s not as scary as it might sound. The blank template is the most convenient option since you’ll be treating each slide as a separate scene and editing them individually. Here’s how to do it:
- Choose how long each slide appears on the screen - Add the appropriate narration - Throw in effects , filters, transitions , etc.
Step 3: Upload your media
Assuming you are the one who created the presentation, you should have all the necessary media on your device—photos, slides, and the script . To add it to the video, you’ll first need to upload it through our video editor .
From the menu on the left, select the Uploads option and click on the Upload button at the bottom of the screen.

You can upload files up to 800MB at a time. If you have all the photos neatly sorted into a folder, you can upload the entire folder in one go. All the media you upload will be available immediately to the left of your video—for this and all future projects—and you can drag and drop images to the center of the screen to add them to the timeline.
Step 4: Add the photos
Let’s start with a single scene—the intro of your presentation. Drag and drop the desired image from the Uploads library onto the screen to add it to the scene.

The video editor will show you what the image will look like in the video. When you drop the photo, you’ll need to select one of the two options:
- Replace - Add as a layer

If the slide consists of a single image, choose Replace. Since we’re not using a pre-made template here, the image you chose will replace the black background.
If you would like to add additional images on top of it—such as graphs, screenshots, product photos, or lifestyle images—drag and drop them to the center of the screen once again, but this time select the Add as a Layer option. This will put the new image on top (in front) of the background one, making the first one act as a backdrop.
Step 5: Edit the Scenes and add text
By default, scenes will be about five to six seconds long, which probably isn’t sufficient for the narration. You can edit how long each slide—referred to as a scene in the video editor—will be on the screen for on the timeline.

The image above shows the basic timeline, which is great for having an overview of all your scenes. To edit a specific scene, click on it on the timeline and select the Advanced Timeline option in the top right corner.

On the left side, you’ll see all the different elements that make up the scene. Select each one you’d like to edit, whether it’s a logo, the text, or the image itself.
The middle of the timeline is reserved for the length of the scene. To adjust how long this scene will be in the video, move the sliders left or right. The duration of the scene will always be displayed in the center.
On the right side, you’ll be able to zoom in and out, so you can edit the timeline more easily.
As far as text editing is concerned, you can do so either from the timeline or by selecting the text box on the screen. You’ll be able to drag and drop the text box to adjust the positioning, rotate the text, change the colors and font, and more. To add multiple text boxes, select the Text option from the left-hand menu and drag and drop the new box onto the screen.

Step 6: Add narration
All that’s left to do is add narration. If you’ve recorded the audio already, you can add it through Uploads , the same way you did with photos. If not, you can add a voice-over to each individual scene. Select the Add VO option and import an existing voice-over or choose to record it on the spot.

Step 7: Export the Video
After you record or upload the VO, add the photos, and edit the length of each scene, you’re good to go. You can play around with filters, effects, and transitions if you’d like, but the base video is complete and ready to be shared with the world!
All that’s left to do is to click on Export in the top right corner and wait for the video to render. After a few minutes, depending on the video’s length, you’ll be able to download it, post it on YouTube and social media, or copy the shareable link and use the video in your marketing campaigns.
Turn your PPTs into epic videos
Without spending hours on editing

That’s how easy it is to create stunning videos with InVideo. Click here to get started today for free and turn your PowerPoint presentations into breathtaking videos in no time!
Let’s create superb videos
- Stream Your Favorite Sports
- Where to Watch WNBA Games
How to Convert PowerPoint to Video
Let your presentation speak for itself
:max_bytes(150000):strip_icc():format(webp)/ScottOrgera-f7aca23cc84a4ea9a3f9e2ebd93bd690.jpg "turning powerpoint presentation into video")
What to Know
- Windows: Select File > Export > Create a Video . Choose video quality, timings/narrations, seconds per slide > Create Video . Select file type.
- Mac: Select File > Export . Choose file format, video quality, timings/narrations, and seconds per slide, then choose Export .
PowerPoint decks are great tools for showcasing and presenting a message, product, or data visualization, as viewers are more likely to digest content when it's in video format. Here's how to turn a PowerPoint into a video using PowerPoint for Microsoft 365, PowerPoint 2019, PowerPoint 2016, PowerPoint 2013, PowerPoint 2010, and PowerPoint for Mac.
How to Save PowerPoint as Video on Windows
After you create a presentation, convert your slides into attention-grabbing videos. The steps below show how to turn a PowerPoint file into a video. The result is a file that incorporates animation, narration, and other custom content included in the original PPT or PPTX file.
Follow these instructions to make a video from a PPT or PPTX file in PowerPoint on Windows operating systems:
Launch PowerPoint and open the presentation file you want to turn into a video. If that file is open, ensure that the latest version is saved by selecting File > Save or by selecting Save on the Quick Access Toolbar.
Select File > Export .
If you use PowerPoint 2010, select Save & Send .
Select Create a Video .
Choose the video quality you want to use for your video slideshow. A high-quality screen resolution results in a larger file size. A low-quality output results in a smaller file.
Specify whether or not to include recorded timings and narrations in the video. If the presentation contains timings or narrations, select Record Timings and Narrations . These narrations can include a thumbnail image of yourself, recorded on your webcam.
To specify the amount of time that each slide displays, enter the time in the Seconds spent on each slide text box.
After you make your choices, select Create Video .
In the Save As dialog box, choose a location to save your new video file and enter a filename.
Select the Save as type drop-down arrow and choose either MPEG-4 Video ( MP4 ) or Windows Media Video ( WMV ). Select Save to start the video creation process.
The progress of your video creation displays in the status bar. This may take a few minutes or up to several hours to complete, depending on the size and complexity of the video being created.
How to Save PowerPoint as Video on macOS
Follow these instructions to make a video from a PPT or PPTX file in PowerPoint for macOS.
This feature is available to Microsoft 365 subscribers who have the latest desktop version of PowerPoint.
Launch PowerPoint and open the presentation file that you want to turn into a video. If that file is open, ensure that the latest version is saved by selecting File > Save or by selecting Save from the Quick Access Toolbar.
A pop-out window appears that contains multiple options. In the File Format drop-down menu, select either MP4 or MOV .
Choose a video quality option. Those with the highest quality and screen resolutions (for example, Presentation Quality ) result in larger file sizes. A low-quality output creates a smaller file. This quality selection also dictates the video's width and height, shown below the Quality menu.
Choose whether or not to include recorded timings and narrations in the video. If available, select the Use Recorded Timings and Narrations check box to enable this content in your video.
To increase or decrease the timing for the slides, select the up or down arrow next to Seconds spent on each slide without a set timing . By default, a PowerPoint video spends five seconds on a slide before transitioning to the next slide.
Select Export .
Get the Latest Tech News Delivered Every Day
- What Is a PPTX File?
- What Is a PPTM File?
- How to Get PowerPoint on a Mac
- Create Pictures From PowerPoint Slides
- What Is a PPT File?
- How to Save Sounds From PowerPoint Slideshows
- The 8 Best Slideshow Apps of 2024
- What Is a PPSX File?
- How to Make a Slideshow on PowerPoint
- Change a PowerPoint Show File to a Work File
- What Is a PPSM File?
- How to Create Digital Photo Albums in PowerPoint
- Converting PowerPoint Slides to Word Documents
- Loop a PowerPoint Slide Show
- What Is a PPS File?
- How to Use Microsoft's Free PowerPoint Viewers
- Accessories
- Entertainment
- PCs & Components
- Wi-Fi & Networks
- Newsletters
- Digital Magazine – Subscribe
- Digital Magazine – Info
- Smart Answers
- Best laptops
- Best antivirus
- Best monitors
- Laptop deals
- Desktop PC deals
When you purchase through links in our articles, we may earn a small commission. This doesn't affect our editorial independence .
How to make a PowerPoint presentation into a video

Looking to turn your PowerPoint slides into a video? Well, you’re in luck. Microsoft PowerPoint has a built-in feature that lets you convert the presentation. This is especially useful if you want to share the presentation with someone, especially if they don’t have PowerPoint.
To get started, open the PowerPoint presentation you would like to turn into a video and click the “File” tab in the top-left corner of the window.

IDG / Marshall Gunnell
Next, click “Export” in the left-hand pane, and then select “Create a Video” under the Export options.

Now it’s time to pick the video quality and the recorded timings and narrations . There are four different options to choose from when it comes to video quality:
- Ultra HD (4K) : The largest file size available with ultra-high quality.
- Full HD (1080p) : A large file size with full high quality.
- HD (720p): A medium file size with moderate quality.
- Standard (480p): The smallest file size with the lowest quality.
Once you’ve selected the video quality, use the option below it to choose if you want to include recorded timings and narrations or not.

Next, you can adjust how many seconds each slide should be shown during the video. The default is 5 seconds. Click the up or down arrow to increase or decrease the timing by 1-second increments. When ready, click “Create Video.”

Finally, choose a location to save the video on your computer. Once selected, PowerPoint will then begin the conversion. The amount of time required to convert the presentation to video depends on the size of the presentation and the quality of the video you selected.
You can monitor the progress of the conversion at the bottom of the PowerPoint presentation. You’ll receive a notification when the conversion is complete.
Author: Marshall Gunnell
Recent stories by marshall gunnell:.
- How to add the Developer tab to the Microsoft Office Ribbon
- How to block (and unblock) someone in Gmail
- How to enable dark mode in Microsoft Office
Blog > How to convert PPT to a Video Format
How to convert PPT to a Video Format
07.20.20 • #powerpointtips.
If you want to send your PowerPoint presentation to someone or publish it on social media, it is usual to turn it into a video. But if you don´t know how this works, you are perfectly right here!
Basically, there are two different types of timings. You can choose between fixed and personalized timings. So you can also determine how long a single slide is displayed and control it yourself. The detailed instructions are explained in the following blog.
Fixed slide timings
This option sets a fixed time for all slides, for example each slide will be visible for 5 seconds before the next one is displayed. If you have included animations in your presentation and they last longer than the set duration of the slides, the animation will still be played in full length, regardless of the set duration.
Step by Step Tutorial
- Click on File and go to Export .

- Then you select Create a video , still in the File tab.

- Click on the first drop-down-menu and pick the quality you prefer - usually Full HD .

- In the second drop-down-menu below you can set if recorded timings or narrations are included in the video.

- Select the duration of the slides e.g. 5 sec and then select Create video .

- In the last step set the storage location and a file name and your PowerPoint is saved as a mp4 video file!

Custom slide timings
If you select this option, it is possible to determine your own the duration of the slides or add some extras.
- Click on the drop-down-menu and select the penultimate option called More commands .

- Click on Customize Ribbon , one above the current option.

- Go to the right windowYou and scroll down a little bit. There is the option Recording , which is the one you need to select. Go to Ok in order to confirm your setting.

- Now there is a new tab between View and Help with some handy functions you can quickly reach if you need them often.

- Here are some simple functions you can set for yourself, like if the video starts at the beginning or from the current slide or you can also insert audio or videos files and more handy stuff.

- But the special things there is, that you can customize your timings of the slides. That means there are not fix timings for each slide, just click through the slides while recording. So you have an individual tempo, you can draw sketches or determine if notes you have already written get displayed or not. If you choose in the Record Slide Show menu Record from Current Slide or the other option Record from Beginning has just one little difference.

A window will open, similar to the presenter view and you can click through your slides at your own pace and also add sketches or markers. Basically, this option is like screen recording. In the bottom bar you'll find two drawing tools with different thickness, different colors are available and also a camera with sound, so you can comment your slides for example. In the upper bar you start the recording and can also pause it if necessary. It is also possible to show or hide already written notes of a slide. With the settings on the far right you can set the camera or sound recording. In case your are unhappy with your recording of a slide - no problem at all, just remove it and try it again! If you are done, just stop the recording and export your video.
Now to the peculiar topic: How to convert my presentation into a video?
- If your are happy with your settings, go to Export to Video

- Click on the first drop-down-menu and pick the quality you prefer - usually Full HD.

- Select the duration of the slides, e.g. 5 sec .

- In the last step klick on create video and set the storage location and a file name for your video and your PowerPoint is saved as a video!

Useful Keyboard Shortcuts
How can I export a PowerPoint presentation as a video?
If you want to export your PowerPoint as a video, first go to "File" and then to "Export". Then click on "Create a Video". You can now pick the quality you prefer and set a display duration for slides. You can read a more detailed instruction and how to export slides with custom slide timings here.
Related articles
About the author.

Philipp Angerer
Philipp is a creative supporter at SlideLizard in marketing and design. There he uses his imagination and provides creative freshness, also in blog articles.

Get 1 Month for free!
Do you want to make your presentations more interactive.
With SlideLizard you can engage your audience with live polls, questions and feedback . Directly within your PowerPoint Presentation. Learn more
Top blog articles More posts

Business & Charts - Free PowerPoint Template

How to show PowerPoint slides in Portrait orientation

Get started with Live Polls, Q&A and slides
for your PowerPoint Presentations
The big SlideLizard presentation glossary
Horizontal communication.
Horizontal communication is the exchange of information between people, departments or units within the same level of an organisational hierarchy of a company.
.ppt file extension
A .ppt file is a presentation which was made with PowerPoint, that includes different slides with texts, images and transition effects.
.pps file extension
A .pps file is a slide show. They are similiar to .ppt files but they open as a slide show if you double-klick them. They later got replaced by .ppsx files.
mLearning means mobile learning, which comes from "Mobile Telephone". You can access the learning material over your mobile phone anywhere, which makes learning mobile.
Be the first to know!
The latest SlideLizard news, articles, and resources, sent straight to your inbox.
- or follow us on -
We use cookies to personalize content and analyze traffic to our website. You can choose to accept only cookies that are necessary for the website to function or to also allow tracking cookies. For more information, please see our privacy policy .
Cookie Settings
Necessary cookies are required for the proper functioning of the website. These cookies ensure basic functionalities and security features of the website.
Analytical cookies are used to understand how visitors interact with the website. These cookies help provide information about the number of visitors, etc.
The Ultimate PPT to Video Converter
Bring your presentations to life with our free ppt to video converter..

Animaker's helped over 25M+ people create awesome videos by themselves! And is trusted by some of the world's leading brands.
Animaker was voted as the No.1 Best Design Product of the World.
Boring presentations to jaw-dropping videos.
Converting a presentation to a video allows you to easily share and view the presentation on a variety of platforms & devices. This improves the overall accessibility of the presentation/video to a wider range of audiences.
Videos are known for capturing the attention of viewers more effectively than any other form of content. Hence, converting powerpoint to video leads to an overall improvement in engagement and retention of the audience.
Videos can be paused, played, and forwarded/rewound at the viewer’s own pace. This is not the case when presentations are considered. So, videos improve the way the data presented is consumed.

How to convert PPT to Video Online?

To convert your PPT to a video, create a free account on Animaker and head over to your dashboard to create a new project. Import your PPT Presentation to the project.

Once you upload your presentation, you can select the text font, apply slide transitions, and choose from various entry and exit effects to make your video stand out.

Choose from over 30K music tracks and sound effects from the massive music library. Select an apt tune that suits your presentation’s theme and apply it.

Personalize your video further by adding animated assets, custom characters & lots more, and download it.
In just three simple steps
Why Animaker’s PPT to Video converter is awesome?

Give your presentation a great personality by effortlessly adding custom characters and quirky GIFs effortlessly. This can significantly elevate your interaction with the audience.

Choose any track from over 30K music tracks and sound effects and make your presentation the most amazing one!

Record your script into a voice-over, sync it with the converted video, and play/pause it whenever you want to interact with the audience. Make your presentation 10x personalized!

Static elements are the primary reason to detest presentations! Add Entry/Exit Effects and slide transitions to transform your presentation into beautifully animated ones.

With a simple & intuitive interface, Animaker’s PPT to Video tool allows you to easily navigate through different features and turn your boring presentation into a stunning video!
With a super simple & intuitive interface, Animaker’s PPT to Video tool allows you to easily navigate through different features and turn your boring presentation into a stunning video!
Here’s what our users say

Animaker’s PPT to Video tool is a game changer for creating dynamic presentations. The ability to add animated effects, eye-grabbing transitions, and even custom characters make it stand out from the crowd. I highly recommend it.
Lillian Griffith

As a student, I have been using Animaker’s PPT to video tool for several months now. It has been an excellent tool for enhancing my boring presentations with animated elements. If you are looking for ways to hook your audience to your presentation, this is the way!
Melinda Alvarado

I recently came across Animaker’s PPT to Video tool and it has been a game changer for me when it comes to converting & creating presentations. I can turn my traditional presentation into a stunning video with a few clicks. With some customization here & there, I have a highly engaging video presentation ready for me.
Peter Colon
Frequently asked questions.
So, what are you waiting for?
Are you ready to add subtitles to your video.
Convert PowerPoint to MP4
Converting ppt to mp4 has never been easier.
Are you looking for a convenient solution to convert your PowerPoint to MP4? No hassle, no extra downloads and installs? Our lightning-fast tool empowers you to save PPT as MP4 files within just a couple of clicks. Before you convert PPT to MP4, you can enhance your video by trimming, adding effects and transitions, and layering other images or even other videos. Flixier is an advanced online video editor that anyone can use, anytime, and anywhere.

Save Time As You Convert PPT to MP4
Flixier is a browser-based video editor, which means that all you need is a steady internet connection and access to your favorite browser to convert PowerPoint to MP4. Say goodbye to having to download additional applications and software barriers. Save time and storage by working directly in our powerful cloud servers as you convert PPT to MP4. It’s that easy to convert PPT to MP4 with audio, all in one tab!
Convert PPT to MP4 With Audio
Flixier is not the usual PPT to MP4 converter that you can only use to change the file format. Not only can you take advantage of our tool to record presentations, but you can also convert PPT to MP4 with audio, so you don’t miss out on speaker key points. Before you save PPT as MP4 you can also record yourself or even use the innovative and natural-sounding voice-over generator in many languages of your choice. Pretty neat, right?
Convert PPT to MP4 And Share on Socials
Great, now that you’ve converted and edited PPT to MP4 with audio effects, your presentation is a bona fide multimedia project that’s ready to see the light! Flixier’s user-friendly interface can streamline your entire creative process whether by downloading and saving the MP4 locally or in a cloud storage solution. Even better, you can share your project to your preferred social media platform directly through Flixier’s seamlessly integrated interface. It’s as easy as click & share!
Enhance and Save PPT as MP4
There’s nothing more frustrating than faded colors on a presentation video. Use Flixier’s video enhancer tool to automatically adjust brightness, contrast, saturation, or gamma values as you convert PowerPoint to MP4, and you get a professional-looking video within minutes. The live enhancement previews allow you full control over the look and feel of your presentation before you save PPT as MP4 multimedia projects.
How to convert PowerPoint to MP4?
Click on “Get Started”, then tap the "Record" button to turn your presentation into a video you can convert to save PPT as MP4. Flixier’s PowerPoint recorder works like a charm to record your decks.
Experiment with video and audio customization features before you convert your PowerPoint to MP4. Go for snappy transitions, colorful effects, and visual aiding elements to highlight information in your presentation.
Click on the “ Export” button and make sure you select “ Video” from the Format dropdown options. Flixier does its magic almost instantly and automatically produces your requested MP4 file.
Why use Flixier as a PowerPoint to MP4 converter
Convert powerpoint to mp4 for free.
The best thing about Flixier is that you can convert PPT to MP4 for free, without even creating an account! Click on ”Get Started” and jump right into editing your PowerPoint deck video. There’s also a free trial option that lets you save progress and safely store your files, so you can save PPT as MP4 and enjoy our tool’s numerous functionalities.
Add Images to Your PowerPoint
Before you convert PowerPoint to MP4 videos, you can tweak the content as you add image to video directly from Flixier. Either upload your own media or choose from the hundreds of royalty-free stock images the Flixier library boasts. Take your pick and remember that sometimes converting PPT to MP4 with audio is not enough, since you can enrich the presentation with illustrations, all in a couple of clicks.
A Top Presentation Editing Toolkit
Our online video editor boasts an impressive number of video editing functionalities to make your presentation truly stand out. Use Flixier to edit MP4 files and add motion graphics as key visual elements, subtitles, or dynamic transitions. Before you know it, the process of saving PPT as MP4 multimedia projects will have turned into a fun editing experience that will leave your peers speechless.
Save PPT as MP4 Securely
Our cloud-powered servers maintain the highest standards of security, so you can safely store your video projects. When you convert PPT to MP4 with audio files and other multimedia, the progress is automatically saved into your Flixier account, so you can relax and rely on the power of cloud storage and no longer fill up your device’s memory with “Version 5” of the same project.
What people say about Flixier

I’ve been looking for a solution like Flixier for years. Now that my virtual team and I can edit projects together on the cloud with Flixier, it tripled my company’s video output! Super easy to use and unbelievably quick exports.

My main criteria for an editor was that the interface is familiar and most importantly that the renders were in the cloud and super fast. Flixier more than delivered in both. I've now been using it daily to edit Facebook videos for my 1M follower page.

I'm so relieved I found Flixier. I have a YouTube channel with over 700k subscribers and Flixier allows me to collaborate seamlessly with my team, they can work from any device at any time plus, renders are cloud powered and super super fast on any computer.
Frequently asked questions.
Of course! You can easily save a PPT as an MP4 with Flixier, the online video editor that not only helps you record and convert PowerPoint presentations but also brings an advanced video editing suite to your fingertips.
You can make an MP4 take up less space by using Flixier’s native MP4 compressor feature. It’s available for anyone, as long as you’ve got access to an internet connection and your preferred browser.
You can convert PPT to MP4 for free using Flixier! The online video editor comes with a free trial you can take advantage of to access numerous expert editing features, as well as the possibility to edit PPTs without even creating an account. It’s as simple as that!
Need more than a PPT to Video convertor?
Edit easily, publish in minutes, collaborate in real-time, other ppt converter tools, articles, tools and tips, unlock the potential of your pc.
Guide Center
All Tutorials > Educational Resources > How to Turn PowerPoint into a Video: Resource Guide
How to Turn PowerPoint into a Video: Resource Guide
Learn how to convert your existing PowerPoint presentations into a video!
If you are getting ready to move your classes to an online environment, a simple way to get started is by converting your existing PowerPoint presentations into videos. We have some great resources to guide you through the process.
3 Ways to Turn PowerPoint Slides Into a Video
Watch this video tutorial to learn more about the different methods including strengths and weaknesses for turning your presentation into a video.
How to Record a Presentation with Webcam, Narration, and More
Get tips and recommended tools you can use to record a presentation right away. https://www.techsmith.com/blog/record-a-presentation/

Additional Resources
- Help Article: Record a PowerPoint Presentation
- Video Tutorial: PowerPoint Add-In Toolbar
- Video Tutorial: Import PowerPoint Slides
- Blog Post: Turn Your Slides into PowerPoint Videos With Editing Effects
Convert PPT to Video. PowerPoint (PPT, PPTX, PPSX) to Video Converter.
Convert powerpoint to video. ppt to mp4. ppt to video. ppsx to mp4. powerpoint to mp4. powerpoint to video., powered by aspose.com and aspose.cloud ., * by uploading your files or using our service you agree with our terms of service and privacy policy ..
Send the download link to
Press Ctrl + D to save this page as a bookmark.
We've already processed ??? files with a total size of ??? Mbytes.

How to convert PPT to video
- Click Drop or upload your files .
- Select the PowerPoint file you want to convert to video on your computer.
- Specify your preferred parameters for the conversion—the slides to be converted, duration for each slide, video resolution, transition, and audio. Or you can use the default parameters.
- Click the CONVERT button.
- Wait for your presentation to get converted to an MP4 video.
- Click the DOWNLOAD NOW button. Or you can type in an email address and click the message icon. The email address will receive a download link.
Aspose.Slides PPT to Video converter is a free online service for converting PowerPoint presentations to videos. Slides : Convert all slides in your PowerPoint to video. Or you can select specific slides or a range of slides for conversion. Slide duration : Specify the time that is spent showing each slide in the video. Video resolution : Select the resolution that determines the amount of detail in the video. If you plan to display the video on a big screen, you will do well to select HD. However, in such case, FullHD or QHD is probably even better. Transition : Select the transition that is played between slides in the video. PowerPoint transitions give life to presentations. They provide additional on-screen movement and interest for your audience. Audio : Your presentation can seem brand-new with audio. You can use the audio from the original presentation, upload your own, or select it from the drop-down option. The presentation to video converter is a free service powered by Aspose.Slides .

Aspose.Slides PPT to Video
- Convert PPT to video.
- Export PPT to video.
- Save PowerPoint PPTX and PPT as video.
- Convert presentation to video.
- Create video from PowerPoint.
- Add audio and transition effects to your video.
- Convert PPTX to MP4.
- Convert PPT to MP4.
- Convert PowerPoint to MP4.
- Download PowerPoint video. Open video. Share video.
- How do I convert PPT to video? Upload your PowerPoint presentation, specify your preferred parameters for the conversion operation or leave the default options intact, and then click CONVERT .
- What are the advantages of converting PowerPoint to video? By converting your PowerPoint to video (MP4), you end up with a more convenient file. A video is easier to share than a PowerPoint. A video can be opened on any device or platform.
- Is Aspose PPT to Video Converter free? Yes. The PowerPoint PPT to video converter is completely free to use.
- How long does it take to convert PPT to video? The time required for the PowerPoint to video export operation is dependent on the number of slides involved.
- What is the format of the resulting PowerPoint video? MP4 is the resulting format.
- How do I save my PPT as MP4? Use the PPT to Video converter on this page.
- How can I open the video created from a PowerPoint? You can open the video in any video player. The MP4 video file can be played on any laptop (Windows, Mac, Linux) or smartphone (iPhone or Android device).
- How do I save my PowerPoint as a video? Use the PowerPoint to video converter on this page.
- How do I convert PowerPoint to MP4 for free? Use the converter on this page. It is FREE.
- Are there limits on uploaded files? For a single presentation, the maximum file size is 35 MB and the maximum number of slides is 50. If you must convert a presentation that exceeds 35 MB or contains more than 50 slides, we recommend you use Aspose PowerPoint Splitter to divide the slides into multiple presentations. You can then convert the presentations you obtained individually.
Fast, Easy, and Secure Conversion
Convert from Anywhere
High Quality Conversion
Other supported conversions.
You can use other tools to convert PPT, PPTX and PPSX files. Please see the list below.
- PDF to video (PDF to MP4)
- Images to Video (Images to Video Converter)
- PowerPoint to YouTube video (PowerPoint Presentation)
- MP4 to MP3 (MP4 to MP3 Converter)
- MP4 to WAV (MP4 to WAV Converter)
- MP4 to WEBM (MP4 to WEBM Converter)
Oops! An error has occurred.
Error has been reported successfully..
You have successfully reported the error, You will get the notification email when error is fixed. Click this link to visit the forums.
� Aspose Pty Ltd 2001-2022. All Rights Reserved.
- Presentation Hacks
How To Turn A PowerPoint Presentation Into A Video
- By: Leslie Belknap
If you want to know how to turn a powerpoint presentation into a video , you’re not alone. This is a common question.
If you haven’t considered transforming your presentations into videos, you might want to give it some thought. As you will see below, the process is quite simple, and the results can be impressive.
If you created a beautiful, professional presentation, your video will also be beautiful and professional. Your video can also have the added bonus of a soundtrack and narration if you opt for those options.
When you transform your presentations into videos, you dramatically increase the potential ROI for your presentations. Your videos can be used for video marketing on Facebook, YouTube, and other video platforms. In addition, you can use your videos to educate clients, onboard new employees, or inform prospects. The sky is the limit for what you can do with your videos, and also what you can gain from the few minutes you spend transforming your presentations into videos.
The tutorial below was created using PowerPoint 2011, version 14.4.1. If you are using a different version of PowerPoint, don’t worry, there are resources that will benefit you below.
Step #1: Select PowerPoint Transitions
Customize your PowerPoint presentation video by selecting your preferred transition.
As you can see below, selecting transitions is as easy as following a few quick steps:
1. Select the transitions tab at the top of the screen.
2. Click on a transition option to preview the transition style.
3. Once you have determined your preferred transition, click on that transition before proceeding.
4. Next, select the duration for the transition by typing a length of time into the duration box at the top of the screen.
5. When using transitions, I like the transitions to transition through a black slide, especially when using my preferred transition, fade . The through black option creates a cleaner looking fade transition .
– If you want to use this transition feature, select through black from the effect options pull down menu that you can find to the right of the transition options.
6. Next, select the method for advancing slides.
– Slides can either advance after a specified period of time that you set by typing a time in the after box.
– Or, you can set a custom time by clicking the on mouse click option.
7. For most presentations, you will want your preferences to apply to all slides. If your presentation falls into this category, select the all slides option in the right, upper corner.
Step #2: Narration & Custom Timing (optional)
If you want to embed narration in your PowerPoint presentation video, follow the steps below.
When recording your narration, your click through rate will be recorded and utilized for the final video to keep your narration in sync with the progression of slides. If you record narration for only a few of your slides, the click through timing that you selected in Step #1 will be utilized for all slides without narration.
*Before you proceed with the following narration recording steps, move to a quiet location and plug in your best external microphone to record a high-quality narration .
1. Select the slide show tab at the top of the screen.
2. Click on record slide show .
3. Recording starts immediately so be prepared to begin your narration immediately upon clicking record slide show .
4. Once you have recored your narration, you can check the narration for each slide by clicking on the audio symbol in the bottom right corner of slides that have narration.
5. If you want to delete narration for a slide, click on the audio symbol and hit delete on your keyboard.
Step #3: Set Up Slide Show
When you set up your slide show, you have a variety of options for customizing your presentation video. Review each option carefully, and maybe even try a few experiments to ensure you get the best look for your final video.
Follow the steps below to add the final touches to your PowerPoint presentation video:
2. Click on set up show .
3. Customize the settings for your slide show.
– If you recorded narration, make sure the show without narration box is not selected.
– If you used animation, make sure the show without animation box is not selected.
– If you want to create a video with only a few slides from your deck, select your preferred slides in the slides section of the set up show settings box.
– If you set timing for slide advancement, select use timings, if present.
Step #4: Save As Movie
At this point you have made all of the difficult creative decisions. Now you get to quickly save your project as a movie and enjoy reviewing your hard work in action.
To save your presentation as a movie, follow these simple steps:
1. Select the save as movie from the file drop down menu.
2. Click on movie options from within the save box.
3. Movie options gives you the following options:
– Optimization: automatic , size , smooth playback , quality .
– Movie Dimensions: 640 x 480 is the default size; you can also set custom dimensions, or select current screen size .
– Media Settings: follow slide show settings, or none .
– Background soundtrack: if you want to add a soundtrack for your video, this is where you select your preferred background music. If you need background music, check out the YouTube Audio Library ; all music in this library is available free of charge.
– You can also choose to loop the movie and show movie player controls
4. Once you have determined all of the above settings, you can choose to apply the settings to the current presentation , or you can choose to use the settings for all new presentations .
5. Click OK and you’re done!
Everyone loves videos, even busy business executives watch online videos regularly.
75% of business executives watch at least one work-related video each week, and 54% of senior executives share at least one work-related video with colleagues every week.
You can also reach the millennial generation with video marketing. Eight out of ten millennials reference videos when researching a product or service. In addition, millennials are 85% more likely than baby boomers to purchase a product or service if they can watch a video explaining it beforehand.
The bottom line : videos are a powerful form of communication. Take advantage of your beautiful presentations and transform them into videos!
If you want to share more sophisticated videos with your clients and prospects, consider motion graphic videos. Check out the potential of motion graphic videos by viewing some Ethos3 examples here .
Additional Resources:
Marketing with Motion Graphic Design Video? 2 Tips for You.
How to Create Killer Blogs, Podcasts, Videos, Ebooks, Webinars (and More)
10 Facts About Visual Content For Digital Marketing
Office Blog: Turn your presentation into a video

Leslie Belknap
Join our newsletter today.
© 2006-2024 Ethos3 – An Award Winning Presentation Design and Training Company ALL RIGHTS RESERVED
- Terms & Conditions
- Privacy Policy
- Diversity and Inclusion
Convert PPT to VIDEO
You have the option to convert your ppt file to video, as well as a variety of other formats, using our free online converter.
How to convert ppt to video?
Upload ppt-file, select «to video», download your video file, the security of your files is our priority.
Understanding the importance of the security of our users' data, we have implemented a number of measures to ensure reliable file conversion without the risk of information leakage or privacy violations.
Data encryption
Safe storage, harmless scripts, best tool to convert ppt to video, ppt to video fast and easy, secure ppt to video conversion, no software installation required, microsoft powerpoint, faqs on ppt to video conversion, ppt converter, convert to video.
How-To Geek
6 ways to create more interactive powerpoint presentations.
Engage your audience with cool, actionable features.
Quick Links
- Add a QR code
- Embed Microsoft Forms (Education or Business Only)
- Embed a Live Web Page
- Add Links and Menus
- Add Clickable Images to Give More Info
- Add a Countdown Timer
We've all been to a presentation where the speaker bores you to death with a mundane PowerPoint presentation. Actually, the speaker could have kept you much more engaged by adding some interactive features to their slideshow. Let's look into some of these options.
1. Add a QR code
Adding a QR code can be particularly useful if you want to direct your audience to an online form, website, or video.
Some websites have in-built ways to create a QR code. For example, on Microsoft Forms , when you click "Collect Responses," you'll see the QR code option via the icon highlighted in the screenshot below. You can either right-click the QR code to copy and paste it into your presentation, or click "Download" to add it to your device gallery to insert the QR code as a picture.
In fact, you can easily add a QR code to take your viewer to any website. On Microsoft Edge, right-click anywhere on a web page where there isn't already a link, and left-click "Create QR Code For This Page."
You can also create QR codes in other browsers, such as Chrome.
You can then copy or download the QR code to use wherever you like in your presentation.
2. Embed Microsoft Forms (Education or Business Only)
If you plan to send your PPT presentation to others—for example, if you're a trainer sending step-by-step instruction presentation, a teacher sending an independent learning task to your students, or a campaigner for your local councilor sending a persuasive PPT to constituents—you might want to embed a quiz, questionnaire, pole, or feedback survey in your presentation.
In PowerPoint, open the "Insert" tab on the ribbon, and in the Forms group, click "Forms". If you cannot see this option, you can add new buttons to the ribbon .
As at April 2024, this feature is only available for those using their work or school account. We're using a Microsoft 365 Personal account in the screenshot below, which is why the Forms icon is grayed out.
Then, a sidebar will appear on the right-hand side of your screen, where you can either choose a form you have already created or opt to craft a new form.
Now, you can share your PPT presentation with others , who can click the fields and submit their responses when they view the presentation.
3. Embed a Live Web Page
You could always screenshot a web page and paste that into your PPT, but that's not a very interactive addition to your presentation. Instead, you can embed a live web page into your PPT so that people with access to your presentation can interact actively with its contents.
To do this, we will need to add an add-in to our PPT account .
Add-ins are not always reliable or secure. Before installing an add-in to your Microsoft account, check that the author is a reputable company, and type the add-in's name into a search engine to read reviews and other users' experiences.
To embed a web page, add the Web Viewer add-in ( this is an add-in created by Microsoft ).
Go to the relevant slide and open the Web Viewer add-in. Then, copy and paste the secure URL into the field box, and remove https:// from the start of the address. In our example, we will add a selector wheel to our slide. Click "Preview" to see a sample of the web page's appearance in your presentation.
This is how ours will look.
When you or someone with access to your presentation views the slideshow, this web page will be live and interactive.
4. Add Links and Menus
As well as moving from one slide to the next through a keyboard action or mouse click, you can create links within your presentation to direct the audience to specific locations.
To create a link, right-click the outline of the clickable object, and click "Link."
In the Insert Hyperlink dialog box, click "Place In This Document," choose the landing destination, and click "OK."
What's more, to make it clear that an object is clickable, you can use action buttons. Open the "Insert" tab on the ribbon, click "Shape," and then choose an appropriate action button. Usefully, PPT will automatically prompt you to add a link to these shapes.
You might also want a menu that displays on every slide. Once you have created the menu, add the links using the method outlined above. Then, select all the items, press Ctrl+C (copy), and then use Ctrl+V to paste them in your other slides.
5. Add Clickable Images to Give More Info
Through PowerPoint's animations, you can give your viewer the power to choose what they see and when they see it. This works nicely whether you're planning to send your presentation to others to run through independently or whether you're presenting in front of a group and want your audience to decide which action they want to take.
Start by creating the objects that will be clickable (trigger) and the items that will appear (pop-up).
Then, select all the pop-ups together. When you click "Animations" on the ribbon and choose an appropriate animation for the effect you want to achieve, this will be applied to all objects you have selected.
The next step is to rename the triggers in your presentation. To do this, open the "Home" tab, and in the Editing group, click "Select", and then "Selection Pane."
With the Selection Pane open, select each trigger on your slide individually, and rename them in the Selection Pane, so that they can be easily linked to in the next step.
Finally, go back to the first pop-up. Open the "Animations" tab, and in the Advanced Animation group, click the "Trigger" drop-down arrow. Then, you can set the item to appear when a trigger is clicked in your presentation.
If you want your item to disappear when the trigger is clicked again, select the pop-up, click "Add Animation" in the Advanced Animation group, choose an Exit animation, and follow the same step to link that animation to the trigger button.
6. Add a Countdown Timer
A great way to get your audience to engage with your PPT presentation is to keep them on edge by adding a countdown timer. Whether you're leading a presentation and want to let your audience stop to discuss a topic, or running an online quiz with time-limit questions, having a countdown timer means your audience will keep their eye on your slide throughout.
To do this, you need to animate text boxes or shapes containing your countdown numbers. Choose and format a shape and type the highest number that your countdown clock will need. In our case, we're creating a 10-second timer.
Now, with your shape selected, open the "Animations" tab on the ribbon and click the animation drop-down arrow. Then, in the Exit menu, click "Disappear."
Open the Animation Pane, and click the drop-down arrow next to the animation you've just added. From there, choose "Timing."
Make sure "On Click" is selected in the Start menu, and change the Delay option to "1 second," before clicking "OK."
Then, with this shape still selected, press Ctrl+C (copy), and then Ctrl+V (paste). In the second box, type 9 . With the Animation Pane still open and this second shape selected, click the drop-down arrow and choose "Timing" again. Change the Start option to "After Previous," and make sure the Delay option is 1 second. Then, click "OK."
We can now use this second shape as our template, as when we copy and paste it again, the animations will also duplicate. With this second shape selected, press Ctrl+C and Ctrl+V, type 8 into the box, and continue to do the same until you get to 0 .
Next, remove the animations from the "0" box, as you don't want this to disappear. To do this, click the shape, and in the Animation Pane drop-down, click "Remove."
You now need to layer them in order. Right-click the box containing number 1, and click "Bring To Front." You will now see that box on the top. Do the same with the other numbers in ascending order.
Finally, you need to align the objects together. Click anywhere on your slide and press Ctrl+A. Then, in the Home tab on the ribbon, click "Arrange." First click "Align Center," and then bring the menu up again, so that you can click "Align Middle."
Press Ctrl+A again to select your timer, and you can then move your timer or copy and paste it elsewhere.
Press F5 to see the presentation in action, and when you get to the slide containing the timer, click anywhere on the slide to see your countdown timer in action!
Now that your PPT presentation is more interactive, make sure you've avoided these eight common presentational mistakes before you present your slides.
A simple guide to slideshows
Learn what slideshows are, how they’re used, common features, and how to choose a slideshow maker. Get started creating your own slideshows today with Microsoft PowerPoint.
What is a slideshow?
What are slideshows used for.

Meetings and presentations
Slideshows are most frequently used to create professional presentations for business meetings, conferences, and educational purposes. A slideshow program allows people to organize content, include visuals, and enhance the overall impact of their message.

Visual storytelling
Because slideshows sequentially display engaging visuals, text, and other multimedia, they’re a strong way to tell a cohesive and compelling narrative from start to finish.

Content creation
Slideshows give content creators a versatile and efficient way to organize information, increase visual appeal, and communicate effectively across different contexts.

Photo and video sharing
Slideshow makers are popular for creating photo and video presentations, especially for events like weddings, birthdays, and vacations. People can add transitions, music, and captions to fully bring the photo-sharing experience to life.

Training and tutorials
Slideshows help break down complex information into digestible chunks with the support of visuals and text, making them ideal for instructional materials, tutorials, and training modules.

Collaborative projects
In collaborative settings, teams use slideshow makers to create joint presentations or reports. The best slideshow makers enable multiple contributors to add their content simultaneously, which helps ensure a cohesive and unified presentation.
What are the features of a slideshow creator?
Slideshow creators vary in what they offer but ideally include:
A library of templates, themes, and images.
If you’re not a designer, this feature is huge. Simply browse the options available in your slideshow maker library to create a polished, professionally designed presentation in a flash. Be sure to confirm that access to the library is free and the images are approved for unrestricted usage.
Audio and video compatibility.
Keeping your audience engaged is key to any successful slideshow presentation. To mix things up, being able to add a multimedia element—like a song or a video clip—will help people stay focused and interested.
Presentation tools.
Handy presenter tools go a long way toward making your slideshow experience seamless. For example, straightforward slide navigation, slideshow keyboard shortcuts, pen and highlighter markup, and adjustable resolution settings.
AI assistance.
With AI revolutionizing content creation, using a slideshow maker that has AI capabilities will enhance efficiency and innovation. Depending on the slideshow app you have, creating an entire slideshow could be as easy as a quick prompt, like “Make a presentation about the benefits of sustainable fashion that has 15 slides.”
Animations.
Like audio and video, animations give your audience a bit of sensory surprise that can capture their attention.
Slide transitions.
Add some pizzazz to how you change slides with visual effects like fading, wiping, and zooming.
Screen recording.
Being able to record your screen in a slideshow maker is helpful when giving an instructional talk, software demonstration, and other types of presentations that require visual aids.
A place to put speaker notes.
Having somewhere to jot a few notes down will help remind you of everything you want to cover as you present.
Different viewing options.
Looking at different views—for example, a presenter view, an audience view, and a high-level view of slide order—is useful when organizing your slideshow’s structure and understanding and preparing for what you’ll see versus what your audience will see.
How do I choose the right slideshow maker?
When choosing a slideshow maker, keep the following questions in mind to make sure you get the most for your money:
Is it scalable with your business?
As your organization grows and changes, it’s important to have flexible technology that adapts to new needs. Having certain features—such as cloud-based collaboration, compatibility with other work apps, and a mobile app—will help ensure that no matter how your business changes, the slideshow maker is up to the task. This also applies to pricing plans. Consider choosing a slideshow app that has a subscription plan (so the software is always up to date), volume-based pricing, or enterprise-level pricing.
Does it have a variety of visual elements?
It’s pretty much a given that a slideshow maker will allow you to add images, but think outside the JPEG box—what other visual elements are available to you? Features like preset themes, free templates, SmartArt, a built-in clip art library, shape tools, background styles, 3D models, and charts and graphs provide diverse ways to switch up how a slideshow looks without relying solely on adding your own images.
Is it easy to use?
You could have the most feature-rich slideshow maker on the market, but if it isn’t easy to use, you probably won’t use it. Or you will, but you’ll be frustrated, waste valuable time, and have difficulty convincing people you work with to use it. As you research slideshow makers, look for videos that show the apps’ interfaces in action to help you decide if they’re intuitive and will have a shorter learning curve.
Does it have collaboration and sharing options?
Because making a slideshow is often a collaborative effort, it’s worthwhile to find a slideshow creator that was designed with this in mind. Pick one that offers editing controls and commenting, as well as the ability to work on a slideshow at the same time as someone else. Having a cloud-based slideshow maker will be key here. You’ll not only save yourself time but also keep things simple by not having multiple versions of the same slideshow.
Explore more about slideshows and slideshow makers
Copilot in powerpoint.
Transform how you make slideshows with the versatile AI in Copilot for PowerPoint.
Improve your presenting skills
Practice presenting with an AI speaker coach to get feedback on body language, repetition, and pronunciation.
Six slideshow tips and tricks
Read up on tips about how to finesse your slideshows to give your most confident presentations.
Get free PowerPoint templates
Show your style with PowerPoint templates in more than 40 categories.
How to make a branded slideshow
Create a cohesive visual identity for your brand that goes beyond adding a logo to every slide.
Try a photo album template
Relive your favorite memories with photo album templates designed for all your unforgettable moments.
The benefits of visual aids in slideshows
Discover why using visual aids helps communicate ideas and messaging more effectively.
Slideshows that reach all learners
Explore the different ways that people learn and how to include all learning styles in your presentations.
Frequently asked questions
How do i make a good slideshow.
Making a good slideshow in PowerPoint is easy:
Plan what you’d like to include in your slideshow.
Launch your slideshow creator.
Choose the theme you’d like.
Import media.
Add text, music, and transitions.
Record, save, and share your slideshow.
Learn more about how to make a slideshow .
How do I add music to a slideshow?
To add music to a slideshow, first make sure that you’re using a slideshow maker with music compatibility. In PowerPoint, follow these steps:
Open your PowerPoint presentation and select the slide where you want to add music.
Click on the Insert tab in the ribbon menu.
Click on the Audio button and select Audio on My PC.
Browse to the folder on your computer where the audio file is located and select it.
Click on the Insert button.
How do I record a slideshow?
The steps for recording a slideshow in PowerPoint will vary depending on the version that you own. Get help with slideshow recording based on your version.
What types of files can I add to a slideshow?
File compatibility in PowerPoint includes the use of JPEGs, PNGs, TIFFs, GIFs, PDFs, MP3s, WAVs, MIDIs, MPEG-4 Videos, and Windows Media Videos.
How do I share my slideshow?
To share your PowerPoint slideshow, follow these steps:
Open your presentation and click Share at the top right of your screen.
If your presentation isn't already stored on OneDrive, select where to save your presentation to the cloud.
Choose a permission level, like Anyone with a link , or maybe just people in your company. You can also control if people can edit or just view the doc.
Select Apply.
Enter names and a message.
Select Send.
Follow Microsoft

- Free Download Generate AI Video Online Free Download Buy Now
- AI script generator saves you time on initial script drafts.
- Add a human touch to your videos with lifelike AI avatars.
- Convert boring PowerPoint slides into engaging videos.
- Empower your video production with AI voice.
- Translate video content into diverse languages.
- Chrome Video Translators: Top 5 Video Translation Chrome Extensions
- How To Convert Video Voice to Text Online for Free?
- The Ever-Changing Era of AI Video Translation: A Reality to Be Fulfilled
- [Top 10] Solutions for Movie Subtitle Translation Making Things Perfect
- Translate Video From Japanese to English Online for Free
- Breakthrough in 2024: How to Make A Picture Speak
- Top 10 AI-Talking Avatars Revolutionizing Communication
- How to Make a Talking AI Avatar From Photos: Easy Guide
- How To Make Animation Talk? Explained with Easy Steps
- Easy Steps To Create Talking Memoji on iPhone [Free]
- Top 10 AI Avatar Generators in 2024
- Top 10 AI Avatar Video Generators in 2024
- The 8 Best AI Avatar Apps for iOS & Android
- 2024's Top 8 AI Character Creators
- How To Create AI Avatars Online (2024 Guide)
- Exploring The Best Text-to-Speech Online Tools To Use in 2024
- Exploring the Finest Text-to-Speech Male Voice Tools for Natural Output
- In-Depth Review of Ivona Text to Speech by NextUp Technologies
- The Best Text-to-Audio Converters of All Times
- Top 5 Best Tools to Convert Text to Audio Online for Free
- Best 12 AI Voice Cloning Tools [Online & Offline]
- Recognizing The Top Deepfake Voice App and Software in the Market
- Top Voice Cloning Apps for Android & iOS Devices
- Coqui Voice Cloning: The Ultimate Solution to Streamline Audio Content
- [Review] Descript Overdub: Controlling the Audio in Video
- Top 4 Hatsune Miku Voice AI Generators for All Times
- Top 6 Darth Vader AI Generators for All Platforms
- Top 6 Mickey Mouse Voice Generators Providing Efficient Results
- An Ultimate Guide of Best Narrator Voice Generators
- A Comprehensive List of The Top SpongeBob Voice Generators
- Master Deepface Live: Download and Train Your Live Model
- Level Up Your AI Streaming Game: A Quick Guide and Tool Recommendation
- 5 Must-Know Hacks to Beat Deepfake Attacks: Streamer Survival Guide
- Build Your AI Twitch Streamer with Animated Avatars
- Smooth Presentations on Any Platform – Convert PPSX to MP4
- How to Make a PowerPoint Presentation With a Video of the Presenter
- How to Make a 3D PowerPoint Presentation That Viewers Will Love
- Top Methods to Create a Green Screen in PowerPoint
- How to Convert PowerPoint Presentations to AVI – Best Methods
A Complete Guide to Converting MP4 to PPT
- Best AI YouTube Script Writers and The Ultimate Guide
- Top 5 AI Movie Script Generators in 2024
- Top 10 AI Script Generators in 2024
- Top 10 AI Script Writers to Choose in 2024
- Translate Video Speech to Text with Speech-to-Text Converters
- How To Create AI-Powered Videos Using Synthesia Avatar and Voices
- Top 10 Text-to-Video AI Generators to Create Engaging and Captivating Videos
- The Best AI Video Makers from Photos to Create Captivating Videos with Pictures
- Top 5 AI-Powered Script to Video Makers of 2024
- Top 8 AI Titles Generators for Creating Catchy Titles For All Platforms

Presentations are a crucial tool in modern business since they’re the most efficient way of conveying a complex message. However, they are not the easiest to work with, and you may not know how to include different data formats in your presentations.
Today, we’ll deal with the process of converting MP4 files to PPT to help you create excellent slides in no time.
In this article
Reasons why you might want to convert mp4 to ppt.
- Convert MP4 to PPT With Conversion Software
Convert MP4 to PPT with Online Converters
Convert mp4 to ppt with powerpoint, tips for converting mp4 to ppt.
There are many situations that would require the conversion process, such as:
- Improving content quality – by converting your videos into PPT files, you’ll add a unique element to your presentations and make your content more engaging.
- Integrating multimedia – converting MP4 files to PPT will provide more variety in your presentations, so you’ll surely awe the audience.
- Storytelling – these elements will bring the audience closer to your content and convey your desired message better.
- Visual appeal – MP4 files will surely improve the visual appeal and increase engagement with your content.
Different Ways You Can Convert MP4 to PPT
Below are all the methods you can use to make a successful conversion.
1. Convert MP4 to PPT With Conversion Software
Not too many conversion tools support MP4 to PPT conversions since they have different purposes and structures. Instead, you can use a powerful third-party presentation software to add your MP4 file and save it as a PowerPoint presentation. Although it’s not a straightforward conversion process, it’ll do the trick.
Best MP4 to PPT Conversion Software
As mentioned above, you cannot discover a designated solution for converting MP4 to PPT, but we advise you to use Wondershare Presentory to meet your goals. This tool was designed to help you reach your presentation goals and create content using the power of artificial intelligence.
For instance, you can input your theme into the AI box, and the tool will automatically create slide designs according to your needs and preferences. It can also refine the tone of your presentations according to the target audience and make your presentations more engaging.
One of the best parts about this platform is that you can generate images from scratch by elaborating your theme. This will make your content unique and presentable, so we advise you to check it out after converting your MP4 files to PPT.

How to Convert MP4 to PPT With Wondershare Presentory
The first step to starting your conversion journey is downloading Wondershare Presentory to your desktop device. Head to the official website, download and install the tool, and follow the guide below to convert MP4 to PPT in a few clicks.
Step 1 : Open Presentory and click on the Create Video Presentation option.

Step 2 : Click on New Project from the top bar.

Step 3 : Now, click on Import > Video and select the MP4 file you want to convert.

Step 4 : Preview the file and click on the Export button from the top bar. Select Export to PowerPoint .

Bonus Tip: How To Convert MP4 to PPT and Vice Versa
If you want to convert your presentations to MP4, we advise you to use one of the best tools on the market: Virbo . AI powers this tool, and you can customize your presentation experience before you convert the file. For instance, you can add avatars, change the voices, and access a library of numerous additional features to take your presentations to the next level.
To use the tool, head to the official Virbo website, download the Virbo desktop application, and follow the steps below:
Free Download
Step 1 : Open Virbo on your desktop and click on the Create Video option from the top.

Step 2 : Select the video’s orientation.

Step 3 : Add your PPT file and click the Create Video button.

Step 4 : You can customize your presentation by adding avatars, changing voices, and more.
Step 5 : Once you’re ready, click the Export button and save your video.

The program will automatically save your file as an MP4 document. The process is quick and simple, and you can even add additional elements to your presentations by choosing this method.
You may opt for online converters if you don’t want to download additional tools to your desktop device and simply need a one-time converter for your MP4 to PPT needs. These tools are easily accessible and can convert your files within minutes. Although they’re not as fast as the abovementioned solutions, you can still support your journey and meet the conversion goals.
Best Online MP4 to PPT Converter
Online converters usually don’t provide additional features to help you on the conversion journey. Almost all online converters have the same functions and capabilities, so choosing the ideal online tool may be challenging. The only thing you should look out for is selecting a tool that won’t affect the quality of your files.
One such tool is Convert Helper. It provides many export formats for your files, such as audio, document, presentation, ebook, etc. It’s easy to use, and you won’t have issues navigating your conversion journey.
Converting your MP4 files to PPT will only take three steps with this online conversion tool, providing you with convenience and accessibility. The best part about this solution is that it supports six languages, so you can navigate your journey if you’re outside of the English-speaking region or country.
You can also download a browser extension to maximize efficiency and gain access to faster online MP4 to PPT conversions.

How to Use Online MP4 to PPT Converters
As previously mentioned, using an online MP4 to PPT like Convert Helper is easy and convenient. You can follow the guide below to learn how to complete this journey and get to the desired PPT file.
Step 1 : Open Convert Helper in your browser.
Step 2 : Import your file by clicking the Upload button and selecting the file from the library.

Screenshot Source: https://www.converthelper.net/
Step 3 : Hover over the Presentation option and click on PPT as the export format.

Step 4 : Click the Start Conversion button.

Step 5 : After converting, select where to save the file.
Lastly, you can convert your MP4 files to PPT using the PowerPoint application on your device. However, this method may be inconvenient and will undoubtedly affect the quality of your videos. If you need a quick fix and don’t care about the video’s quality, you can use this method to reach the file conversion goals.
The tool doesn’t have a built-in converter. Instead, you can import your video to the platform and save it as a PPT file.
Converting your videos with this method is easy; you don’t need special skills or PowerPoint knowledge to learn how to do it. We’ll present a step-by-step guide below to help you on this journey.
How to Convert MP4 to PPT Using Powerpoint
Here’s how to use PowerPoint to convert your files to PPT.
Step 1 : Open a PowerPoint presentation and head to the Insert tab. Click on Video .

Step 2 : Select the MP4 file from your library.
Step 3 : Click on File > Save As to export your video.

After completing these steps, your MP4 file will be converted to PPT.
Although the conversion process should be simple and efficient, we’ve prepared some tips to help you get the best PPT results. You can check out these tips below.
- Compress large files – sometimes, the conversion tool won’t be able to meet your needs if the file is too large. Moreover, it may lead to corruption or other issues, so compress your files to maximize results.
- Always have a backup solution – you never know what can happen during the conversion journey. You may end up with broken files, so we advise you to have a backup if things go sideways.
- Select the proper conversion method for your needs – you can choose one based on your needs and preferences. For instance, to preserve the video’s original quality and improve the details, you should use a desktop solution such as Wondershare UniConverter. On the other hand, if quality isn’t your primary concern, you can use online conversion tools.
Converting your files from MP4 to PPT format can have numerous benefits, depending on your needs and preferences. For instance, you can turn some of your crucial video moments into a presentation and help it reach the target audience. You’re probably here because you’re searching for the proper conversion methods, which was the topic of today’s guide.
We’ve presented three different conversion methods you can try based on your needs, time, and desired results. To get the most out of your journey and access numerous advanced enhancement features, we advise you to use Wondershare Presentory.
It’s an AI-powered tool that will elevate the video quality and deliver the best results.
You May Also Like

Related articles
- Today's news
- Reviews and deals
- Climate change
- 2024 election
- Fall allergies
- Health news
- Mental health
- Sexual health
- Family health
- So mini ways
- Unapologetically
- Buying guides
Entertainment
- How to Watch
- My Portfolio
- Latest News
- Stock Market
- Premium News
- Biden Economy
- EV Deep Dive
- Stocks: Most Actives
- Stocks: Gainers
- Stocks: Losers
- Trending Tickers
- World Indices
- US Treasury Bonds
- Top Mutual Funds
- Highest Open Interest
- Highest Implied Volatility
- Stock Comparison
- Advanced Charts
- Currency Converter
- Investment Ideas
- Research Reports
- Basic Materials
- Communication Services
- Consumer Cyclical
- Consumer Defensive
- Financial Services
- Industrials
- Real Estate
- Mutual Funds
- Analyst Rating
- Technical Events
- Smart Money
- Top Holdings
- Credit cards
- Balance Transfer Cards
- Cash-back Cards
- Rewards Cards
- Travel Cards
- Personal Loans
- Student Loans
- Car Insurance
- Morning Brief
- Market Domination
- Market Domination Overtime
- Opening Bid
- Stocks in Translation
- Lead This Way
- Good Buy or Goodbye?
- Fantasy football
- Pro Pick 'Em
- College Pick 'Em
- Fantasy baseball
- Fantasy hockey
- Fantasy basketball
- Download the app
- Daily fantasy
- Scores and schedules
- GameChannel
- World Baseball Classic
- Premier League
- CONCACAF League
- Champions League
- Motorsports
- Horse racing
- Newsletters
New on Yahoo

- CA Privacy Notice
Yahoo Finance
Vena introduces vena for microsoft powerpoint, purpose-built to help strategic finance and operations professionals revolutionize turning data into impactful stories.
Solution enables teams to build presentations and interact with their live financial and operational data without ever having to leave Microsoft PowerPoint, creating a seamless flow of work
TORONTO, May 15, 2024 --( BUSINESS WIRE )-- Vena , the Complete Planning platform loved by finance and trusted by business, today introduced Vena for Microsoft PowerPoint , a native integration with Microsoft 365 purpose-built to help strategic finance and operations teams revolutionize the way they bring their numbers to life, align teams and inspire action with compelling financial presentations.
According to Gartner , improving finance metrics, insights and storytelling ranks as a top priority for chief financial officers (CFOs) in 2024. Vena for Microsoft PowerPoint combines the power of Vena’s category-leading reporting and analytics capabilities with the advanced productivity and collaboration features of Microsoft 365 and Microsoft PowerPoint’s familiar interface to help finance teams build presentations that turn data into impactful stories while simultaneously streamlining their flow of work.
With Vena for Microsoft PowerPoint, finance and operations professionals can build beautiful, audience-ready presentations in minutes, collaborate with stakeholders in real time, interact with live financial and operational data and refresh for the latest results—all without ever having to leave PowerPoint. This boosts personal effectiveness and operational efficiency while improving data storytelling, enabling them to better communicate powerful financial insights that drive improved decision making using their most up-to-date data.
"Vena for Microsoft PowerPoint is the latest step of Vena’s commitment to driving business insights," said Hugh Cumming, Chief Technology Officer at Vena. "With the ability to leverage Vena’s dynamic datasets and automation technology, our customers can rapidly transform their Microsoft PowerPoint presentations into up-to-the-minute, decision-support tools."
Early adopters such as Bell Partners, an apartment investment and management company focused on quality multifamily rental communities throughout the United States, are already reporting significant productivity increases.
"Currently, it takes us an hour to pull together our monthly reporting package. Vena for Microsoft PowerPoint makes the monthly update only take a few minutes," said Michelle Canada, CPA Director of FP&A, Bell Partners.
With Vena for Microsoft PowerPoint, finance and operations professionals can:
Dynamically connect charts, tables, textual narratives and dashboards from a built-in library of their existing financial and operational reports to any slide while maintaining their calculations, corporate branding, data visualizations and standard financial formatting.
Interact with financial and operational data in real time and instantly refresh presentations with the latest results and Microsoft Excel formatting through a live integration with their Vena data model and reports.
Work with stakeholders on building and perfecting impactful, data-driven narratives in real time from anywhere on any device through Vena's native integration with Microsoft 365, which amplifies the best of their existing investment in Microsoft PowerPoint.
With these capabilities, finance and operations teams can dramatically reduce the time spent creating and updating financial presentations. They can collaborate in real time with anyone in their organization to build impactful, data-driven narratives. Additionally, teams can present with confidence using the latest numbers, and improve team alignment and decision making with enhanced data storytelling leveraging the presentation tool they already know and use.
To learn more about Vena for Microsoft PowerPoint, please visit the Vena website .
Vena is the only Complete Planning platform natively integrated with Microsoft 365. Vena streamlines financial and operational planning, reporting and analysis processes, and provides advanced analytics and modeling capabilities to help business, finance and operations leaders make agile and more informed business decisions. With Vena, you can leverage the power of Excel and AI-powered insights in a unified, cloud-based platform that enhances productivity, collaboration and insights. Over 1,800 of the world’s leading companies rely on Vena to power their planning. For more information, visit venasolutions.com .
View source version on businesswire.com: https://www.businesswire.com/news/home/20240515282847/en/
MEDIA Jonathan Paul Vice President, Content Marketing [email protected]
Recommended Stories
Cahill gordon & reindel beefs up crypto practice, adds 3 crypto-native lawyers including lewis cohen.
International law firm Cahill Gordon & Reindel has added three crypto-native lawyers to its growing digital assets and emerging technology practice, in hopes it will become a one-stop shop for cryptocurrency companies looking for legal and regulatory advice. Lewis Cohen, the co-founder of crypto-focused firm DLx Law, will join the firm as a partner and co-chair the expanded practice – which has been renamed CahillNXT – alongside former Southern District of New York (SDNY) prosecutor Samson “Sam” Enzer. Two other lawyers from DLx Law – Delaware-based Gregory Strong and New York-based Sarah Chen – will join Cohen as partners in Cahill’s newly expanded practice.
'$2 Million Is Nothing' Suze Orman Warns Don't Retire If You Don't Have At Least $5 Million Or $10 Million Saved
On the "Afford Anything" podcast, Suze Orman delivered a pointed critique on the notion of retiring early with a $2 million portfolio. She was direct in her advice, emphasizing the insufficiency of such an amount for early retirement. "Two million dollars is nothing," Orman declared, "It’s nothing. It’s pennies in today’s world, to tell you the truth." Don't Miss: The average American couple has saved this much money for retirement — How do you compare? Can you guess how many Americans successfu
Sam Bankman-Fried Traded In His $35 Million Mansion In The Bahamas For A Prison Cell With 35 Inmates But Claims "He Did Not Do Anything Wrong"
Formerly disgraced FTX CEO and Co-Founder Sam Bankman-Fried was convicted in November of wire fraud, money laundering and conspiracy, and sentenced to 25 years in prison. His high-profile trial marked a significant chapter in the unraveling of FTX, which collapsed under suspicious financial practices, leading to intense scrutiny and legal action. For the first time since his incarceration, Bankman-Fried described his daily life in a detailed interview with journalist William D. Cohan of Puck. Do
Changes from Visa mean Americans will carry fewer physical credit, debit cards in their wallets
Visa on Wednesday announced major changes to how credit and debit cards will operate in the U.S. in the coming months and years. The new features could mean Americans will be carrying fewer physical cards in their wallets, and will make the 16-digit credit or debit card number printed on every card increasingly irrelevant. “I think (with these features) we’re getting past the point where consumers may never need to manually enter an account number ever again,” said Mark Nelsen, Visa’s global head of consumer payments, in an interview.
Warren Buffett's Berkshire Confirms Apple Sale, Dumps This PC Maker, Finally Reveals Mystery Stock: Here Are The Portfolio Changes To Know
Investment guru Warren Buffett confirmed Wednesday the trimming of his Apple, Inc. (NASDAQ:AAPL) stake and finally shed light on the mystery stock his firm, Berkshire Hathaway, Inc. (NYSE:BRK) (NYSE:BRK), accumulated ahead of the first quarter. Apple, Chevron Trimmed: Berkshire reduced its Apple position by a little over 116 million. The firm now owns 789,368,450 Apple shares valued at $135.36 billion, a 13F filing shows. This is the second straight quarter that the Buffett-led company has dilut
Can You Guess How Many Americans Have $2 Million Saved For Retirement? It's Probably Less Than You'd Expect
While retiring with a $2 million nest egg might seem rare, it’s closer to what many Americans now believe they need to retire comfortably. A survey from Northwestern Mutual reveals that Americans feel they need $1.46 million for a comfortable retirement, a number that has surged by 53% since 2020. This dramatic increase, influenced by inflation and growing financial pressures, suggests that a $2 million target may not be as far-fetched as it appears, especially for someone who is 60 and plans to
The GameStop guy is back. But he seems to be having a midlife crisis.
Roaring Kitty is tweeting after a three-year hiatus, and meme stocks like GameStop and AMC are going crazy. But the latest craze seems a bit hollow.
What's the Difference Between Biotech Stocks and TechBio Stocks?
A few enterprising businesses are marketing themselves differently.
'Big Short' Investor Michael Burry Bets Heavy On Gold, Renewable Energy Stocks, Exits Amazon, Alphabet
Michael Burry, the legendary investor who famously predicted the 2008 financial crisis, has once again made headlines with his latest 13F filing for his hedge fund Scion Asset Management LLC. The first quarter of 2024 reveals a strategic recalibration towards physical commodities and renewable energy, while Burry shifted away from some tech giants. The total market value of Scion's 13F securities increased from $94.6 million to $103.49 million. The fund’s activity included five new purchases, ad
Move Over, Walmart and Chipotle: Wall Street Has a New Stock-Split Stock
A stellar company is set to join an exclusive club of top-tier businesses that have somewhat recently conducted a forward-stock split.
Schools across the nation looking into AI to boost security, prevent mass shootings
by GEOFF HARRIS | The National Desk

WASHINGTON (TND) — Some schools across the nation are now turning to artificial intelligence to prevent school shootings.
"It's a persistent problem and we have it on our minds," said Kivil Stasik, a New Jersey mom.
Stasik has an 8-year-old daughter who attends public school. She said she likes the idea of boosting security at schools with AI.
It would instill a sense of security for me as a parent that there is a proactive system in place," Stasik said.
Hundreds of schools across the country have been working to incorporate a proactive system. Specifically, using a company called ZeroEyes .
Could we build a technology layer that could help mitigate the next Parkland style shooting and that's exactly what we took to market," said Kieran Carroll, the Chief Strategy Officer at ZeroEyes.
ZeroEyes uses AI with existing security cameras to identify visible weapons. The weapons must not be concealed firearms or weapons hidden in bags. If verified as a legitimate threat, an alert is sent to school officials and local law enforcement within seconds.
"I think our software is live across K-12 school districts in at least 35 states right now," Carroll said.
But not everyone is a fan of using AI or has the money to buy it. That's why states like Kansas, are looking into establishing gr ants for schools.
"We have sort of a very focused client base and fanbase within Kansas that recommended that we go talk to legislators and that's what happened," said Carroll.
Unlike some artificial intelligence software, ZeroEyes does not use facial recognition, only weapons detection. The only time a person's face would be recorded is during an active shooter situation.
IMAGES
VIDEO
COMMENTS
On the File menu, select Save to ensure all your recent work has been saved in PowerPoint presentation format (.pptx). Select File > Export > Create a Video. (Or, on the Recording tab of the ribbon, select Export to Video .) In the first drop-down box under the Create a Video heading, select the video quality you want, which pertains to the ...
To turn a PowerPoint presentation into a video, first, open your presentation with the PowerPoint app on your Windows or Mac computer. In the top-left corner of PowerPoint, click the "File" option. From the sidebar that opens after clicking the "File" option, select "Export." In the "Export" menu, click "Create a Video."
Watch this video to learn how to convert your PowerPoint presentation into a video. When you make a recording of a presentation, all its elements (narration,...
The Quick & Easy Way. If your presentation is complete with automatic timings, transitions and animations, you might be shocked to learn how easy it is to convert it into a video. Open your Powerpoint presentation. Click on File, select Save As, and from the drop-down menu, choose MPEG-4 Video (*.mp4). (available in Powerpoint 2010 and above).
To begin the export, go to the File > Export > Create a Video menu option. Go to File > Export > Create a Video to choose the export settings for your PowerPoint presentation video. From this menu, there are several key settings to choose before you export your finished video.
Learn how to publish your own video using Microsoft PowerPoint with narration, annotations, animations, and timings. As full disclosure, I work at Microsoft ...
Free online PowerPoint to video converter. VEED lets you convert your PowerPoint presentations to videos in just a few clicks, straight from your browser. You can even record yourself while presenting your slides using our free screen and webcam recorder. Upload your slides and record your webcam, audio, and screen.
In this step-by-step tutorial, I show you how to turn your Powerpoint Presentation into a .mp4 or .mov video file which you can share with others, play for a...
To convert your PowerPoint presentation into a video, simply: Click the File tab. Select Export. . Select Create Video . Choose your Video Quality and Recorded Timings and Narrations (see details below) Click Create Video. Choose where to save the video on your computer and click Save.
Choose the option Create a Video at the very bottom of the right-hand side of the screen. 3. Find the Create a Video tab if you want to see the available video quality options. 4. Click on the downward-pointing arrow next to the Computer & HD Displays option and choose from the three available options.
How to Save PowerPoint as Video on Windows . After you create a presentation, convert your slides into attention-grabbing videos. The steps below show how to turn a PowerPoint file into a video. The result is a file that incorporates animation, narration, and other custom content included in the original PPT or PPTX file.
To get started, open the PowerPoint presentation you would like to turn into a video and click the "File" tab in the top-left corner of the window. IDG / Marshall Gunnell. Next, click ...
Browse to the location where you want to save the file and give it a name then press "Save.". While the video is being created, you will see the small progress bar at the bottom of your PowerPoint window. Wait till this is done and then go to your video. Now you can double-click your video file and it will automatically play with your video ...
Step by Step Tutorial. Click on File and go to Export. Click on the first drop-down-menu and pick the quality you prefer - usually Full HD. In the second drop-down-menu below you can set if recorded timings or narrations are included in the video. Select the duration of the slides e.g. 5 sec and then select Create video.
Hence, converting powerpoint to video leads to an overall improvement in engagement and retention of the audience. Greater Flexibility. Videos can be paused, played, and forwarded/rewound at the viewer's own pace. ... I can turn my traditional presentation into a stunning video with a few clicks. With some customization here & there, I have a ...
Enhance and Save PPT as MP4. There's nothing more frustrating than faded colors on a presentation video. Use Flixier's video enhancer tool to automatically adjust brightness, contrast, saturation, or gamma values as you convert PowerPoint to MP4, and you get a professional-looking video within minutes. The live enhancement previews allow you full control over the look and feel of your ...
Learn how to convert your existing PowerPoint presentations into a video! If you are getting ready to move your classes to an online environment, a simple way to get started is by converting your existing PowerPoint presentations into videos. We have some great resources to guide you through the process.
Aspose.Slides PPT to Video converter is a free online service for converting PowerPoint presentations to videos. Slides: Convert all slides in your PowerPoint to video.Or you can select specific slides or a range of slides for conversion. Slide duration: Specify the time that is spent showing each slide in the video. Video resolution: Select the resolution that determines the amount of detail ...
Step #2: Narration & Custom Timing (optional) If you want to embed narration in your PowerPoint presentation video, follow the steps below. When recording your narration, your click through rate will be recorded and utilized for the final video to keep your narration in sync with the progression of slides.
Learn How to turn a PowerPoint Presentation into Video with the narration. Record your presentation going through the slides and PowerPoint will pick up the ...
🔵 The .ppt file format, used in Microsoft PowerPoint presentations, includes slides with text, images, animations, videos, and audio, often featuring embedded objects from other Office applications. Key points include: - File Type: ".ppt" stands for PowerPoint Presentation, used for creating slideshows.
Part 3: [Traditional way] Step-by-Step Process to Create A Video with PowerPoint. Step 1: Choose Template and Slides. Step 2: Add Animations. Step 3: Export Your PowerPoint Presentation as a Video. Part 4: Benefits of Turning Your Presentation into a Video. Conclusion.
Then, with this shape still selected, press Ctrl+C (copy), and then Ctrl+V (paste). In the second box, type 9. With the Animation Pane still open and this second shape selected, click the drop-down arrow and choose "Timing" again. Change the Start option to "After Previous," and make sure the Delay option is 1 second.
To add music to a slideshow, first make sure that you're using a slideshow maker with music compatibility. In PowerPoint, follow these steps: Open your PowerPoint presentation and select the slide where you want to add music. Click on the Insert tab in the ribbon menu. Click on the Audio button and select Audio on My PC.
Step 1: Open Presentory and click on the Create Video Presentation option. Step 2: Click on New Project from the top bar. Step 3: Now, click on Import > Video and select the MP4 file you want to convert. Step 4: Preview the file and click on the Export button from the top bar. Select Export to PowerPoint.
TORONTO, May 15, 2024--Vena, the Complete Planning platform loved by finance and trusted by business, today introduced Vena for Microsoft PowerPoint, a native integration with Microsoft 365 ...
WASHINGTON (TND) — Some schools across the nation are now turning to artificial intelligence to prevent school shootings. "It's a persistent problem and we have it on our minds," said Kivil Stasik, a New Jersey mom. Stasik has an 8-year-old daughter who attends public school. She said she likes the idea of boosting security at schools with AI.